Cloud Rider X Product Documentation
1. Product Introduction
Cloud Rider X Screen Projection is a software designed for managing Android phones via PC. It is specifically developed for batch screen projection and management of Android devices, significantly improving operation efficiency, particularly in batch operations, automation, and remote control.

The software features unlimited device connections, no registration required, instant use upon launch, smooth and stable performance, clear display, user-friendly operation, and a clean interface. It has received widespread recognition in the industry and is loved by many users.
In addition to Cloud Rider X, we also offer Box Phone hardware. The two can be used together, delivering higher efficiency, greater stability, and enhanced security compared to traditional phone farms.
Application Scenarios
Cloud Rider X Screen Projection is a tool that connects Android phone screens to a computer display via video stream through USB or other methods. It allows users to replace touch gestures with mouse operations on the phone. This is designed to help Android app developers view and operate their mobile applications directly from a computer.
The connection between Android phones and PCs is based on native Android functionality. Cloud Rider X only facilitates this connection without modifying or damaging the phone system, nor does it provide any additional functions to aid specific apps. It simply offers the most basic connection between Android and Windows.
Legal Statement
As clearly stated in the Cloud Rider X User Agreement, the service is intended for mobile app developers to assist with testing and improve development efficiency.
Any use of the software in violation of national laws and regulations is strictly prohibited. Any user engaging in illegal activities with Cloud Rider X Screen Projection is in breach of the user agreement. Such actions are expressly forbidden and are outside the knowledge and intent of Cloud Rider X. The company reserves the right to pursue legal action against individuals whose misuse damages the company's reputation.
Product Advantages
|
Service |
Support |
|
Tech Support |
One-on-One Assistance |
|
Max Connections |
Unlimited |
|
Display Style |
Integrated Window |
|
Rendering |
HTML5 |
|
Free Version |
YES,Supports 40 Device Windows |
|
Safe Mode |
YES |
Safe Mode: An advanced and secure mode that allows USB Developer Mode and Accessibility Mode to be turned off.
Main Features
Note: Due to frequent updates, the actual software features may vary.
|
Module |
Feature |
Description |
|
Software Operation |
Supported OS |
Windows 11, 10 |
|
Color Theme |
Switch freely between light and dark themes |
|
|
Hide Control Panel |
Auto-hide function |
|
|
Export Configuration |
Import/export phone IDs, names, tags |
|
|
Custom Hotkeys |
Assign hotkeys to various features |
|
|
Phone Connection |
Max Connections |
Up to 500 phones per computer |
|
USB Mode |
Auto-detection |
|
|
OTG Mode |
Multi-subnet management, import/export IP ranges, full scan |
|
|
Wi-Fi Mode |
One-click switch to Wi-Fi mode |
|
|
Safe Mode |
Advanced mode to disable USB & accessibility settings |
|
|
Phone Screen |
Screen Size |
Adjustable |
|
Resolution |
Adjustable |
|
|
Frame Rate |
Adjustable |
|
|
Screen Off |
Turn off phone screens |
|
|
Screenshot |
Save to computer |
|
|
Synchronized Operation |
Operate multiple devices simultaneously |
|
|
Keyboard & Input |
Mouse & Keyboard Sync |
Input mirrored from PC |
|
Two-way Copy-Paste |
Between PC and phone |
|
|
Quick Phrases |
One-click send predefined messages |
|
|
Chat Tool Support |
Compatible with Customer Bao, Chat Bao, KeLiao Bao |
|
|
Phrase Import/Export |
Backup/share quick phrases |
|
|
Batch Input |
Import usernames and passwords |
|
|
Text Distribution |
Send text to multiple devices |
|
|
Phone Control |
System Access |
Quick access to settings, Wi-Fi, input methods, accessibility |
|
APK Installation |
Batch install APK files |
|
|
File Transfer |
Send files or images to phone |
|
|
Export Files |
Export from phone to PC |
|
|
Screenshots |
Save phone screenshots to PC |
|
|
Screen Rotation |
Switch orientation |
|
|
Fixed Screen |
Pin large and small screens |
|
|
App Management |
One-click launch, uninstall, cache clear |
|
|
Phone Grouping |
Custom tags |
|
|
Group Sorting |
Custom order |
|
|
Show Selected Only |
Filter by selected tag |
|
|
ADB Console |
Custom ADB commands |
|
|
Random Delay |
Add random delay for batch actions |
|
|
Random Offset |
Add random position offset |
|
|
Small Screen Control |
Operate directly from small screens |
|
|
Phone Control |
Ctrl Select Mode |
Select phones only while holding Ctrl |
|
Alt for Independent Control |
Press Alt to operate one phone among many |
|
|
Input Method Switch |
One-click switch for all devices |
|
|
Service |
Tech Support |
7×12 one-on-one expert service |
|
|
Phone ROM |
ROM supports customization |
2. Download & Installation Guide
Download Links
Official Download for Cloud Rider X Screen Projection
Latest installer:
https://xiaoweirun.lanzoup.com/ilAO72wvsimj
Previous Versions
|
Release Date |
Version |
Download Link |
|
2025-05-22 |
v8.129 |
https://xiaoweirun.lanzoup.com/ilAO72wvsimj |
2.1 Installation Failure
Prompt during installation process Error: 0x800700b7
If you encounter the error shown below during installation, it is likely caused by folder permission issues when installing the Microsoft Edge WebView2 component.
Solution:
Delete the folder at
C:\Program Files (x86)\Microsoft.
If deletion fails, try renaming
the folder.
Official WebView2
download link:
https://developer.microsoft.com/zh-cn/microsoft-edge/webview2/#download-section
2.2 Software Conflict Warning
Please close all other screen projection software before using Cloud Rider X Screen Projection.
Although Cloud Rider X is stable and reliable, running other similar software simultaneously may cause conflicts (e.g., port occupancy, program lock-ups), leading to issues such as: Screen projection failure.Limited number of projected phones.Malfunction of batch control features
To ensure optimal performance, please disable any other projection tools.
2.3 Cloud Rider X Supported Systems
|
Supported Computer Systems |
Supported Android Versions |
Supported Phone Models |
Supported Emulators |
|
1.Windows 11 64-bit |
Android 6 and above |
1.Samsung |
LDPlayer |
|
2.Windows 10 64-bit |
|
2.Xiaomi |
More models will be added soon |
|
|
|
3.Redmi |
|
|
|
|
4.OPPO |
|
|
|
|
5.Huawei |
|
|
|
|
More models will be added soon |
|
Note: Using non-supported computer systems or phone models may lead to instability or limited functionality.
Support for additional phone models is in progress and will be available soon.
2.4 Cloud Rider X Startup Error
If you see an error message such as "Missing Entry Point" or "System Error" when opening the software:
This means
Windows 7 is no longer supported.
Please upgrade
to Windows 10 or above.
2.5 “Software Already Running” Message
If you see the message “Cloud Rider X is already running” when launching the software, it means that another program on your system is occupying port 9999, preventing the software from starting properly.
Solution:
Open
the Task Manager, locate the process using port 9999, and end it. After that, you should be able to
launch Cloud Rider X normally.
2.6 Program Has Stopped Running
This usually
occurs due to Windows 7
incompatibility.
Recommended OS: Windows 10 or Windows 11
2.7 Software Crash / Auto Exit
Error Message:
Program is running...
Error reading parameters: Os { code: 2, kind: NotFound, message: "The system cannot find the file specified." }
[2023-10-30T12:53:01Z ERROR xiaowei]
Fatal system exception at src\api\api_serv.rs:257:10:
failed: Error { kind: NotFound, message: "program not found" }
Cause:
After upgrading from Windows 7
to Windows 10, the path structure for wmic has changed. If
the environment variable is not updated, the wmic command may no
longer work.
Solution:
1.Press Win + R, run sysdm.cpl
2.Go to Advanced > Environment Variables
3.Under System Variables, find Path and click Edit
4.Add the following path: C:\Windows\System32\wbem (Make sure capitalization is correct)
3. Phone Connection
3.1 USB Connection
USB Screen Mirroring Steps
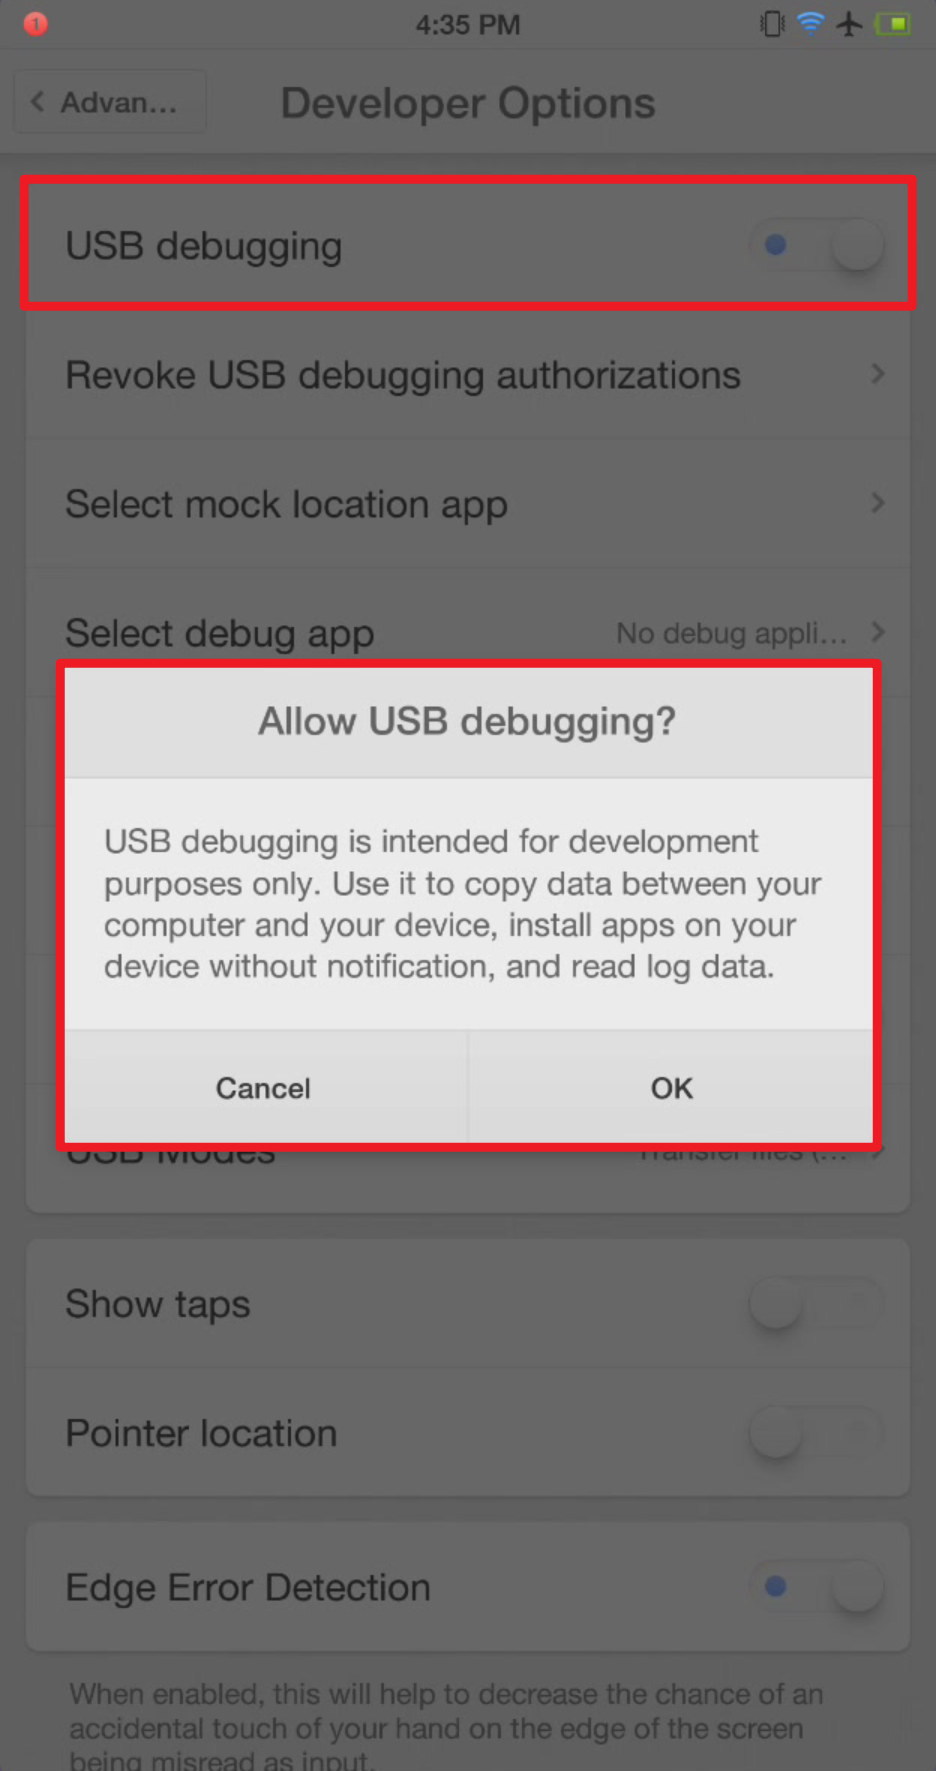
Step 1: Enable USB Debugging mode on your phone.
Step 2: Connect your phone to the computer using a USB data cable.
Step 3: Open the “Cloud Rider X” app.
How to Enable USB Debugging Mode?
The method to enable USB debugging mode varies depending on the phone model. Please refer to the device's user manual or search online for detailed instructions.
The procedure to enable USB debugging differs slightly across different Android versions.
Taking the commonly used Android 13 as an example, the steps are as follows:
- Go to your phone’s Settings and tap on “About phone.”
- Tap the “Build number” 3 to 7 times continuously until you see the message “Developer mode has been enabled.”
- Return to the Settings menu, where you will now see “Developer options.”
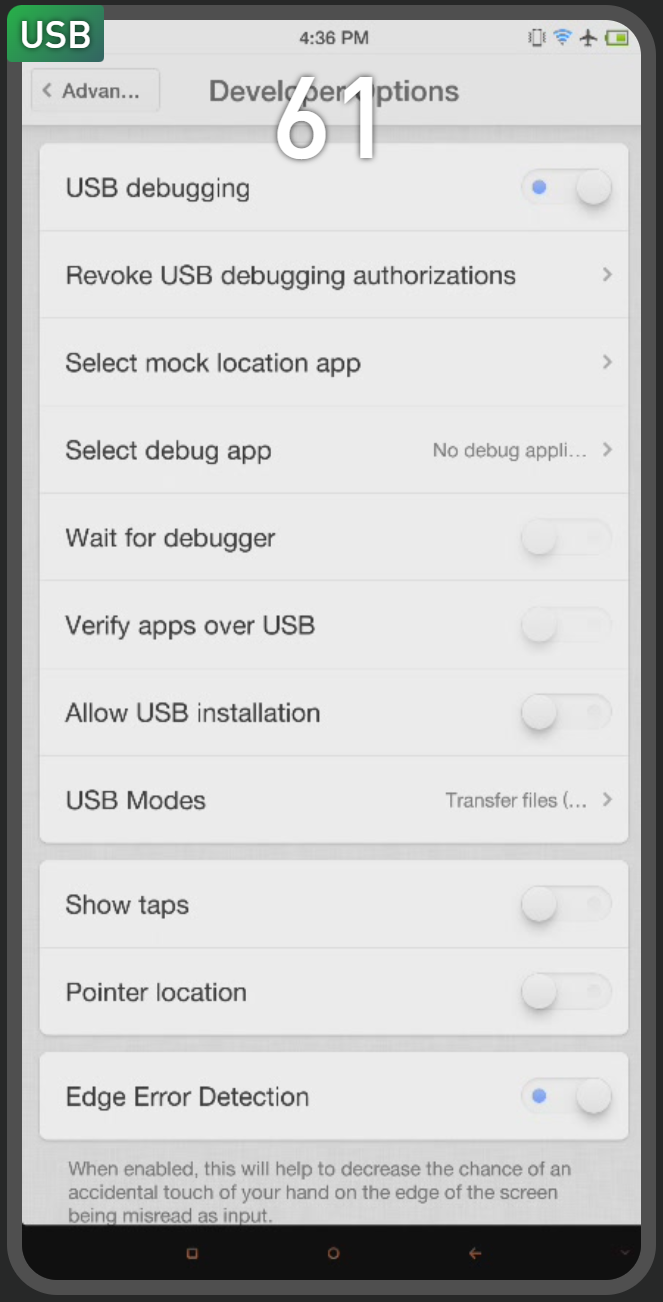
- Tap “Developer options,” then enable “Developer options” if necessary, and turn on “USB debugging.”
1.In the Developer Options, turn on the following switches:
USB Debugging – Enable
Allow USB installation – Enable (This helps install the screen mirroring keyboard for easier typing)
For certain phone brands, additional settings are required:
Xiaomi phones: Also enable USB Debugging (Security Settings); otherwise, screen mirroring works but mouse control does not.
VIVO phones: Also enable Simulate taps; otherwise, screen mirroring works but mouse control does not.
Huawei or Honor phones: Also enable Allow USB debugging only in charging mode.
2.Change the USB charging mode to File Transfer or MIDI.
3.Connect the phone and computer using a USB data cable. Make sure the cable supports data transfer because some cables only support charging. It is best to connect the cable to the USB port at the back of the computer case for better stability, preferably a USB 2.0 port (the black USB port).
USB Screen Mirroring Unstable?
Solutions:
- Poor connection of the data cable (try using the original cable).
- Damaged phone charging port (replace the phone device).
- Insufficient power supply from the computer’s USB port (try using a USB 2.0 port on the back of the computer case, or increase the power supply of the computer).
- If using a USB hub, it may not provide enough power (try reducing the number of devices connected to the hub).
What to Do If USB Screen Mirroring Fails?
- Is your system Windows 7? If yes, it is recommended to upgrade to Windows 10 or install the appropriate Android drivers.
- Is your phone’s Android version 7.0 or above? Versions below 7.0 are not compatible for screen mirroring.
- What is your phone model? If it is a Huawei phone, please follow the steps below.
Huawei Phone Connection Steps:
- Install the Huawei HiSuite software on your computer.
- Connect your phone to the computer using a USB data cable and launch Huawei HiSuite.
- Your phone will prompt to install Huawei drivers; click to install.
- After the driver installation is complete, exit Huawei HiSuite on the computer.
- Reconnect the USB cable; your phone will show an authorization prompt—click “Allow.”
- If it still doesn’t work, try restarting your phone.
- Make sure the USB cable supports data transfer—some cables only support charging and cannot be used for screen mirroring.
- Ensure the USB cable is plugged into a USB 2.0 port on the back of the computer for better stability.
- Confirm that your computer properly recognizes the phone device connected via USB; if the computer doesn’t recognize it, the Cloud Rider X software won’t either.
- Open the “Device List” page in the Cloud Rider X software and check if your phone is recognized. If the device is listed but not authorized, try unplugging and reconnecting the USB cable or restarting your phone. When the authorization prompt appears on your phone, click “Allow”.If no device appears, it means the computer has not detected your phone. Please review steps 1 to 5 to ensure none were missed.
What to Do If the Motherboard Device USB Connection Is Not Showing?
- Check the device list in the Cloud Rider X software to see if the motherboard device is unauthorized.
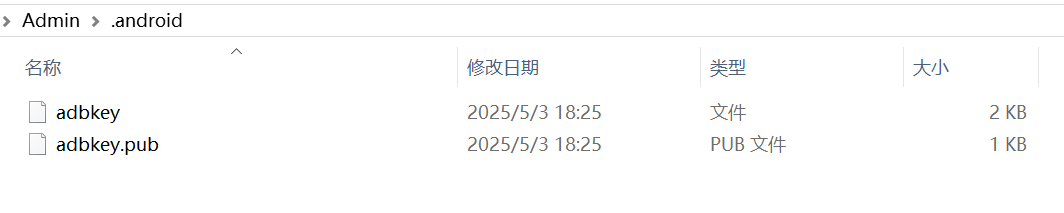
- If unauthorized, it means your motherboard device requires authorization files. Please contact the motherboard device vendor to obtain the authorization files (adbkey and adbkey.pub).
- Place the authorization files in the following folder on your computer:C:\Users\Administrator\.android
- Restart your computer.
3.2 WIFI Connection
WiFi Mode Connection Steps
- The phone must first be successfully connected via USB screen mirroring. Refer to the USB connection tutorial and ensure the phone is connected to Cloud Rider X screen mirroring via USB.
- Turn on WiFi on the phone and connect to a network successfully.
- The phone and the computer must be connected to the same local network (LAN).
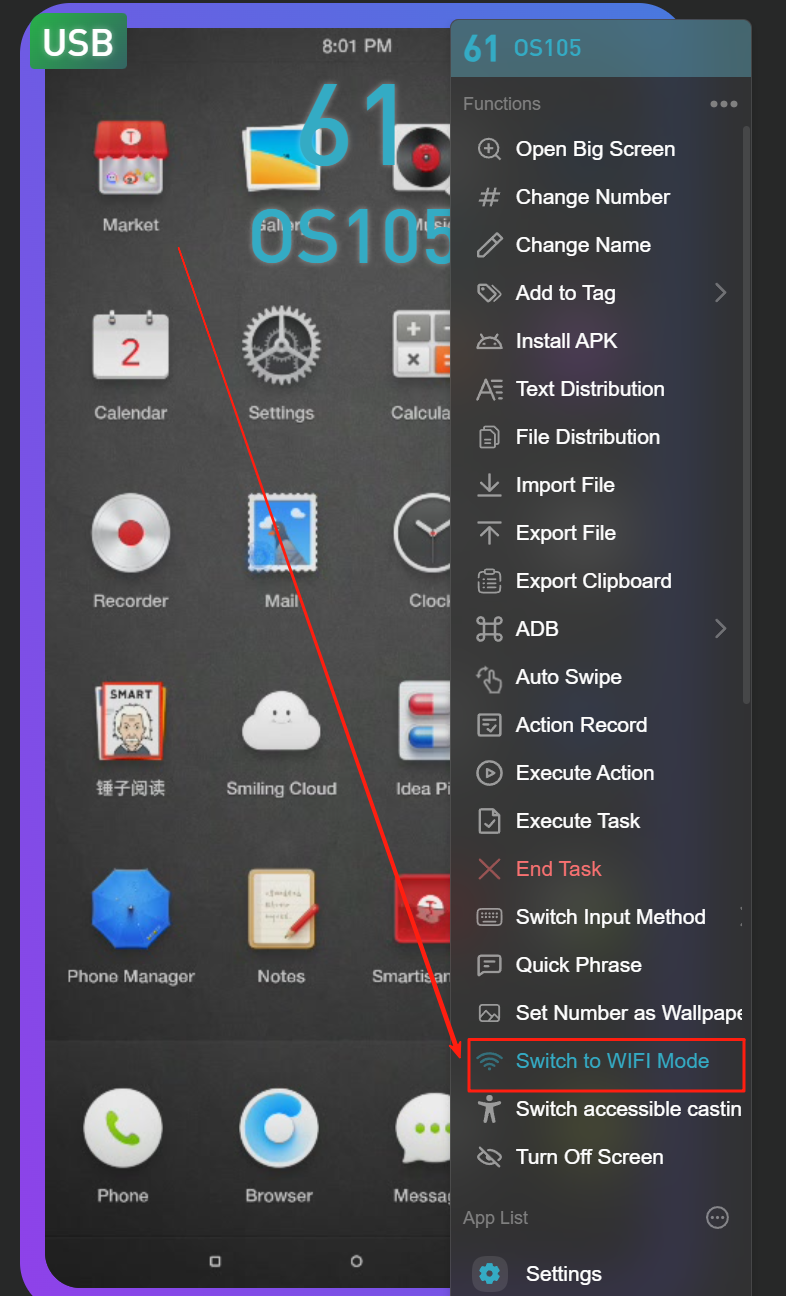
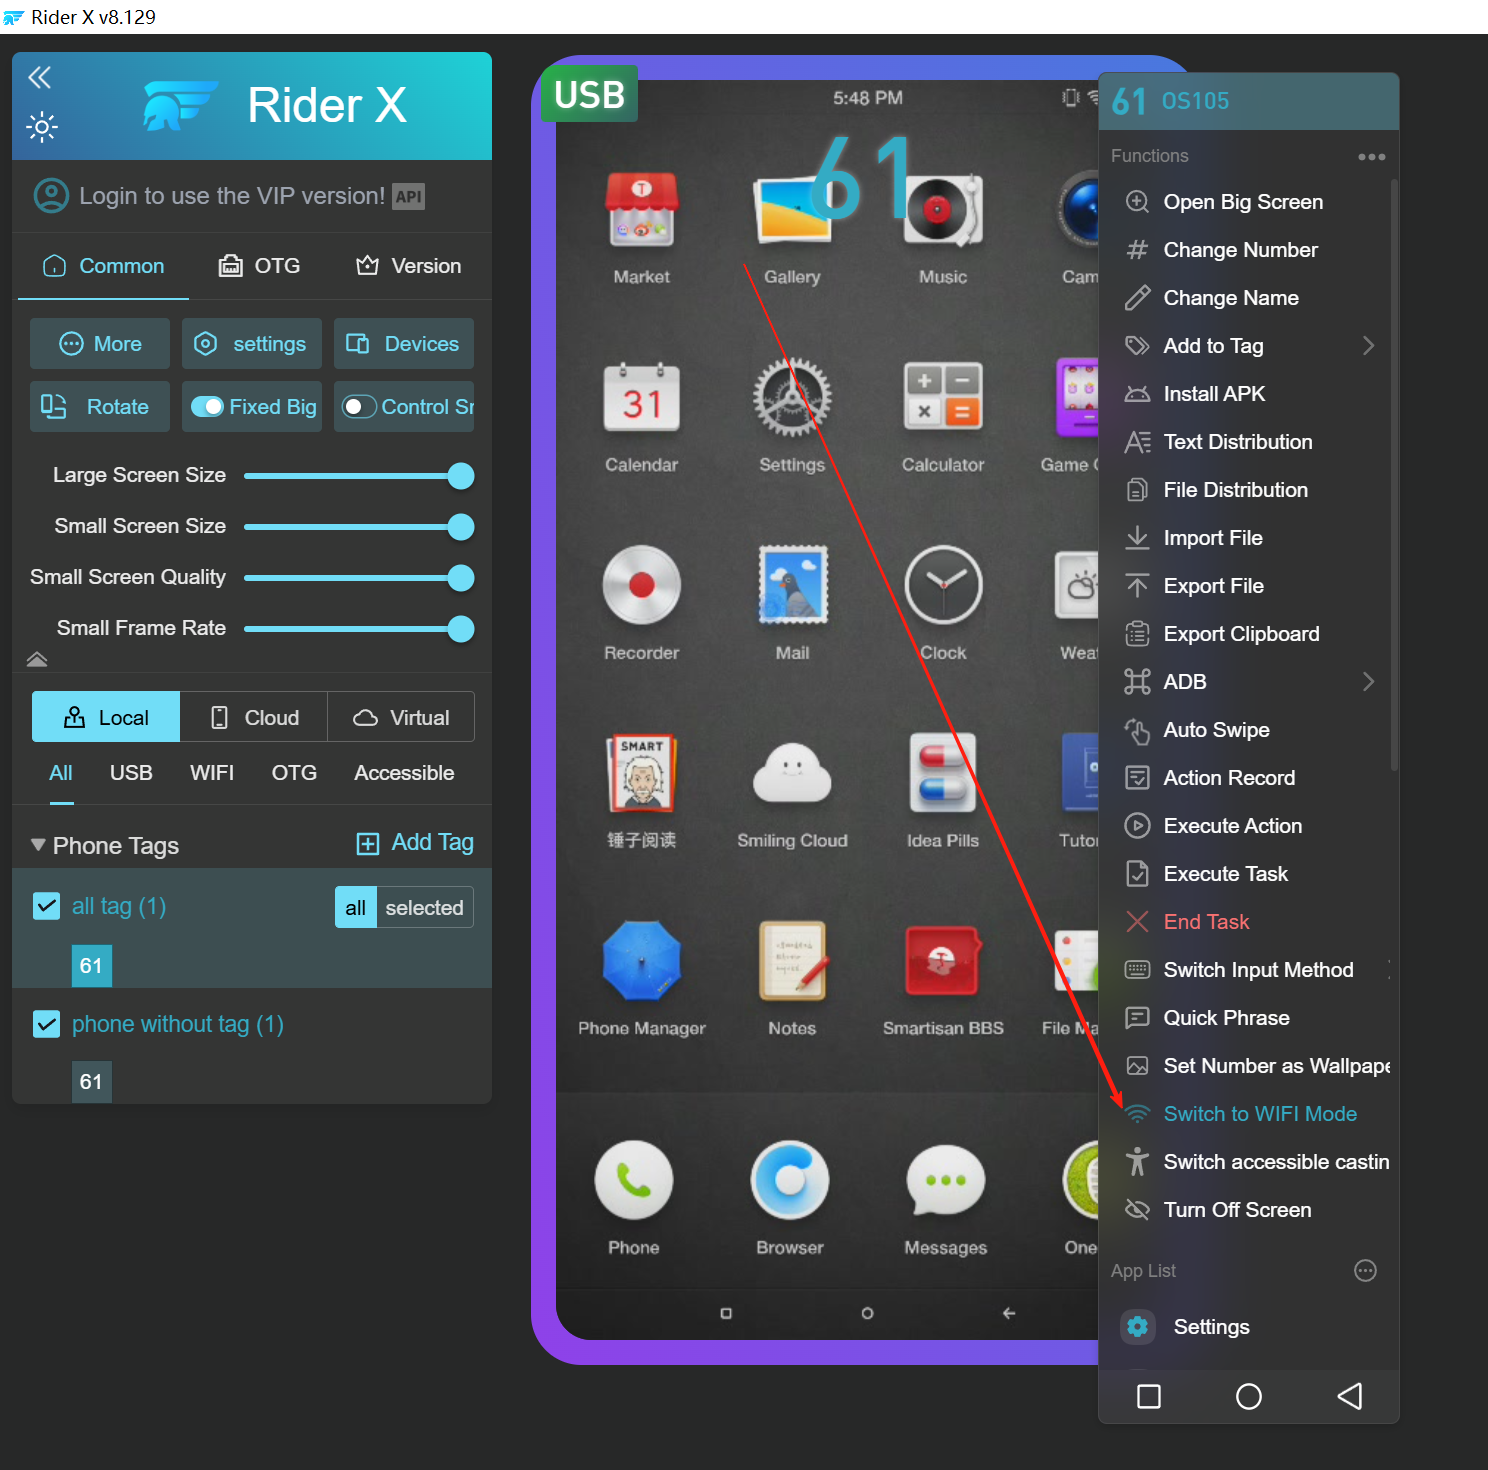
- Right-click the small screen and select “Switch to WiFi Mode.”
- Once switched successfully, a WiFi icon will appear at the top left corner of the phone screen, as shown below.

How to Switch from USB Mode to WiFi Mode?
- Right-click on the small screen to open a popup window
- Click the “Switch to WiFi Mode” button; the selected device will start switching modes
- After a successful switch, a WiFi icon will appear at the top left corner of the small screen


Note:
Prerequisites for switching from USB to WiFi mode:
- The phone must be connected to WiFi.
- The WiFi network connected by the phone and the computer must be on the same local area network (LAN).
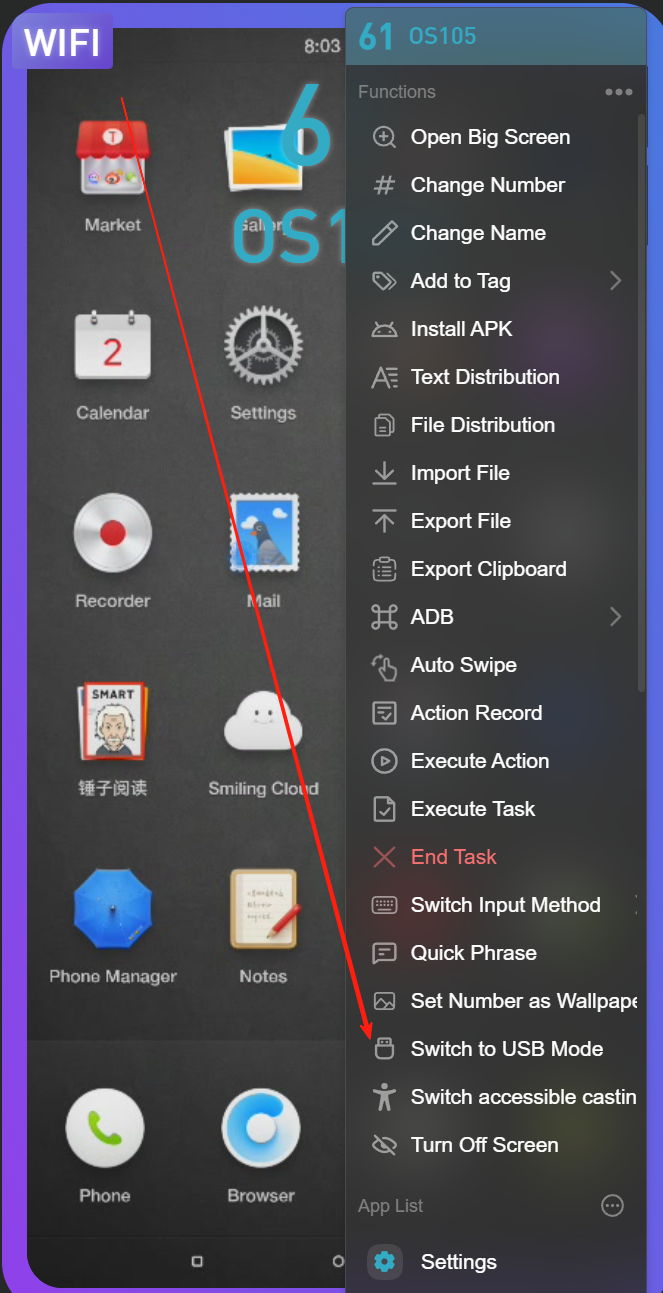
How to Switch from WiFi Mode to USB Mode?
Select the phone(s) you want to switch (multiple or single selection
supported), then right-click and scroll down to find “Switch to USB Mode.”
How to One-Click Switch from USB Mode to WiFi
Mode?
Select the phone(s) you want to switch (multiple or
single selection supported), then right-click and scroll down to find “Switch to WiFi Mode.”
What to Do If Switching to WiFi Mode Fails?
- Check whether your computer and phone are connected to the same router.
- Check if the network between the computer and the phone is reachable by following these steps:
- Press Win + R on your keyboard.
- In the Run dialog box that appears, type cmd and press Enter to open the Command Prompt.
- In the Command Prompt, type ping 192.168.1.23 and press Enter (replace the IP address with your phone’s actual IP address).
3.3 OTG Connection
OTG Dual-mode Chassis
OTG connection requires support from an OTG dual-mode switch case.
The dual-mode switch case supports screen mirroring via USB and wired network (Ethernet).
- First, switch the motherboard device case to USB connection mode.
- Connect it to the computer using a USB cable and ensure screen mirroring is successful.
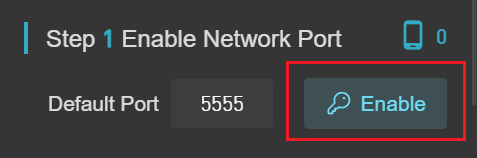
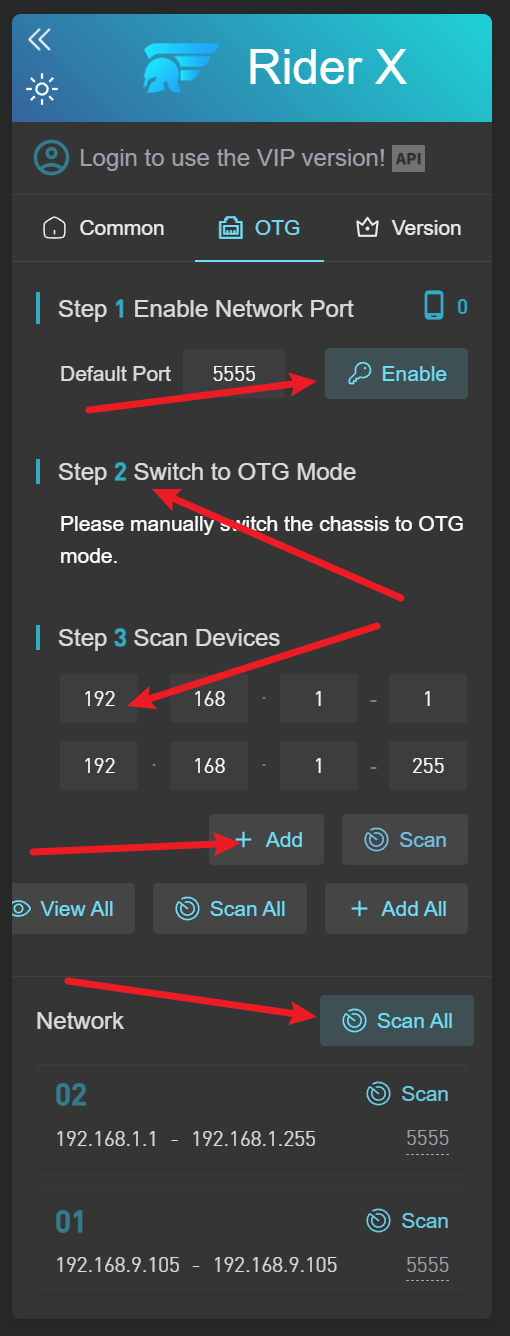
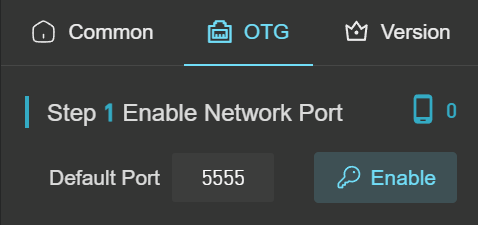
- In the Cloud Rider X window, locate the [OTG Settings] section.
- Click the [Enable] button. The default port is 5555, which usually does not need to be changed.
- After clicking Start, manually switch the motherboard device to OTG mode.
- Manually enter the network IP address of the motherboard device.

- After entering the IP, click Scan to connect the device.
OTG Mode Chassis only supports screen projection via wired (Ethernet) connection.
By default, devices within the OTG Mode Chassis are shipped with their network ports enabled. Therefore, users only need to enter the IP address to perform a scan.
How to operate in OTG mode?
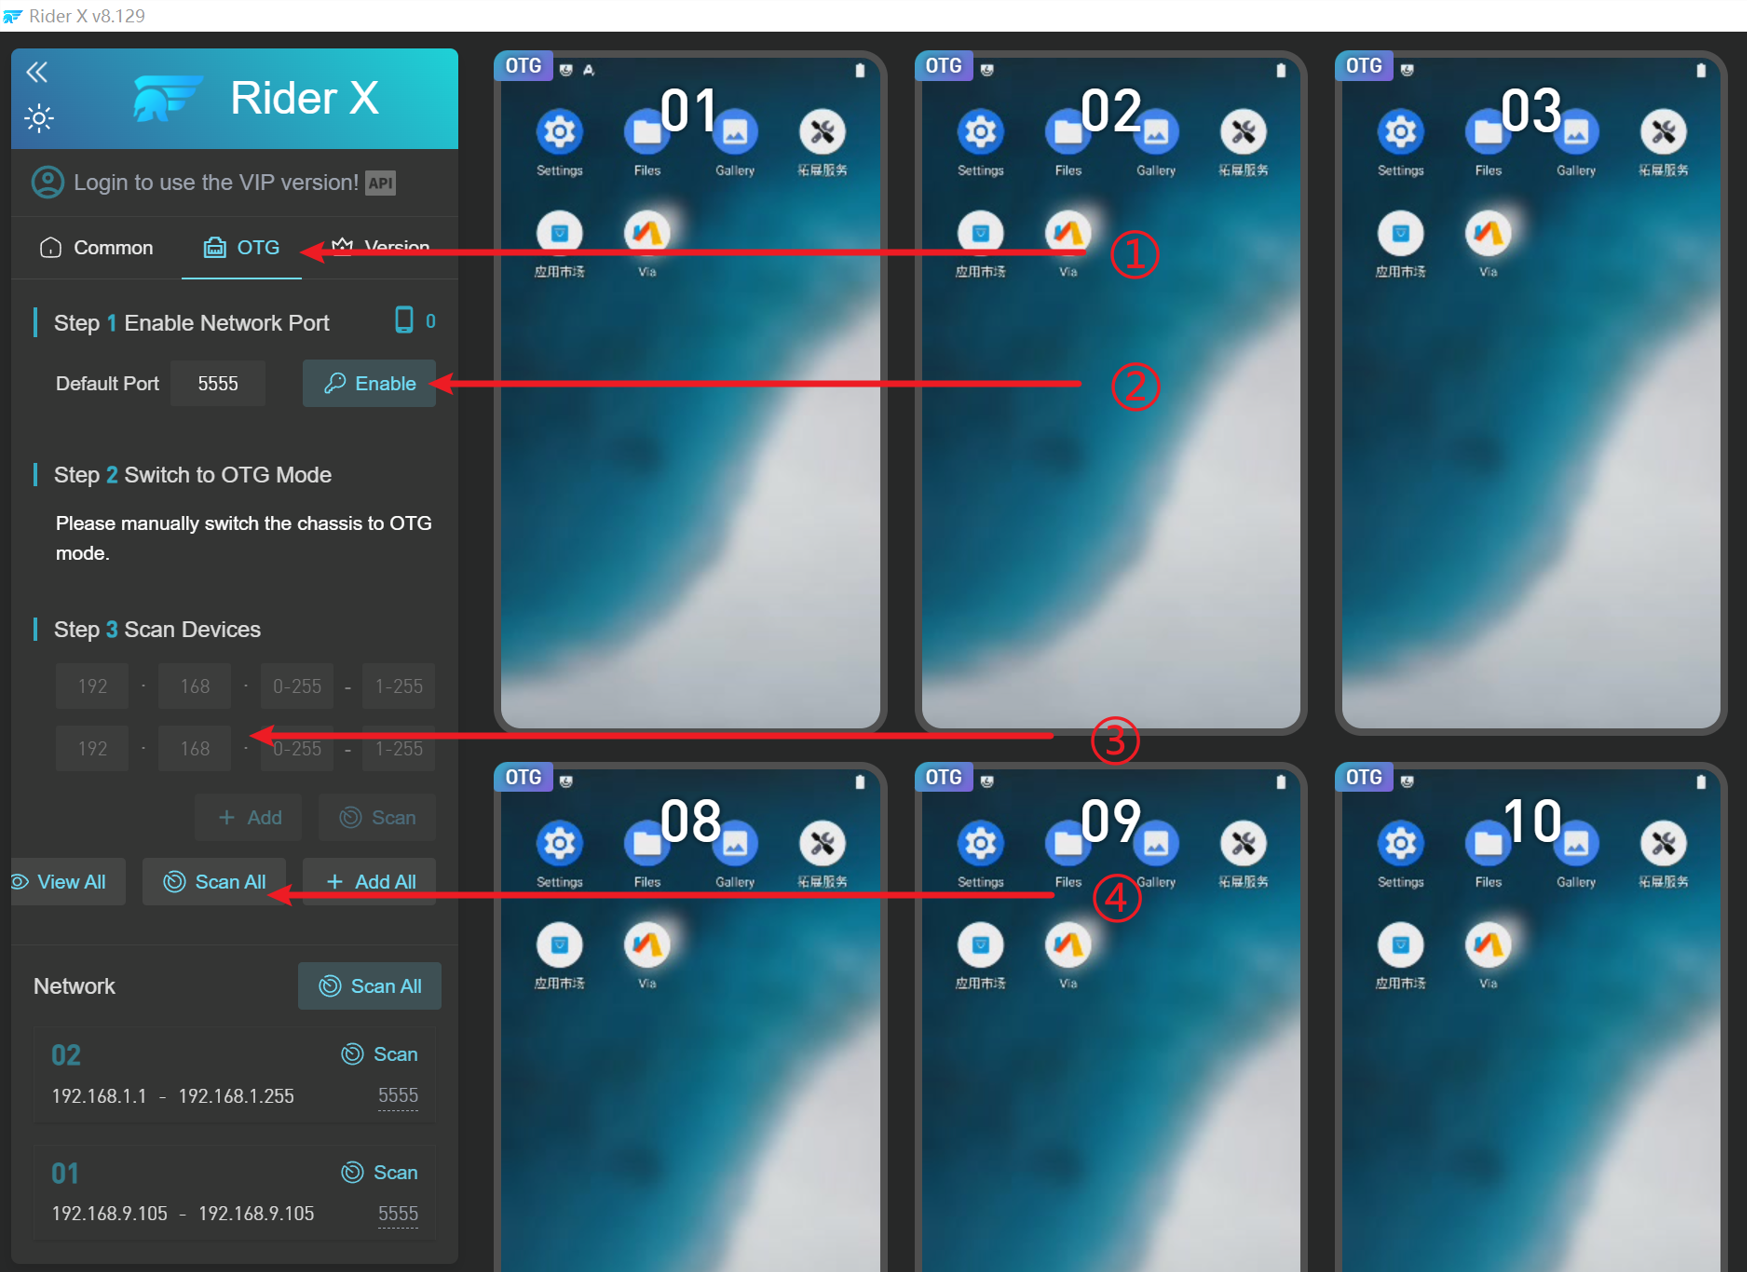
- Click on OTG Settings with your mouse, as shown in Image 1.
- Follow steps 1, 2, and 3 indicated in Image 1.
- After completing the above steps, click the Scan All button.
Note:
OTG mode uses Ethernet (wired network) for screen mirroring, so it is essential that the device and the computer are connected to the same local area network (LAN).
If devices from other computers appear during scanning, you can go to System Settings and change Auto Scan to Manual Scan, then restart Cloud Rider X . After restarting, you only need to scan the specific IP addresses you want to connect.
WiFi/OTG Mode Screen Mirroring Unstable?
- Router issues: It is recommended to use an enterprise-grade router.
- Too many devices connected to the same router may cause signal interference and network instability. (It is recommended to set up a software-based router for better management.)
- If the phone screen is locked, it may cause the WiFi connection to drop.
Steps to Use OTG Connection Mode:
- Click on the OTG tab.
- Click the Enable button to activate OTG mode.
- Enter the network segment (IP range) of the target phone.
- Click Scan to search and connect.
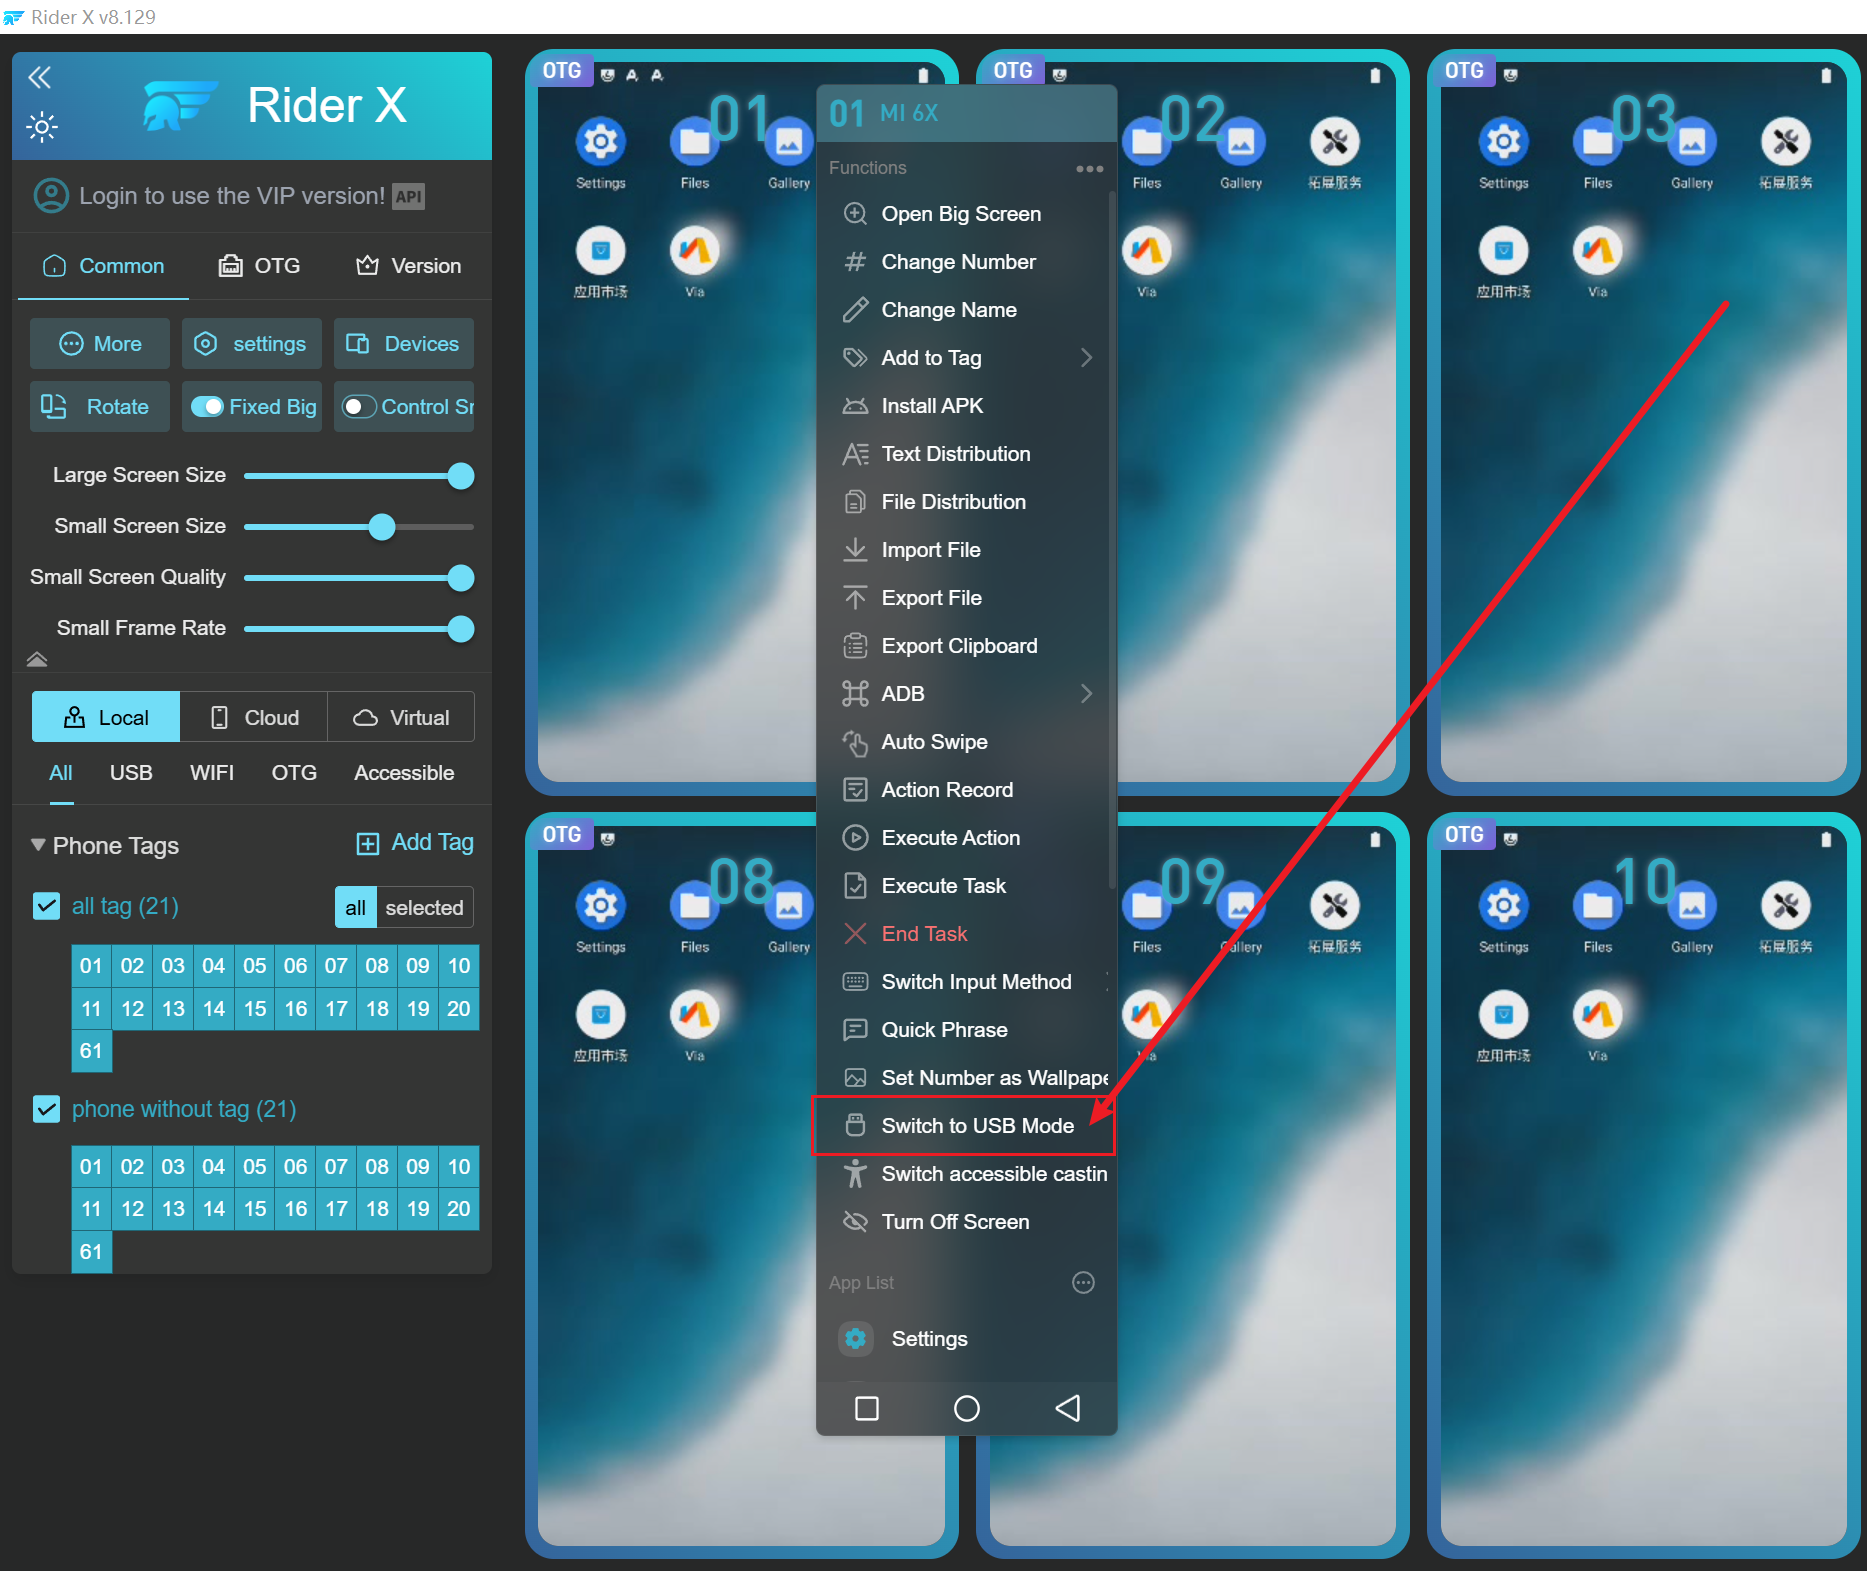
How to Switch from OTG Mode to USB Mode?
Select the phone
you want to switch, then right-click and scroll down to choose USB Mode.
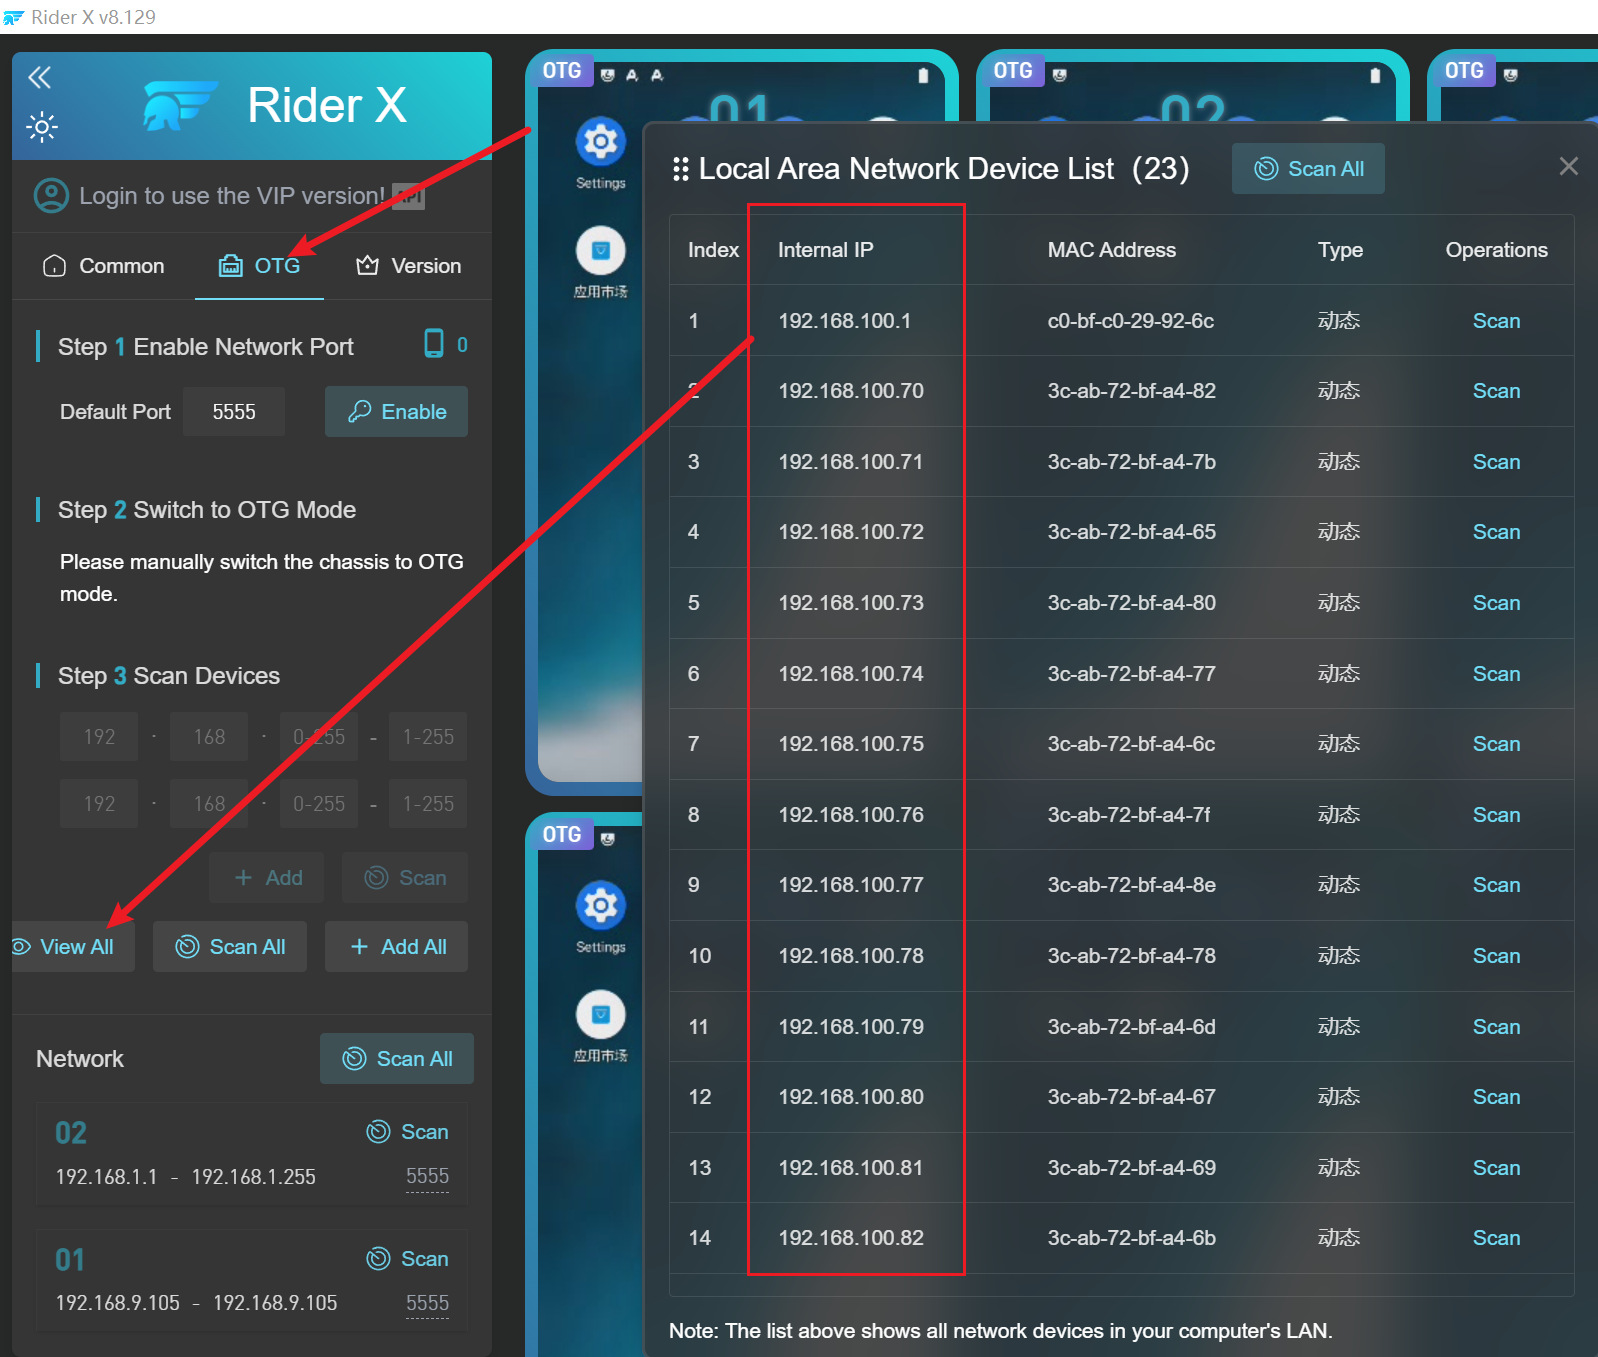
How to View and Add IPs in the Local Network?
- Click View to see all current IP addresses in the local network.
- Click Full Scan to scan all IP addresses in the local network in bulk.
- Click Add All to add all IPs in the local network to the system.
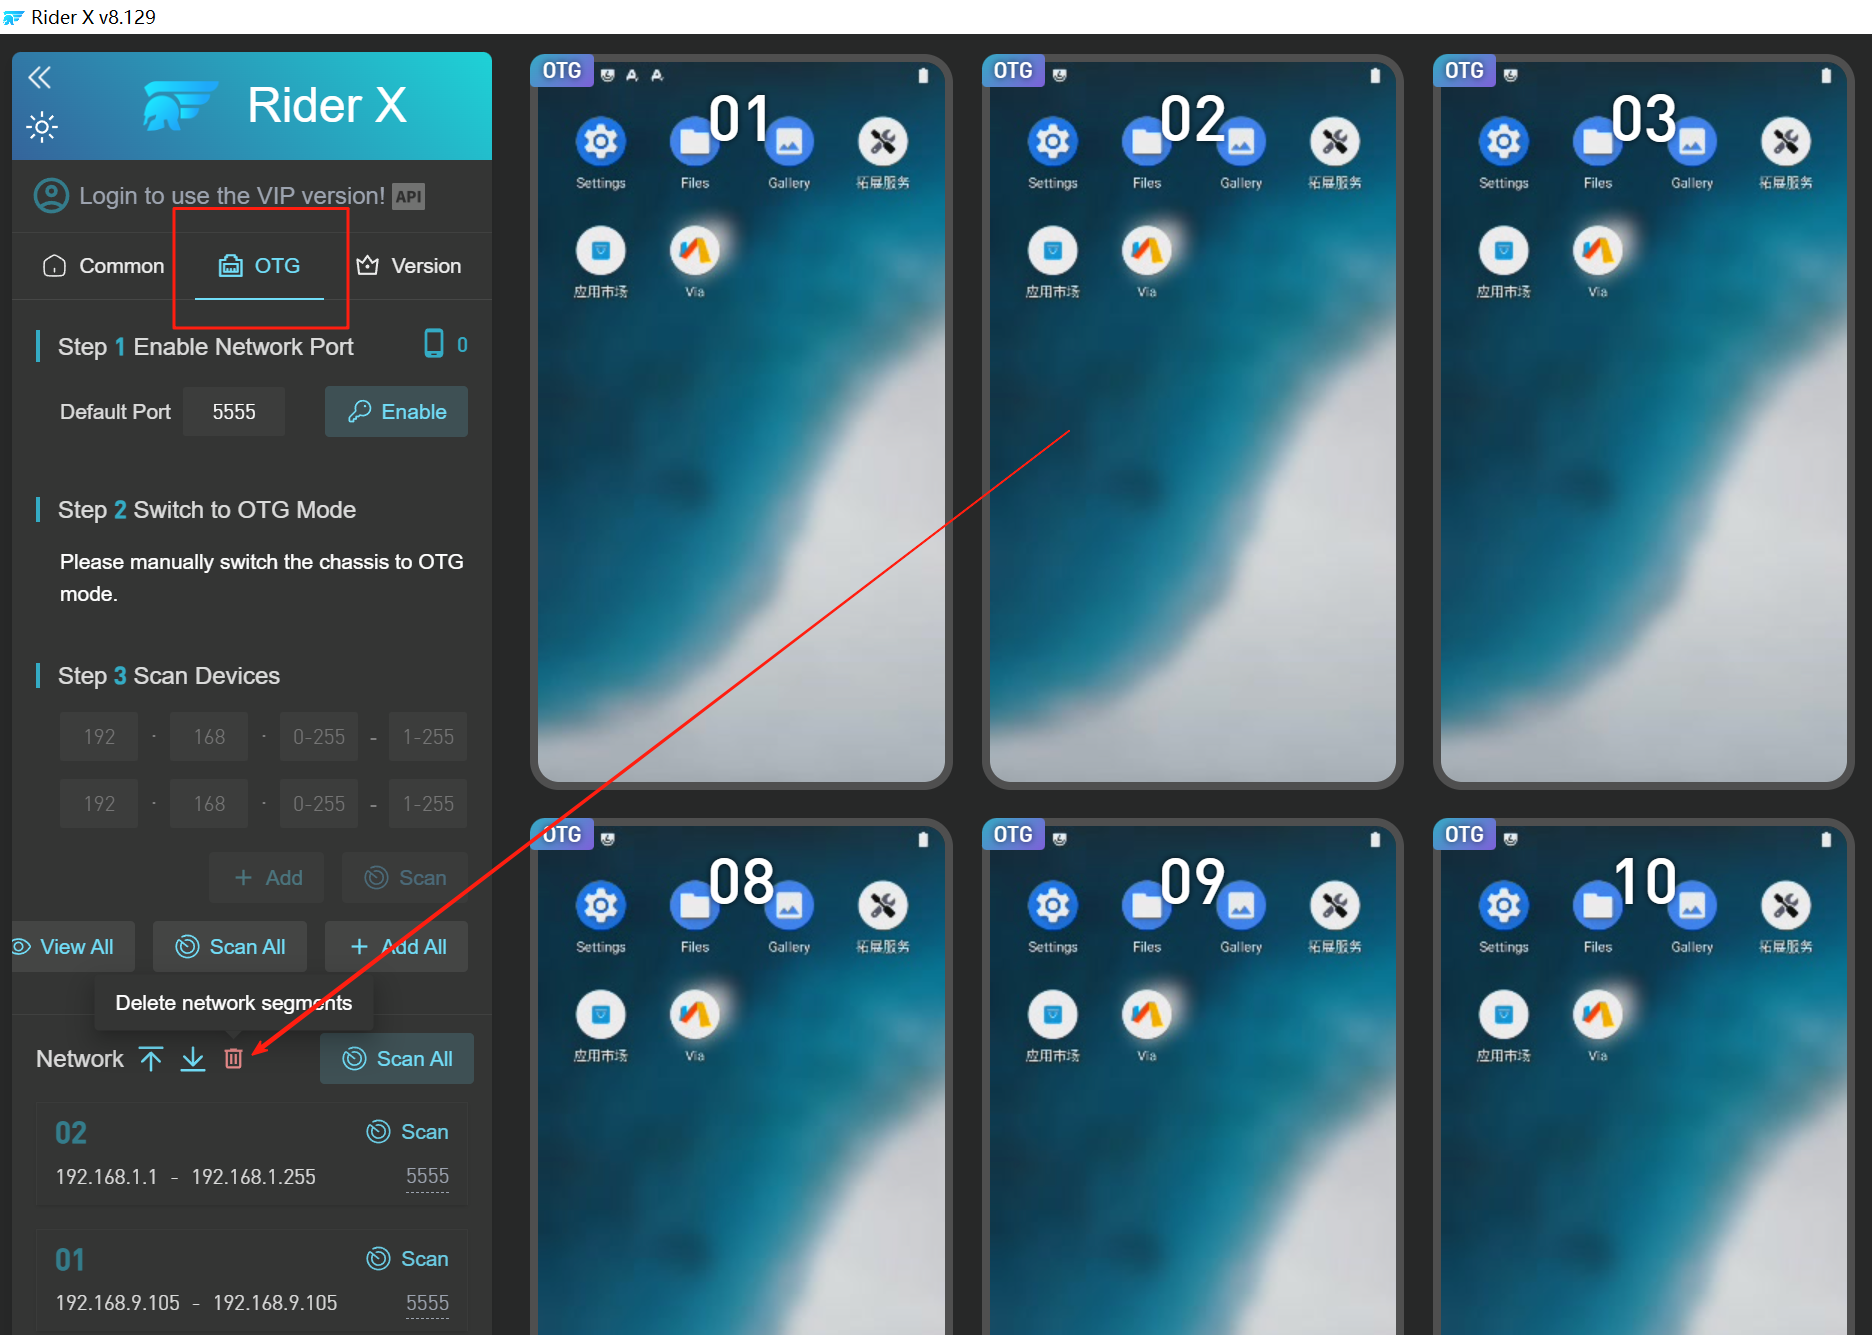
How to One-Click Delete All OTG IP
Segments?
Go to the OTG page, hover the mouse over the Network Segment Management area. The
Delete button will appear.
Click Delete once to
remove all IP addresses or IP segments listed below.
What to Do If OTG Device Cannot Be Scanned?
- Are the router your computer is connected to and the router your device case is connected to the same? If not, check whether the two routers' networks are interconnected. If they are not, please consult a network professional for assistance.
- Is your device case a dual-mode switch case (supports both OTG and USB) or a single-mode case (supports only OTG)?
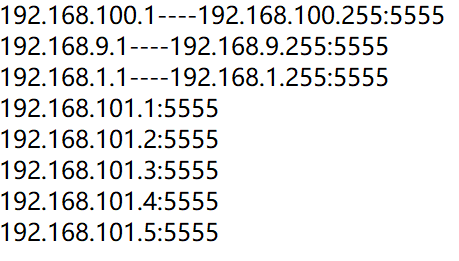
- If it is a dual-mode switch case, first connect to Cloud Rider X using USB mode. After successful connection, click to start port 5555, then manually switch the device case to OTG mode. Enter the network IP range your device is connected to, for example, from 192.168.1.1 to 192.168.1.255. After entering the IP range, click Add, then scan.If it is a single-mode case, simply enter the network IP and scan.
3.4 Accessibility Connection
The Accessibility connection method allows you to use the device without enabling Developer Mode on the phone.
Accessibility requires the phone to be connected via WiFi or OTG, and the phone must be on the same local network (LAN) as the computer.
Accessibility Connection Guide (Step-by-Step with Images)
- Before using Accessibility mode for the first time, you must first connect via ADB screen mirroring.
There are three ADB connection methods: USB, WiFi,OTG.
- Once screen mirroring via ADB is successful, right-click the phone and select “Switch to Accessibility Mode.”
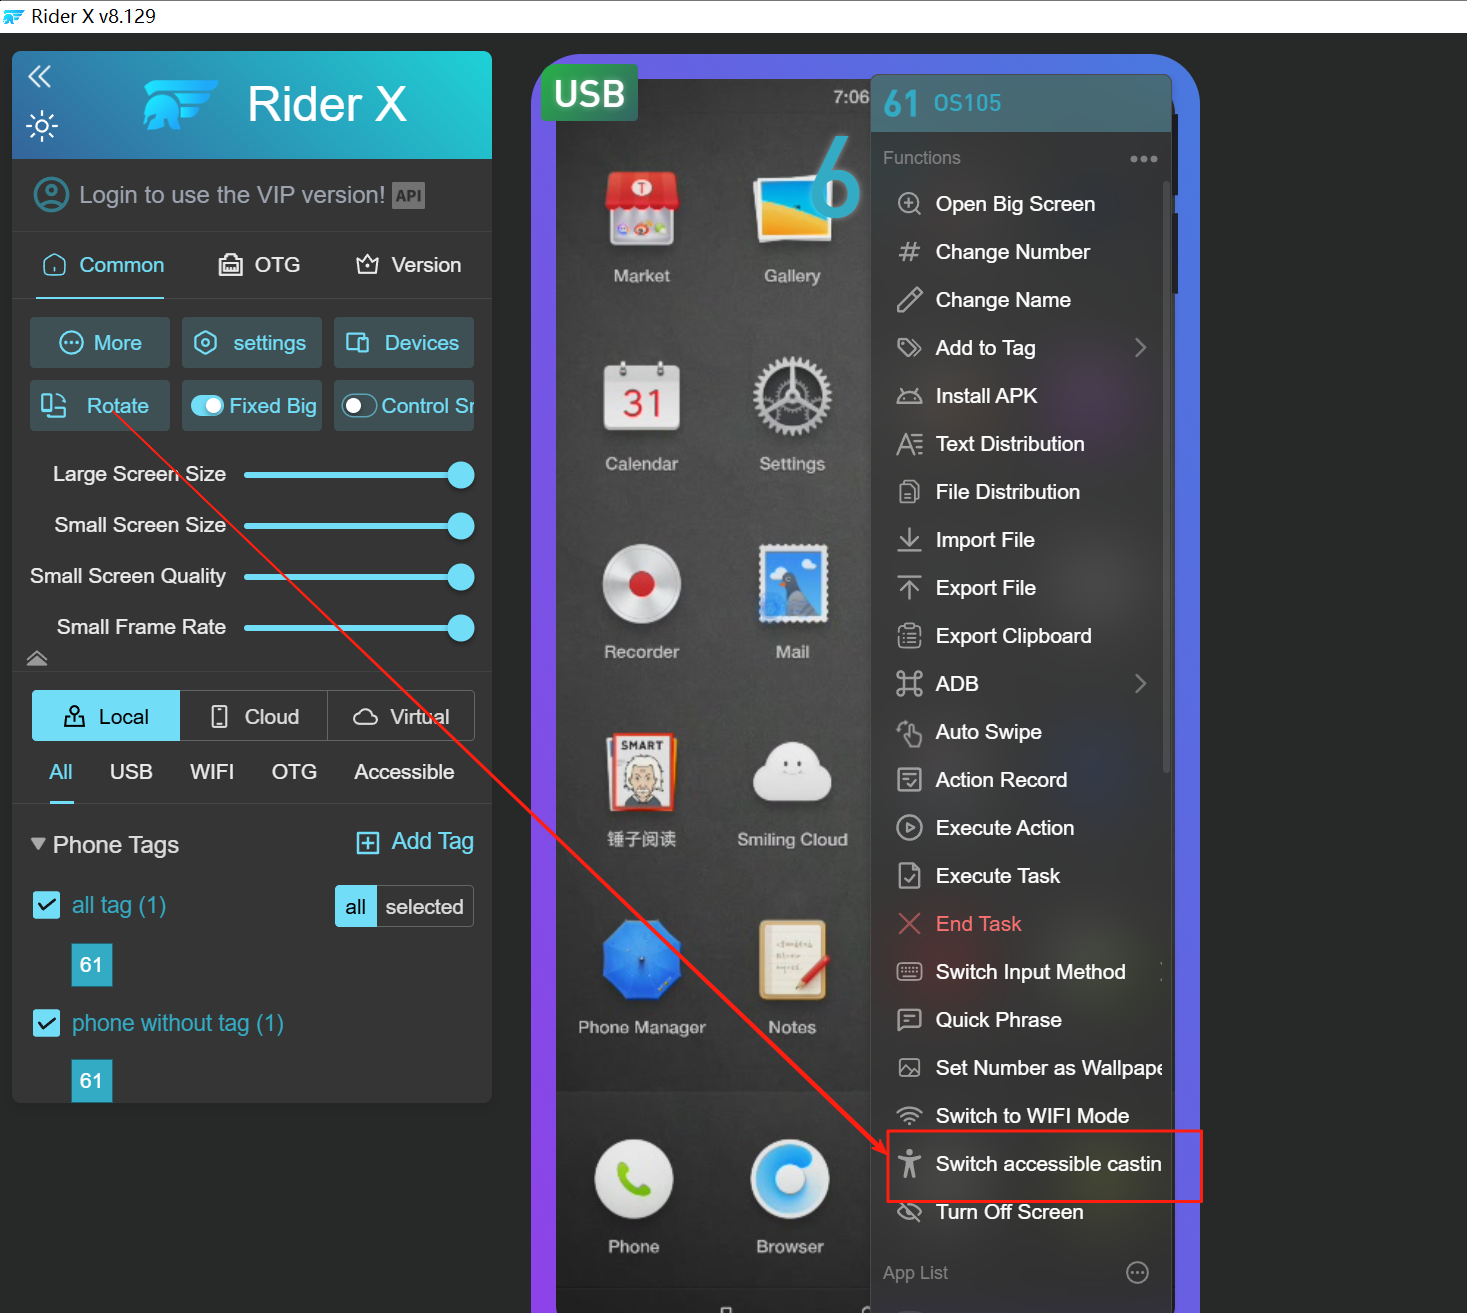
- In the pop-up window, click “Confirm Switch to Accessibility” again.
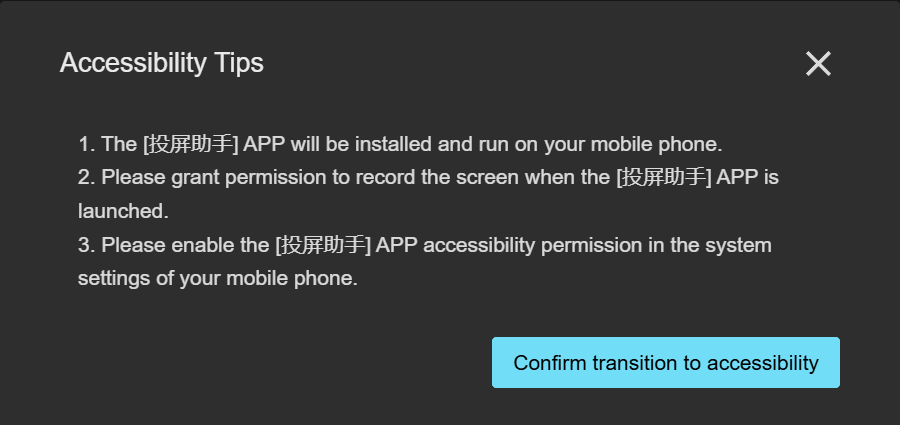
- If the phone does not have the Screen Mirroring Assistant app installed, it will be installed automatically. If already installed, this step will be skipped.
- After installation, an authorization prompt will pop up. Click “Start Now.”
- After clicking "Start Now," an Accessibility permission window will appear. Tap Screen Mirroring Assistant, go to the authorization page, and toggle the switch to enable it.
- After granting
permission, right-click the phone again and click
“Switch to Accessibility
Mode”.
Accessibility mode will now be successfully enabled. - Once Accessibility mode is enabled, you can safely turn off Developer Mode on your phone.
Important Reminder!
Mainboard-type devices should use this feature with caution. Accessibility
reconnection requires tapping the screen for manual authorization.
Do NOT disable Developer Mode on mainboard-type phones.
What if a “Network Connection Error” appears on the phone during Accessibility connection?
- This means the phone is not connected to WiFi.
- The phone’s WiFi is not on the same local area network (LAN) as your computer.
3.5. Secure Mode Connection
How to switch from ADB mode to Secure Mode?
Steps:
- hover your mouse over More Features, a pop-up window will appear.

- In the pop-up, locate and click Secure Mode. A conversion wizard will appear (As illustrated in the figure), which guides the following steps:
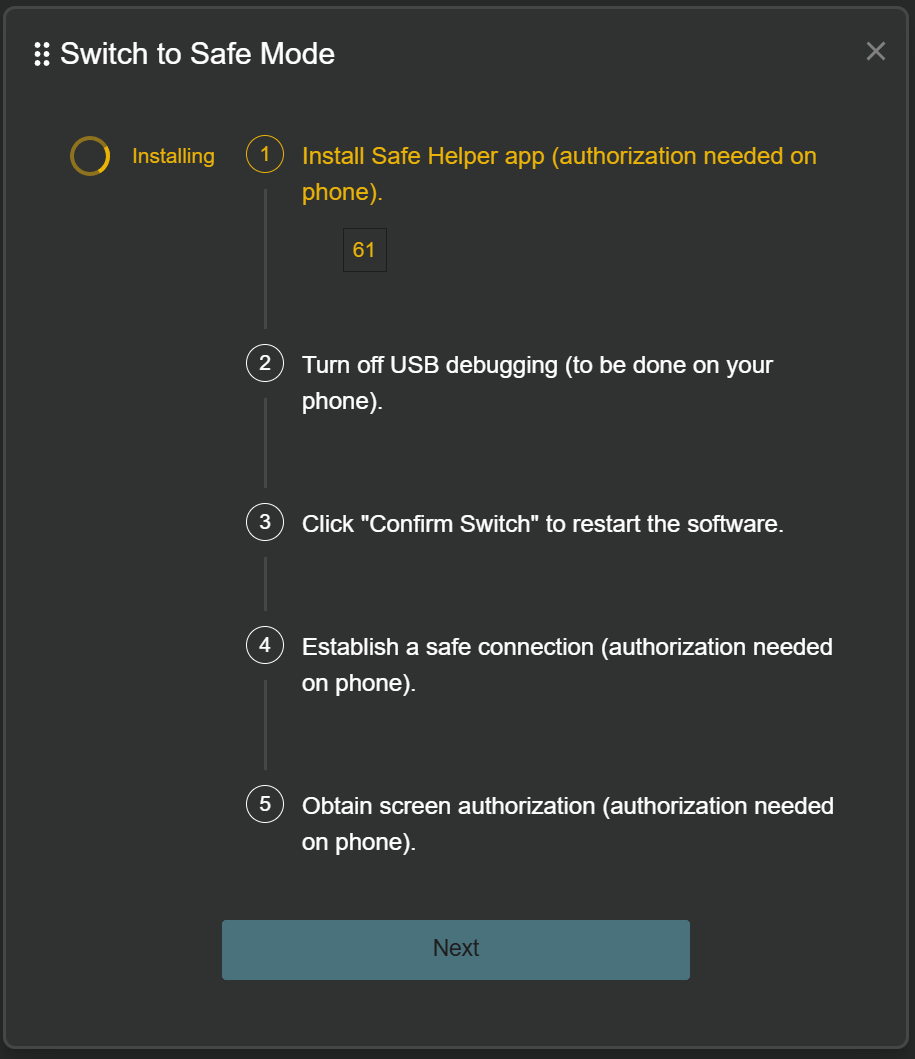
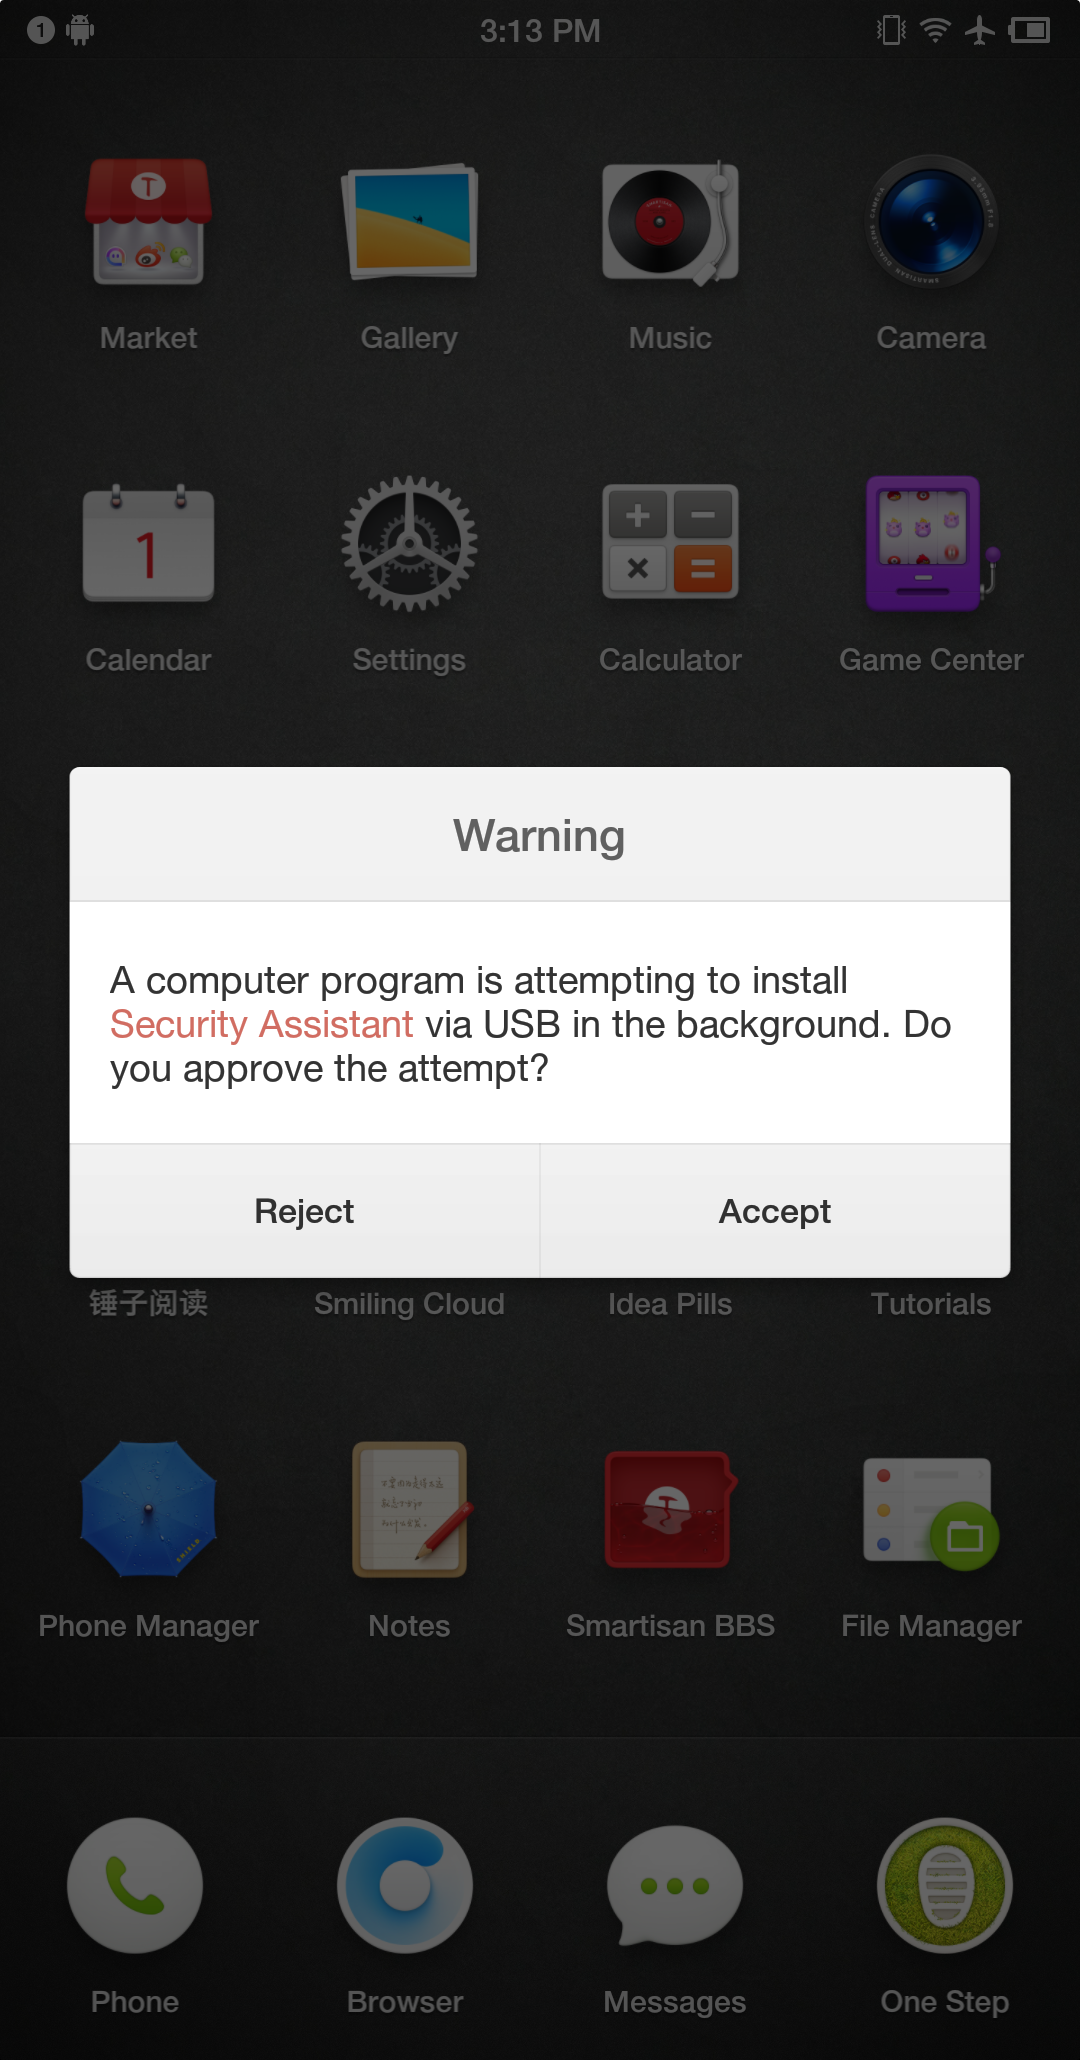
(1) Installing the Secure Assistant app on the phone.
(2) Manually disable USB Debugging on the phone.
(3) Cloud Rider X Screen Projection automatically restarts.
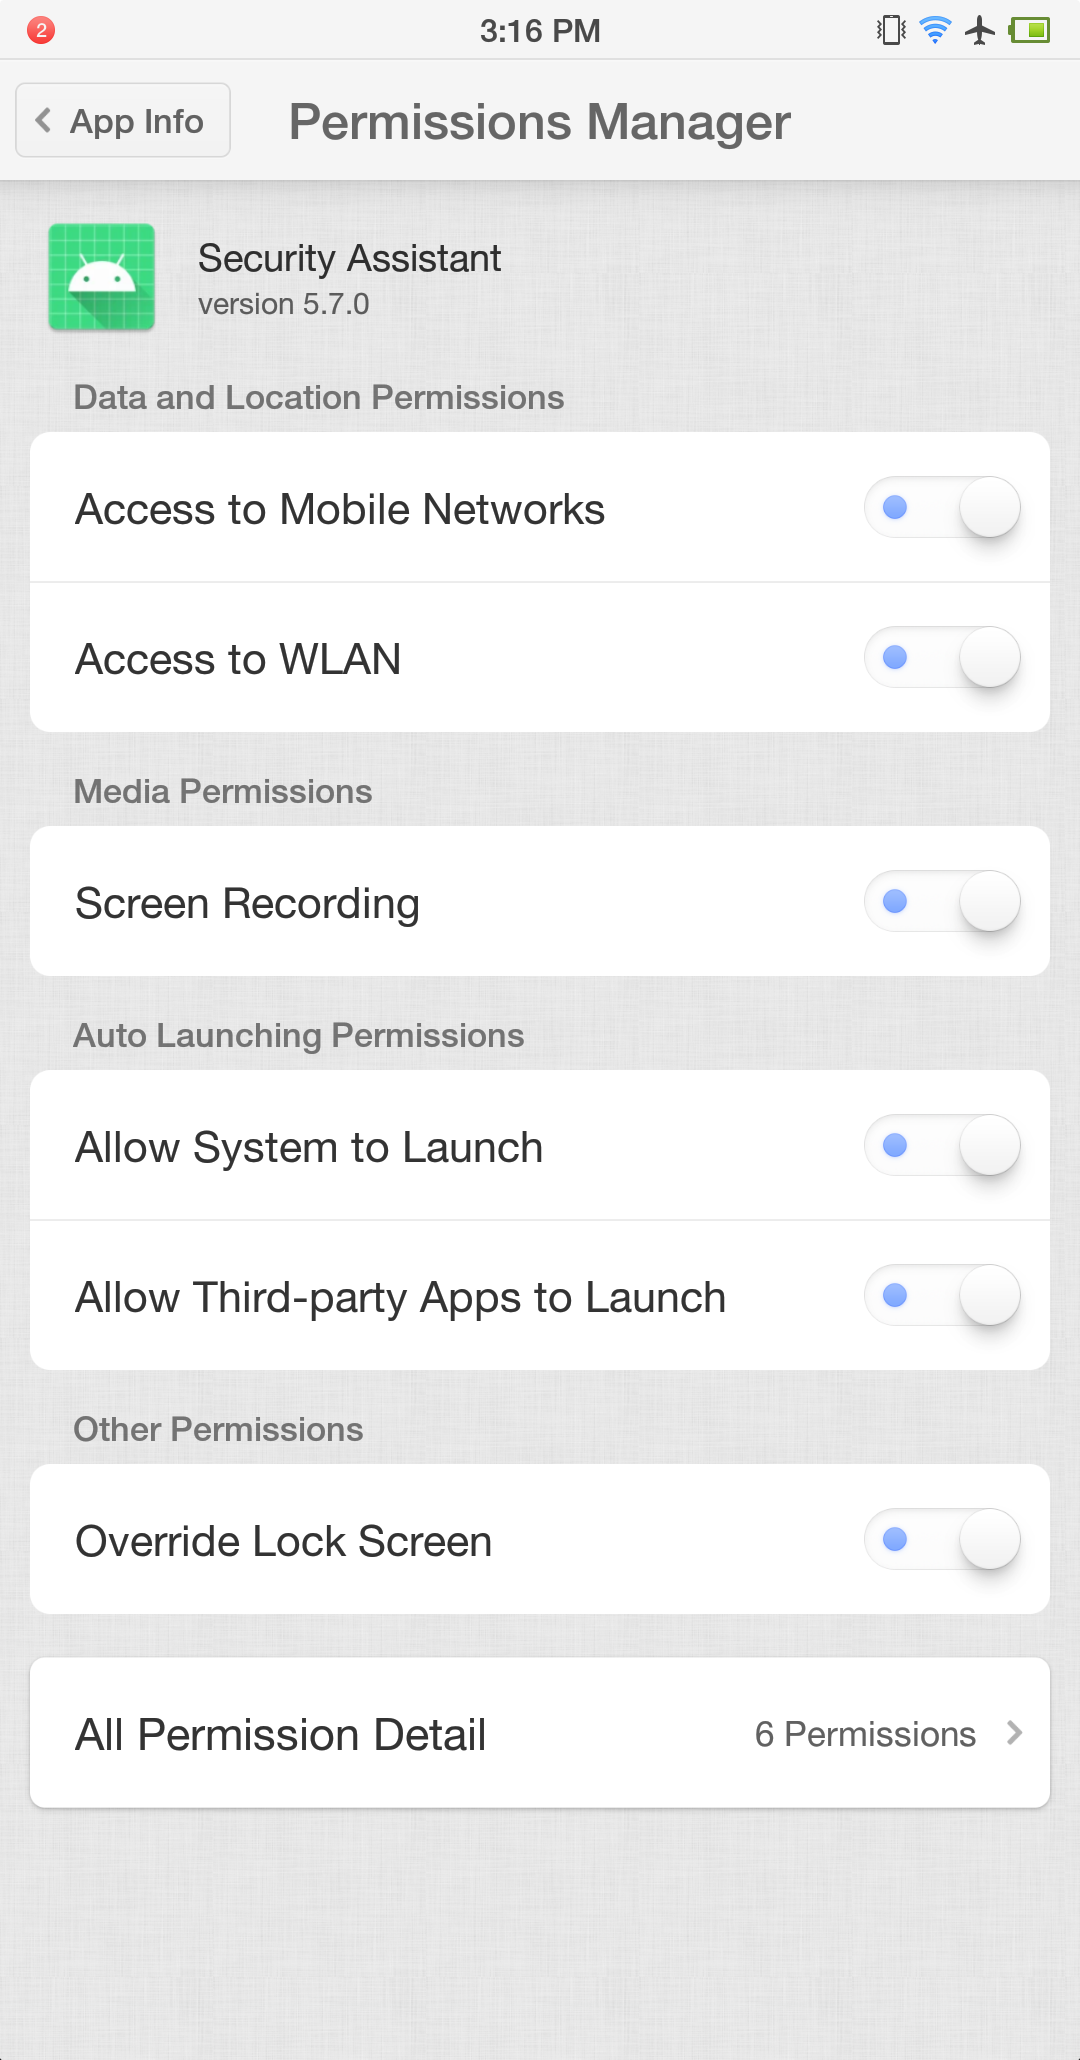
(4) Manually grant USB accessory permissions to the Secure Assistant on the phone (As illustrated in the figure).

(5) Manually grant screen recording permission (As illustrated in the figure).
- After completing the above steps, Secure Mode screen mirroring (without Developer Mode) will be enabled.
Notes:
When switching from ADB mode to Secure Mode, each phone must install its USB driver separately, so expect some delay if connecting multiple devices.
If the authorization prompt does not appear, change the phone’s USB mode to “File Transfer (MTP)”, and reconnect the USB cable.
When Cloud Rider is in Secure Mode, ADB-based mirroring (i.e., with USB Debugging enabled) will not work.
Secure Mode disables ADB, so any ADB-dependent features are unavailable.
Mainboard-type devices are not recommended to use Secure Mode, as screen interaction is required for authorization.
How to switch from Secure Mode back to ADB mode?
- hover over More Features, and click on ADB Mode in the popup.
- The conversion wizard will open (Image 2) and proceed as follows:
(1) Cleaning HID drivers from the PC.
(2) Cloud Rider X Cloud Rider automatically restarts.
(3) Manually enable USB Debugging on the phone(Image 3) .
(4) ADB-based screen mirroring resumes(Image 4).

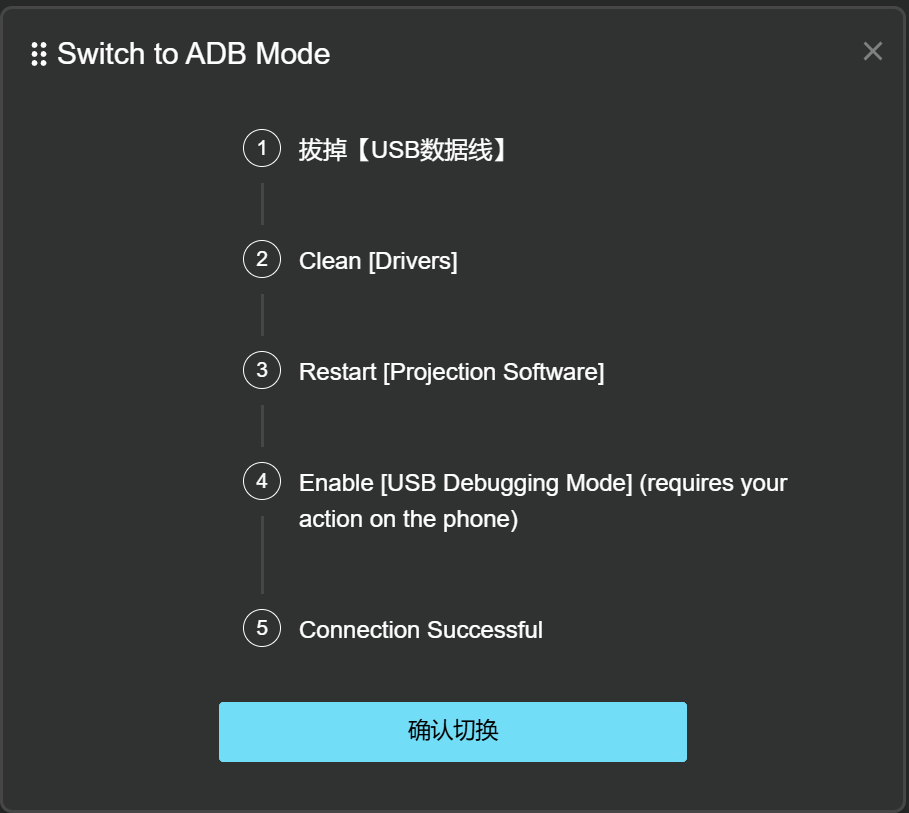
Notes:
- Switching from Secure Mode back to ADB Mode requires driver cleanup, which may take time — please be patient.
- If the phone does not mirror after driver cleanup, set USB mode to File Transfer (MTP) and reconnect the cable.
- When Cloud Rider is in ADB Mode, Secure Mode mirroring is disabled.
Secure Mode is unstable?
- Open Settings on the phone and go to Battery (see Image 1).
- Disable battery optimization for the Secure Assistant app (Image 2).
- Disable Automatic Management, and enable the following:
(1) Allow Auto-start
(2) Allow Associated Start
(3) Allow Background Activity
Note: The settings interface may vary across brands. Regardless of model, Secure Assistant must be allowed to run in the background, and must not be auto-managed by the system.
Blurry screen when launching apps in Secure Mode?
- Open phone Settings
- Go to Security
- Find and open Fraud Prevention
- Disable "Screen Sharing Protection"
Note: This setting may vary by phone brand. The key is to turn off screen sharing protection to resolve blurriness.
How to connect a new phone in Secure Mode?
- Simply install the Secure Assistant app on the new phone.
- The APK file is located in your local Cloud Rider X installation directory .
3.6 Common Connection Issues
Phone Model Compatibility
Q: Unable to control Xiaomi/Redmi phones?
A: Xiaomi/Redmi phones must have the following three settings enabled to allow
control:
USB Debugging
Install via USB
USB Debugging (Security Settings)
Q: Unable to control VIVO phones?
A: Enable USB
Simulated Clicks in the Developer Options.
Q: Huawei or Honor phones not recognized?
A: Huawei and Honor phones require installing the corresponding official PC
suite (other brands do not need this):
Huawei PC Suite: https://consumer.huawei.com/cn/support/hisuite/
Honor PC Suite: https://www.honor.com/cn/tech/honor-suite/
Steps:
- Install the suite on your computer.
- Connect the phone to the computer via USB; follow the in-app instructions to complete the connection.
- The suite will push the appropriate drivers to the phone—install them when prompted.
- After driver installation, close the PC suite and reconnect the USB cable.
- If it still doesn’t work, try restarting the phone.
Unstable Phone Connection
USB Mode Instability
Possible Causes:
Faulty USB cable
Faulty phone charging port
Faulty USB port on the computer
Insufficient power from the computer motherboard
USB hub power supply is insufficient
Solutions:
Replace the USB cable
Replace or clean the phone’s charging port
Use a different USB port on the PC
Upgrade the power supply of the PC
Use a better-powered USB hub or reduce the number of connected devices
Wi-Fi Mode Instability
Possible Causes:
The router cannot handle too many Wi-Fi connections
Wi-Fi signal interference
Solutions:
Use an enterprise-grade router
Set up a soft router to reduce signal interference (setup must be done independently)
OTG Mode Instability
Cause:
Router can't handle many wired connections
Solution:
Use an enterprise-grade router that supports more wired devices
Computer Host Issues
Q: What’s the maximum number of devices that can be
connected?
A: The casting software from Cloud Rider X has no built-in
connection limit. Actual limits depend on your motherboard or router capacity.
For USB Mode:
Typical consumer PC motherboards theoretically support up to 127 USB connections, but most are limited to 40.
Server-grade motherboards (e.g., X79, X99 architecture) often have no such limitation and can support many more devices.
For OTG or Wi-Fi Mode:
Not limited by the motherboard, but by router performance.
Low-end home routers support up to 20 stable connections.
Mid-range enterprise routers support up to 40 stable connections.
Soft routers offer the best value and can support hundreds of devices—assuming sufficient network bandwidth.
Q: What computer specs should I use?
For ≤40 devices: A regular home PC is sufficient.
For >40 devices: A server-grade machine is recommended.
Example: an entry-level commercial E5 server equipped with a 2670v2 CPU, X79
motherboard, GTX 1050 2G GPU, 16GB RAM, and 128GB storage can stably support up to 200 devices without
any problems.
Device Not Detected
First, check if the computer itself detects the device (check "This PC" for the device). If not, the issue is with the PC, not the software.
If the PC detects the phone but the software doesn't, possible reasons include:
Causes:
USB Debugging is not enabled on the phone
The driver is not installed
ADB conflicts caused by multiple versions of adb.exe on the system
Solutions:
Enable USB Debugging in Developer Options
Reinstall the correct USB driver
Resolve any ADB conflicts (remove or unify multiple versions)
USB Controller Resource Exhaustion
Problem: Windows error indicating insufficient USB resources.
Solutions:
Disable the XHCI option in BIOS (under the USB section)
Try different USB ports on the computer
Use a dedicated USB expansion card (each can handle ~15 devices depending on the motherboard)
Missing ADB Authorization Files
Solution:
- Obtain adbkey and adbkey.pub from the vendor
- Place them into C:\Users\Administrator\.android\
- Reboot the computer
"Device disconnected from server" Error
Common Causes:
Incorrect local time or timezone settings on the PC
VPN is causing latency issues with the Lingzheng Technology server
Proxy server enabled in PC network settings
Packet capture tools are interfering with Cloud Rider X services
Solution:
Connect the PC to the internet. The casting software will automatically reconnect.
Special Case:
The Cloud Rider X service is updating.
Wait 1–2 minutes for the update to complete and services will resume automatically.
4. Software Settings
Description: This chapter introduces the commonly used settings and operations in the Cloud Rider X screen projection software.
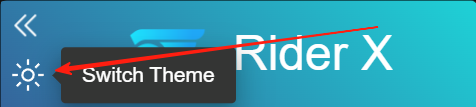
How to Switch to Dark Mode?
Move the mouse to either icon shown in Figure 1 or Figure 2 and left-click to
switch the theme of the entire Cloud Rider X projection interface.
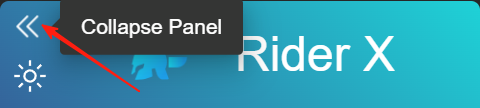
How to Collapse or Pin the Control Panel?
Left-click the area shown in Figure 1 of the control panel to collapse
it.
To pin the control panel, move the mouse to the far
right side of the software window. When the control panel appears, click the location shown in Figure 2
to pin it.

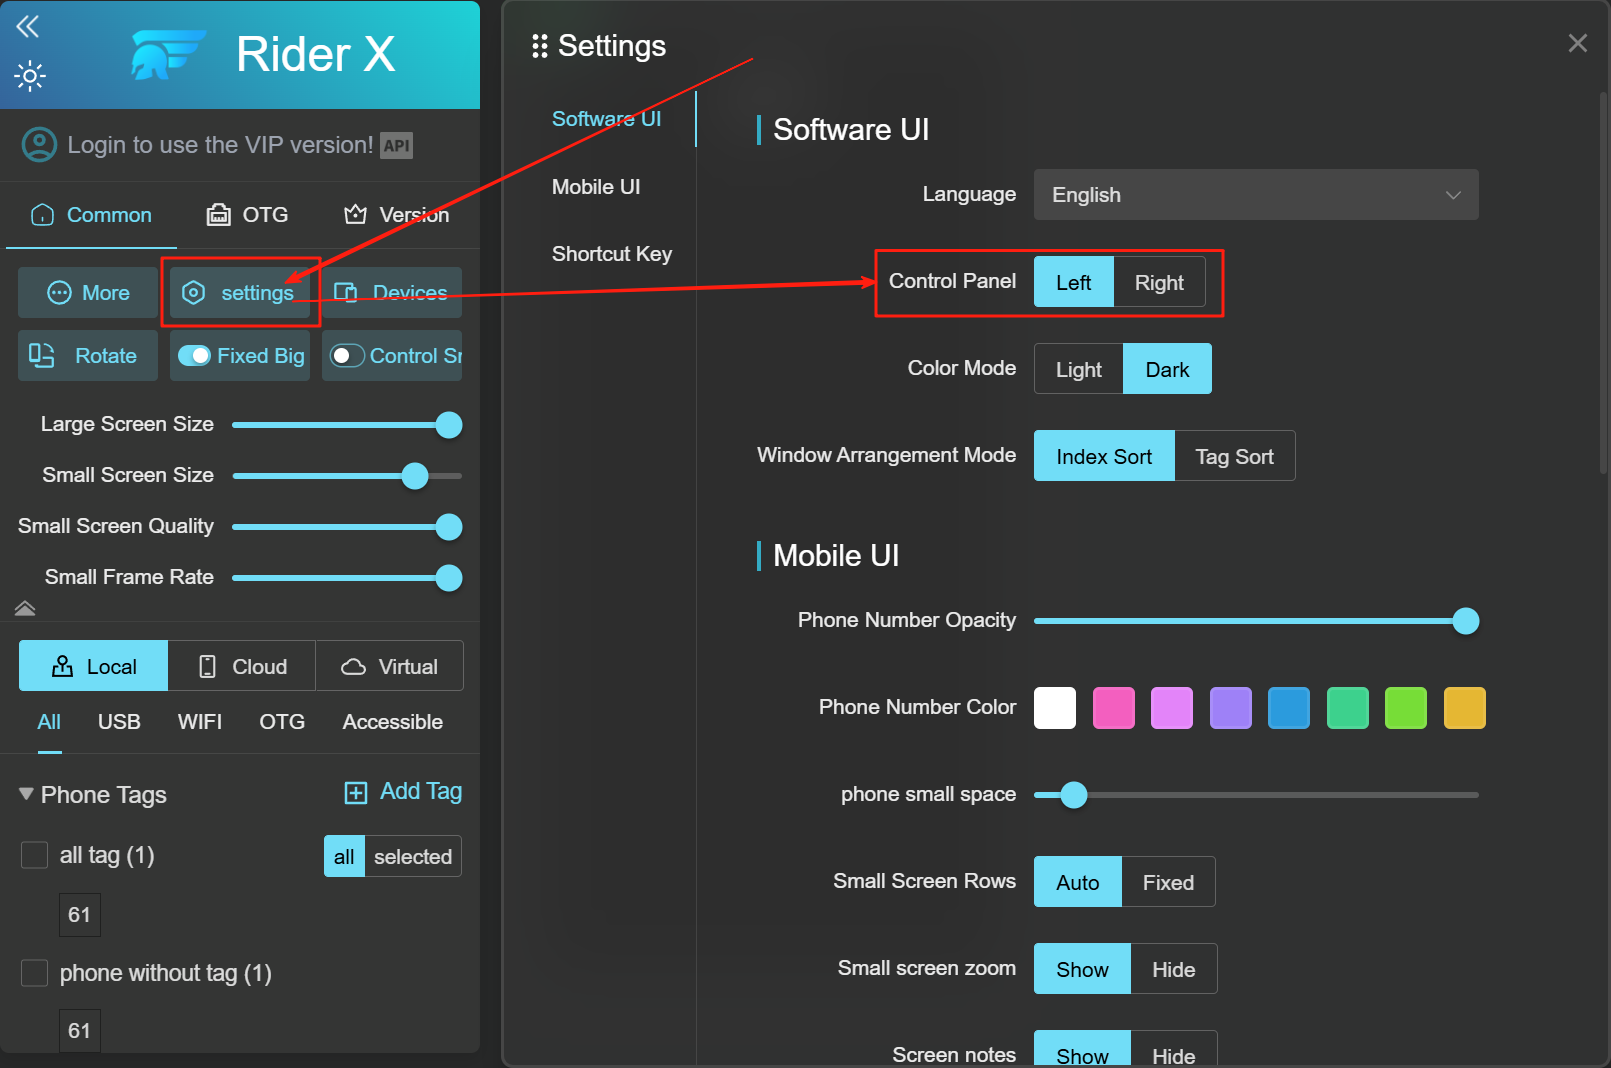
How to Move the Control Panel to the Left Side?
- Click "System Settings" as shown in Figure.
- In the pop-up, find the "Control Panel Position" option and select "Left" or "Right" to switch the position accordingly.
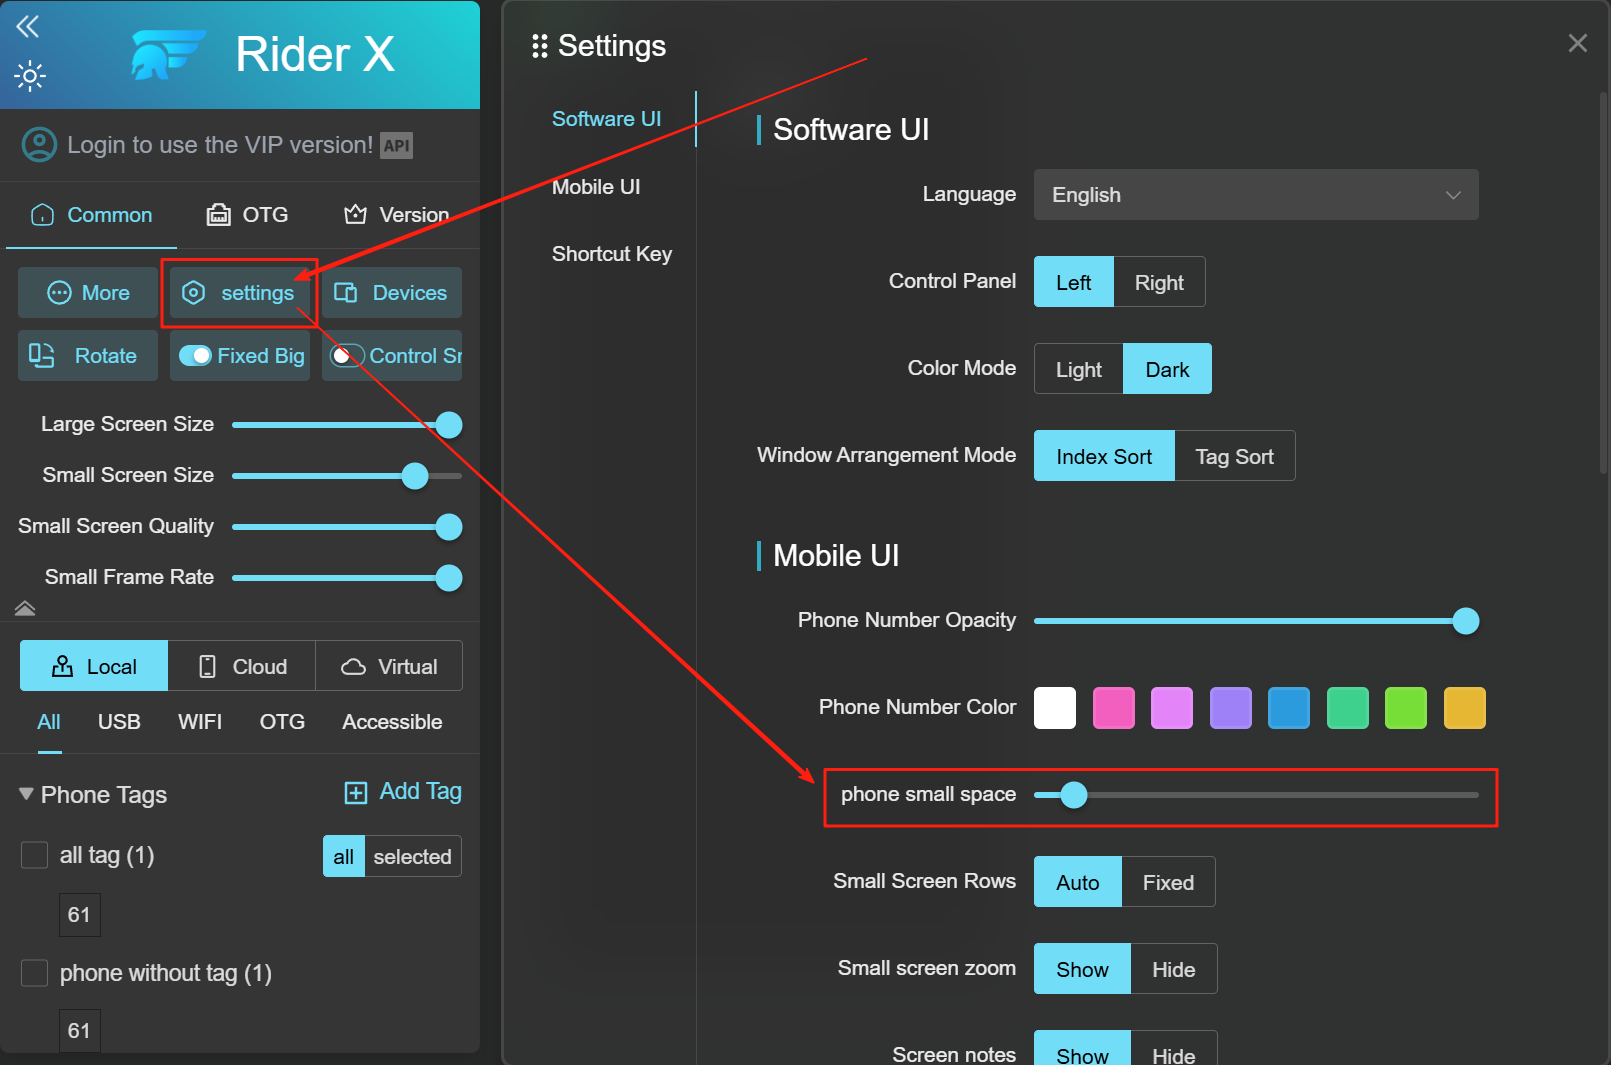
How to Adjust the Spacing Between Phones?
Steps:
- Click "System Settings" as shown in Figure.
- In the pop-up window, find the "Phone Spacing" option Figure. Drag the slider to adjust the spacing.
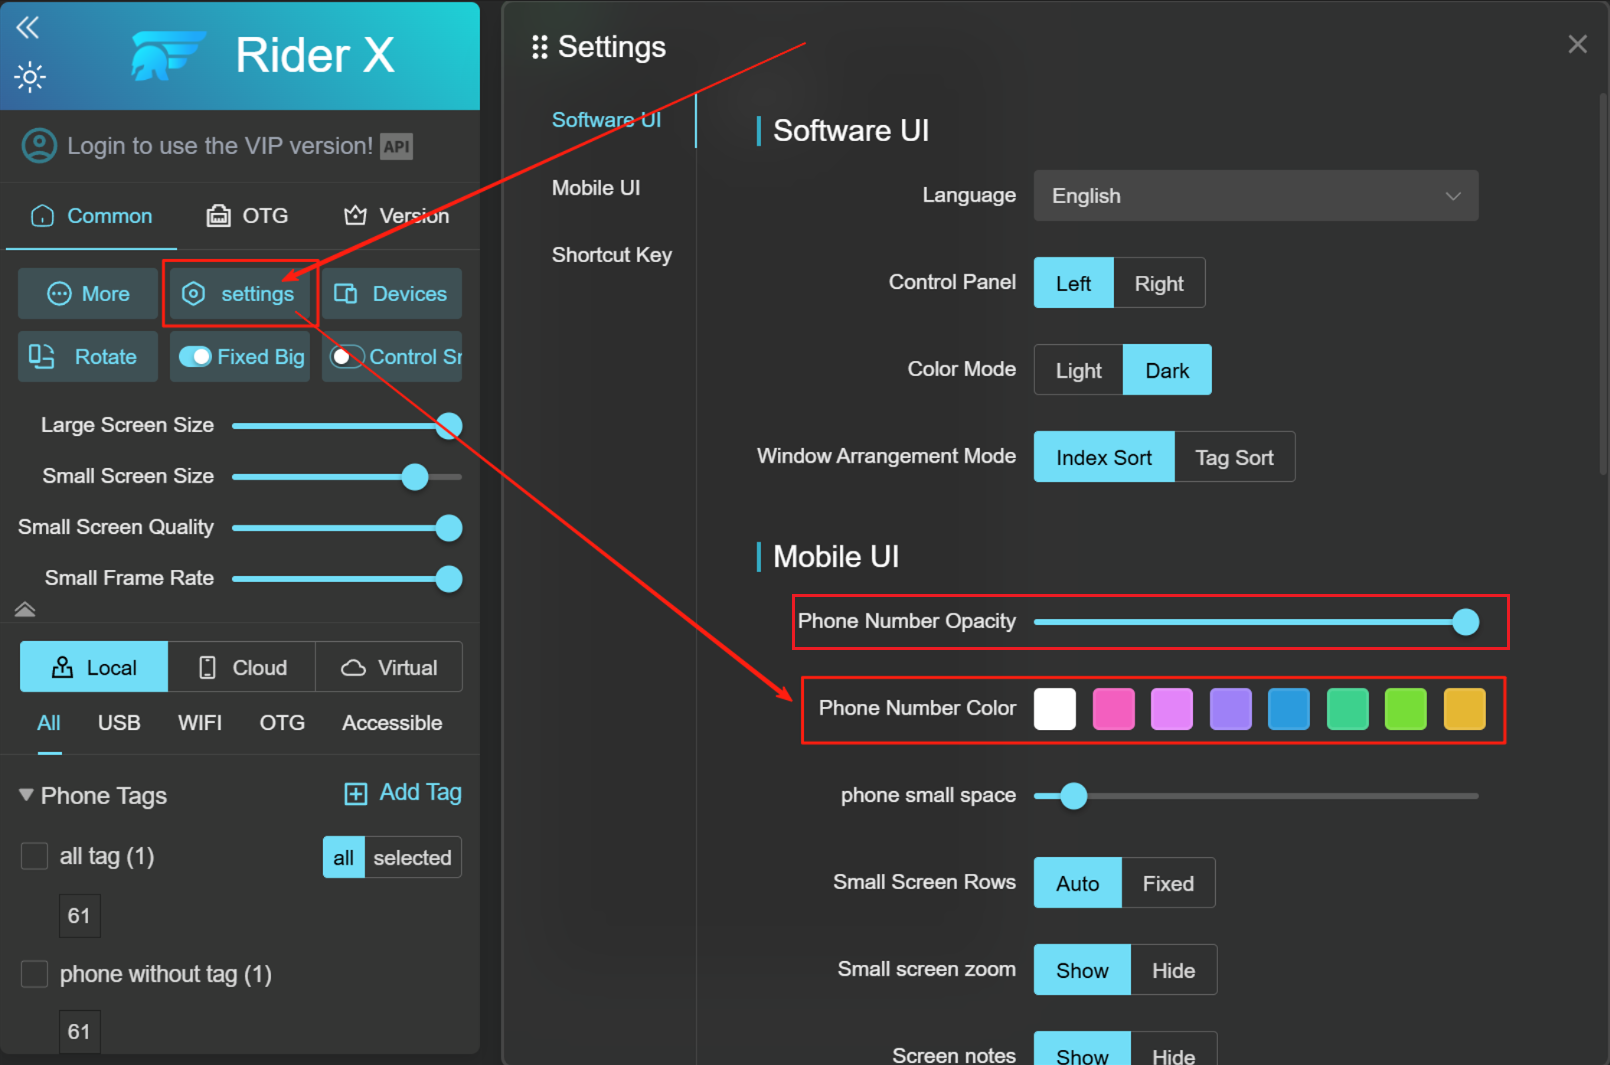
How to Adjust the Transparency and Color of Phone Numbers?
- Click "System Settings" .
- Adjust transparency using the slider under "Phone Number Transparency" .
- To change the color, click the color block under "Phone Number Color".
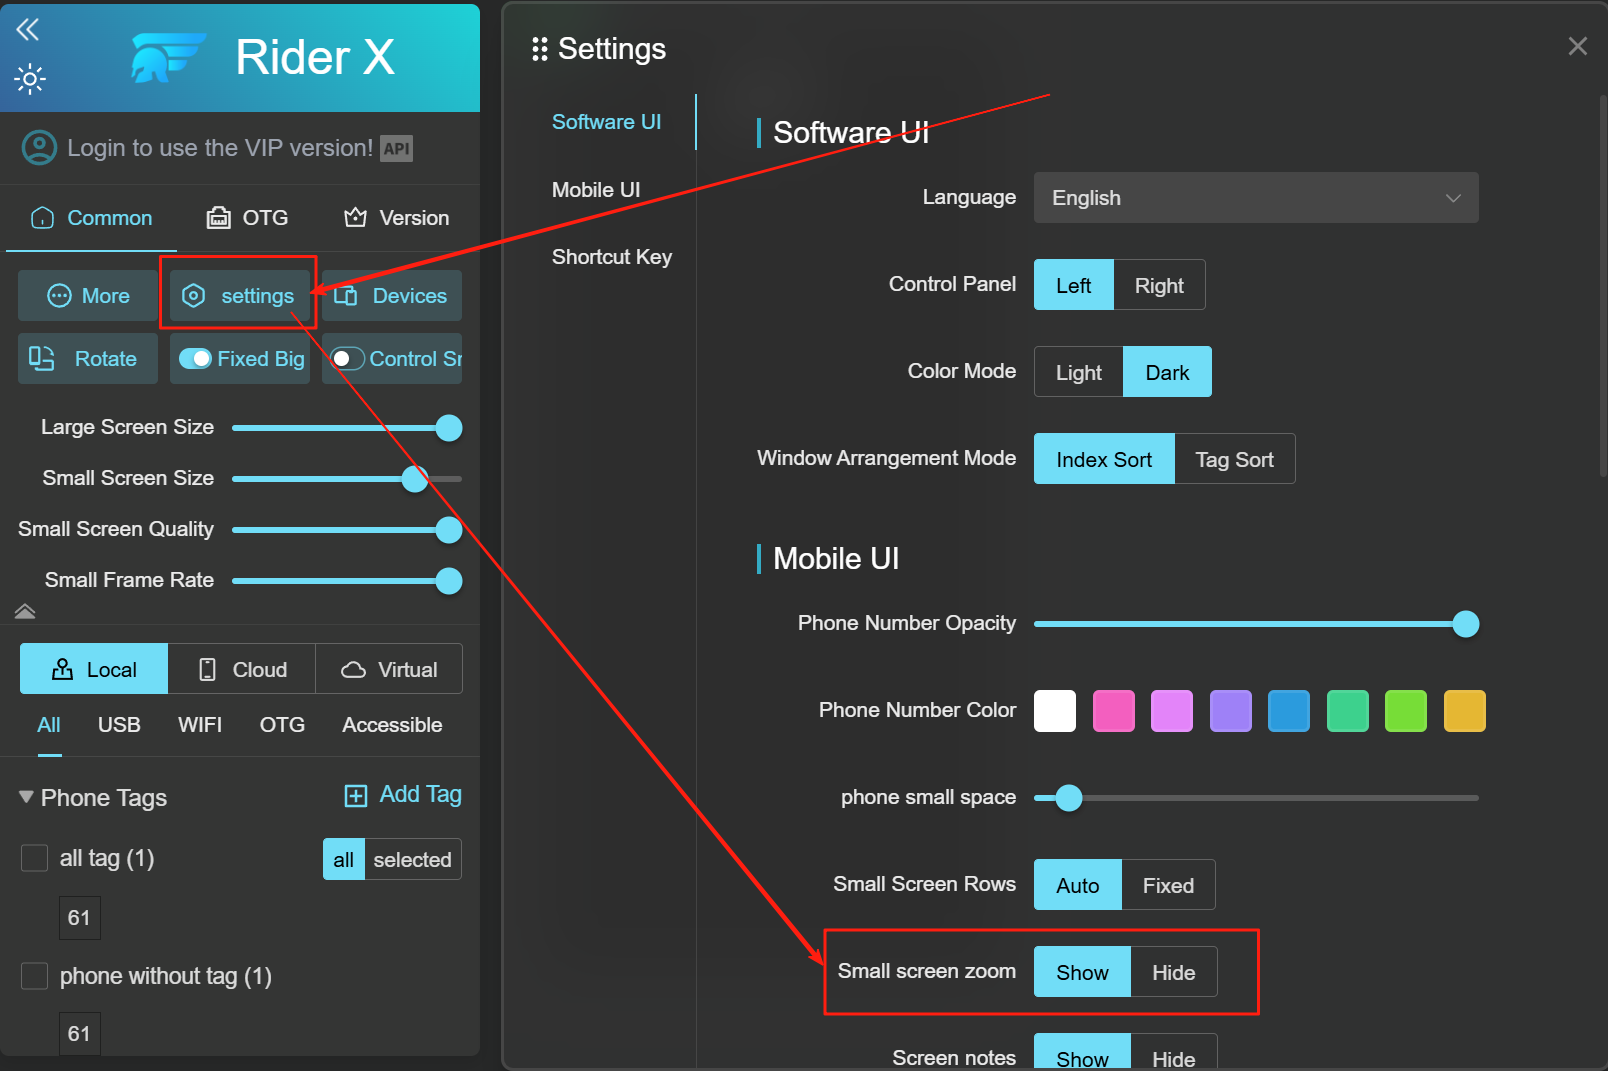
How to Hide the Magnifier Button on the Small Screen?
- Click "System Settings".
- Find the "Small Screen Magnifier" option in the pop-up and select Show/Hide.
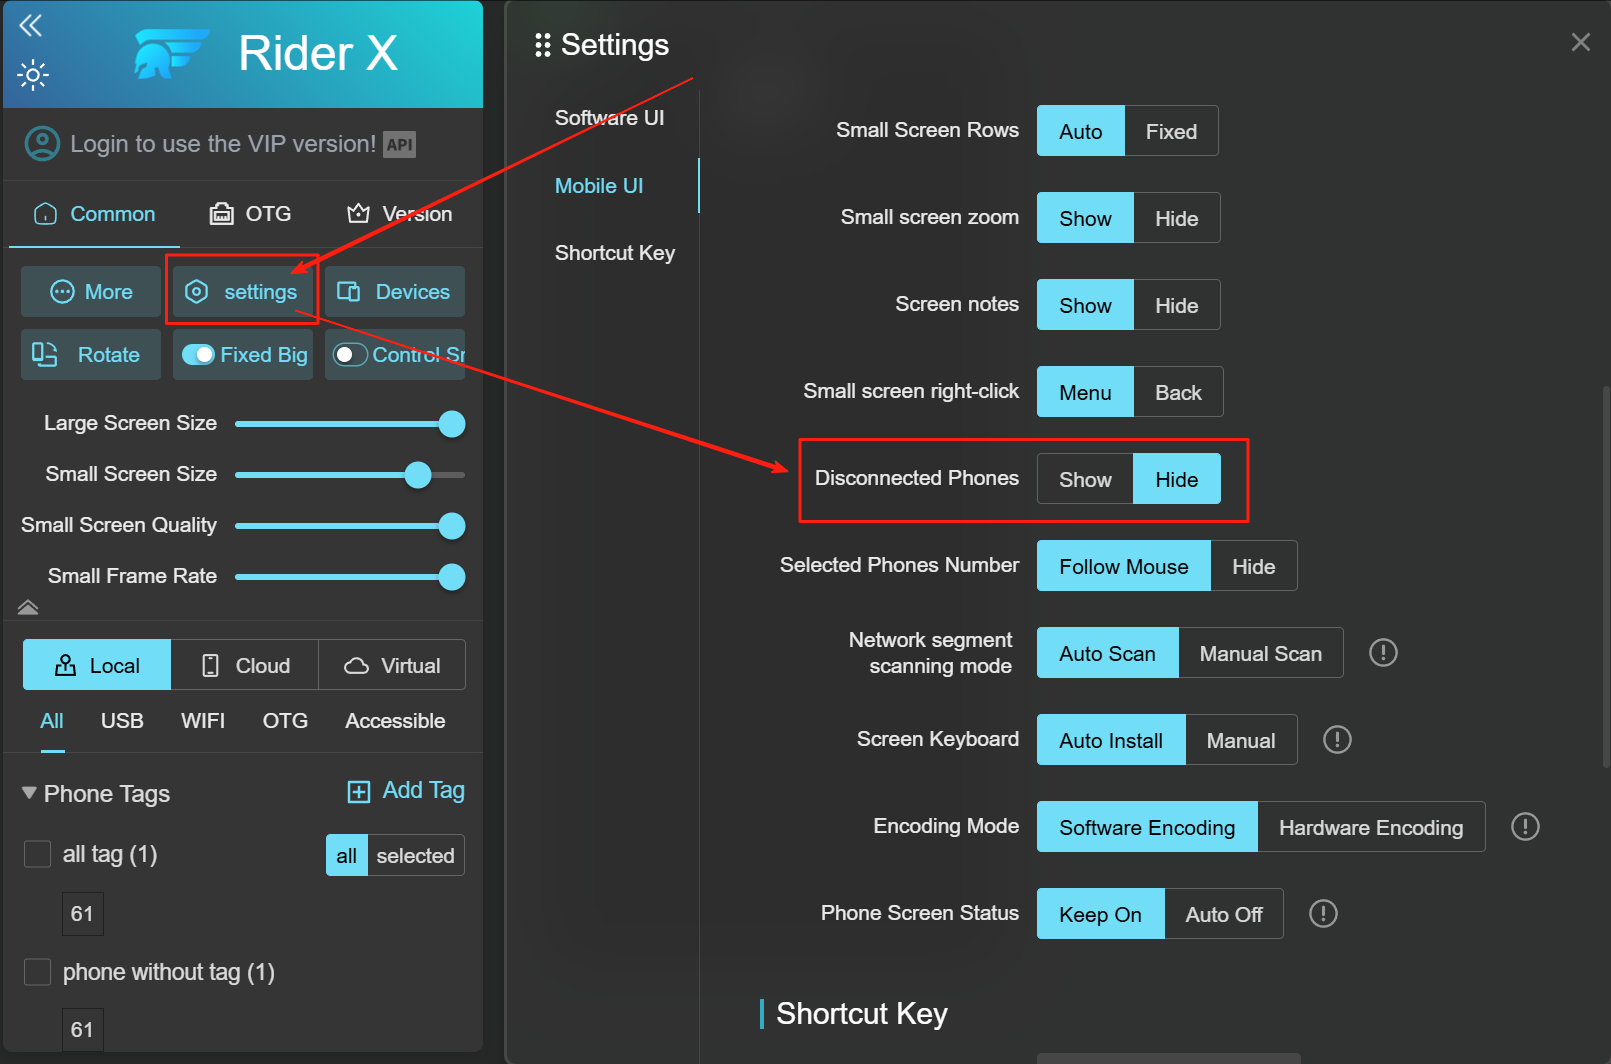
How to Hide Disconnected Phones?
- Click "System Settings".
- Find the "Disconnected Phones" option and choose Show/Hide.
How to Hide the Number of Selected Phones Following the Mouse?
- Click "System Settings".
- In the pop-up window, locate the "Selected Phones Count" option and choose "Follow Mouse" or "Hide".

How to Switch Between Automatic and Manual Scanning?
- Click "System Settings".
- In the pop-up,
find "IP Scan Mode" and choose "Auto" or "Manual". Restart the software for changes to take
effect.
Mode Explanation:
(1) Auto Scan: Devices in OTG or WiFi mode will automatically reconnect upon restarting.
(2) Manual Scan: Requires manual IP scanning to reconnect devices after restart.

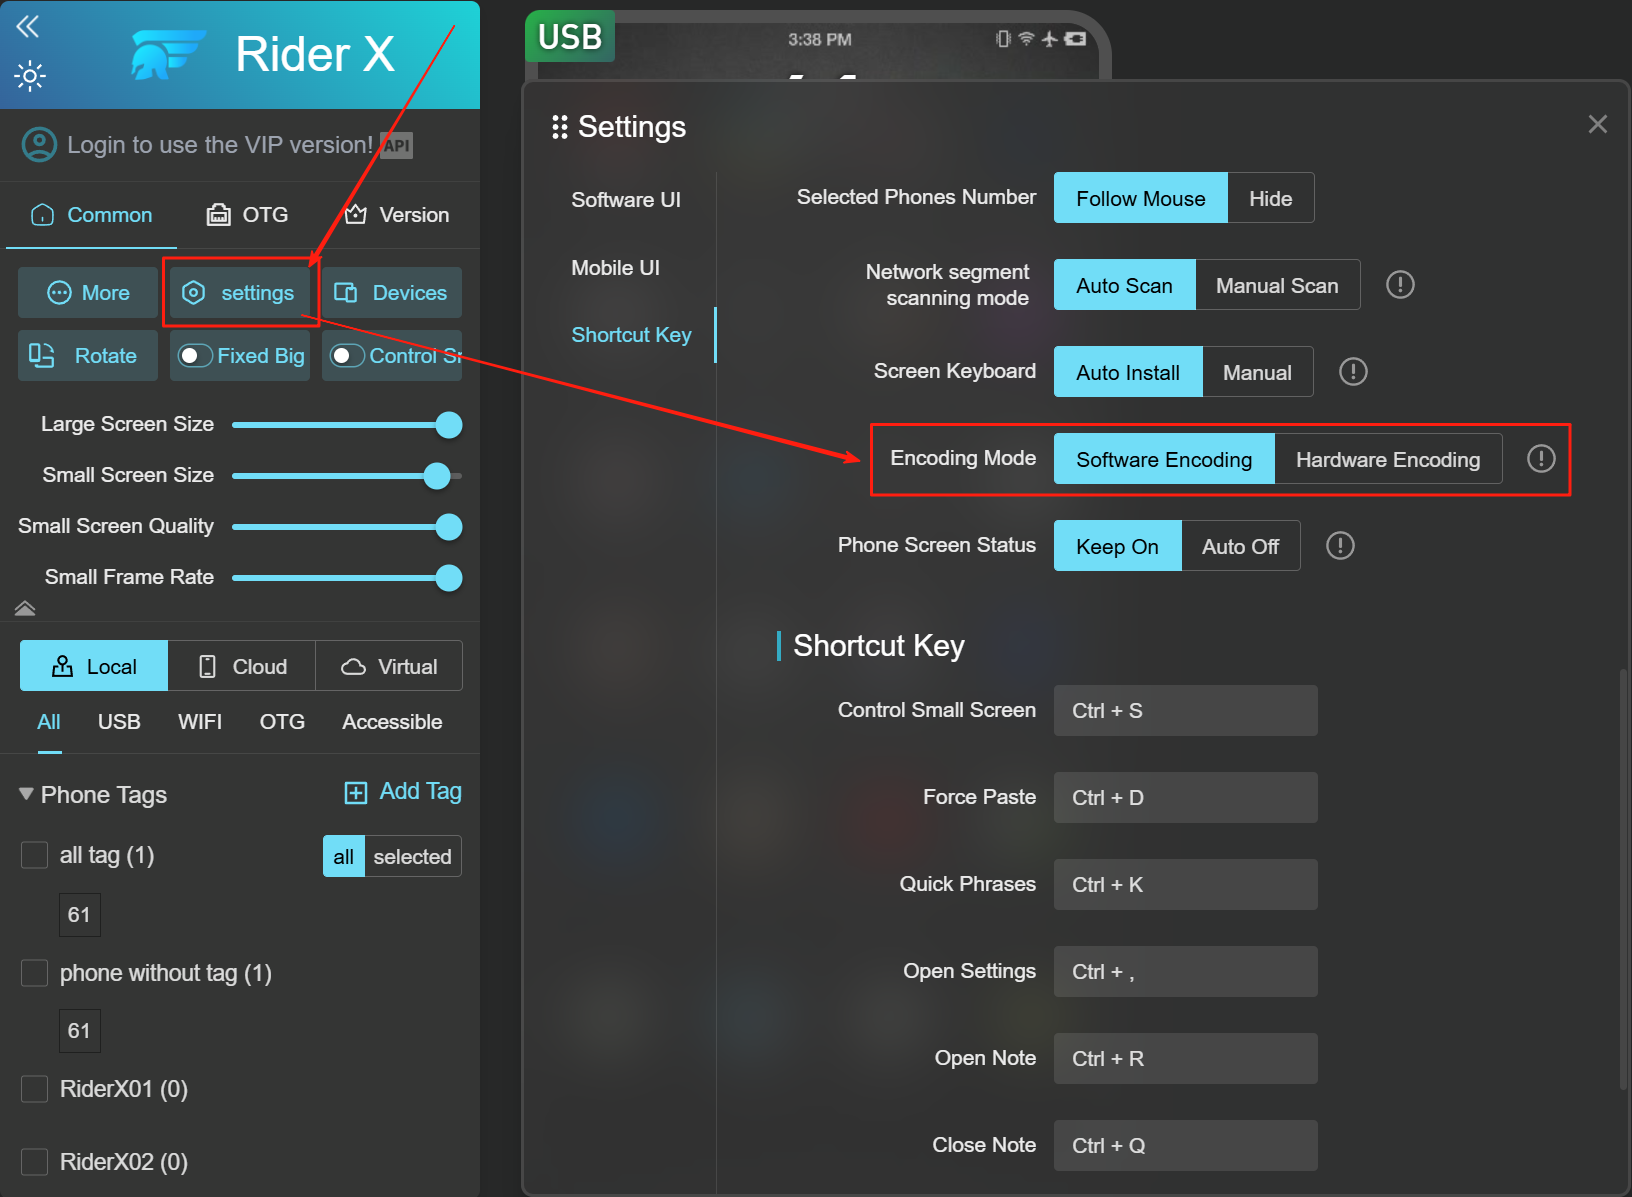
How to Switch the Projection Encoding Method?
- Click "System Settings".
- In the pop-up, find "Encoding Mode" and choose either Software Encoding or Hardware Encoding. Restart the software for changes to apply.
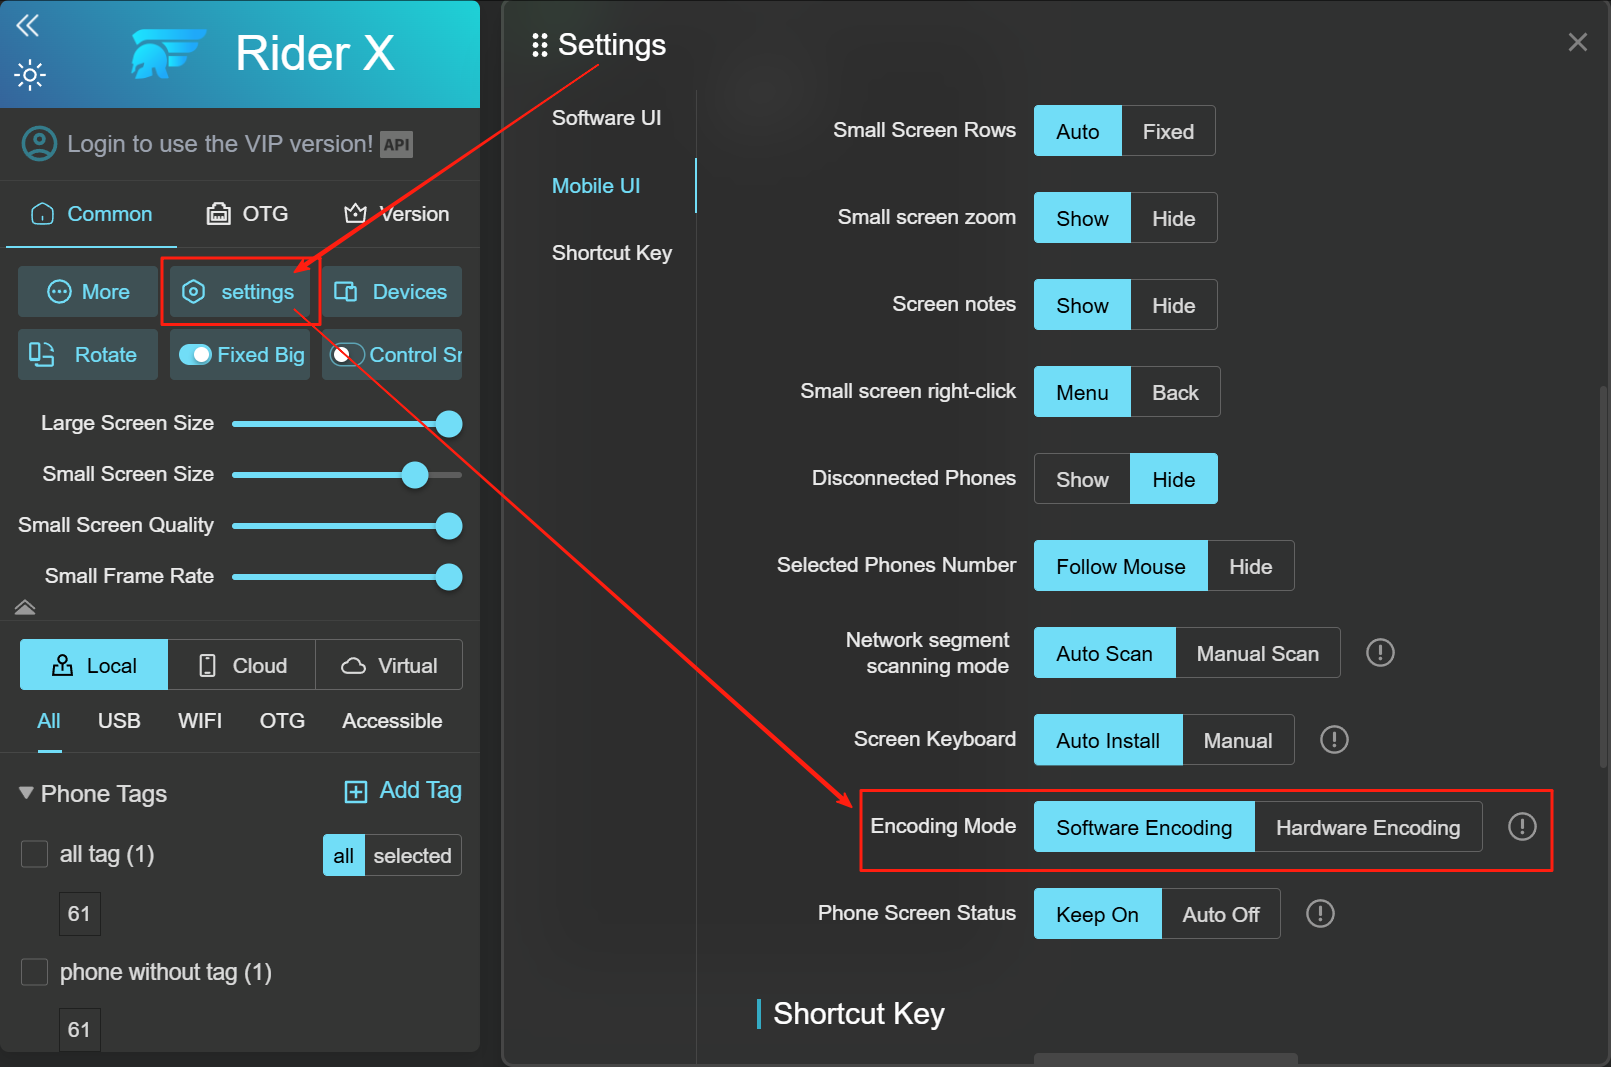
Note: If projection fails, try switching between the two encoding modes.
How to Open the Hotkey Directory?
Click the first icon in Figure to open hotkey information.
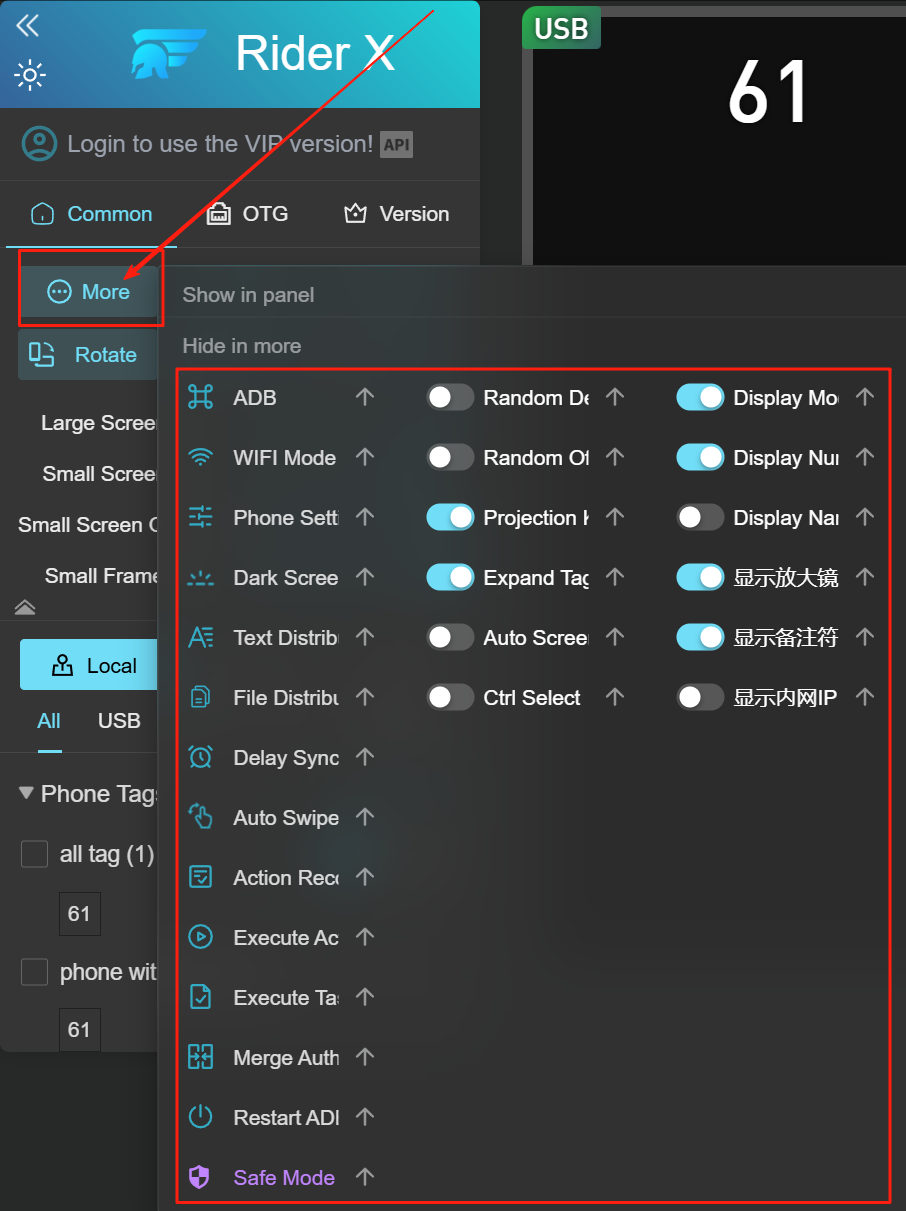
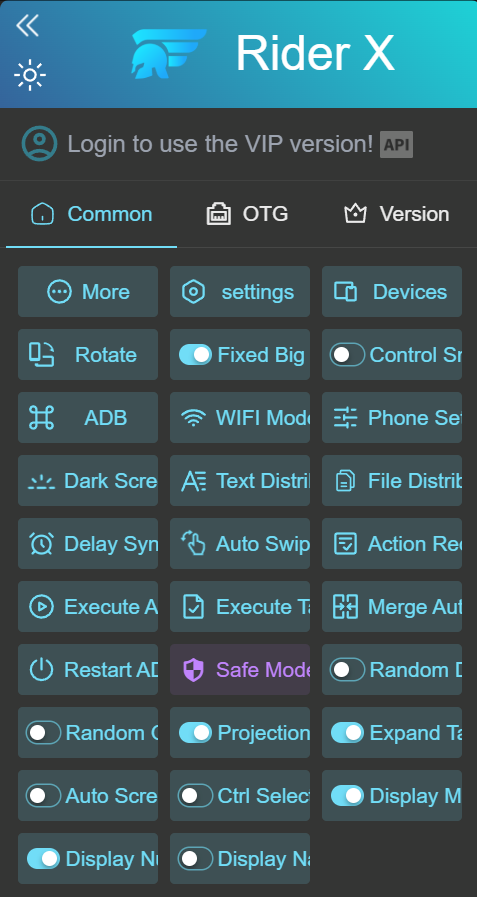
How to Hide Buttons from the “More Functions” Menu?
- Hover over the “More Functions” area to display the popup.
- Left-click on the arrow in the red box to move the selected function to the control panel.
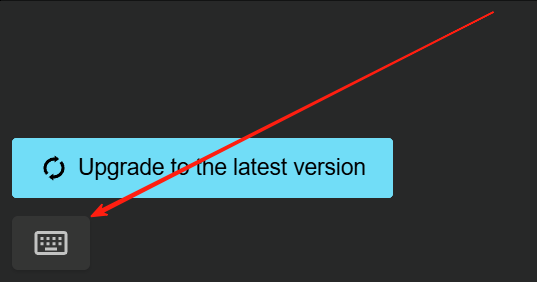
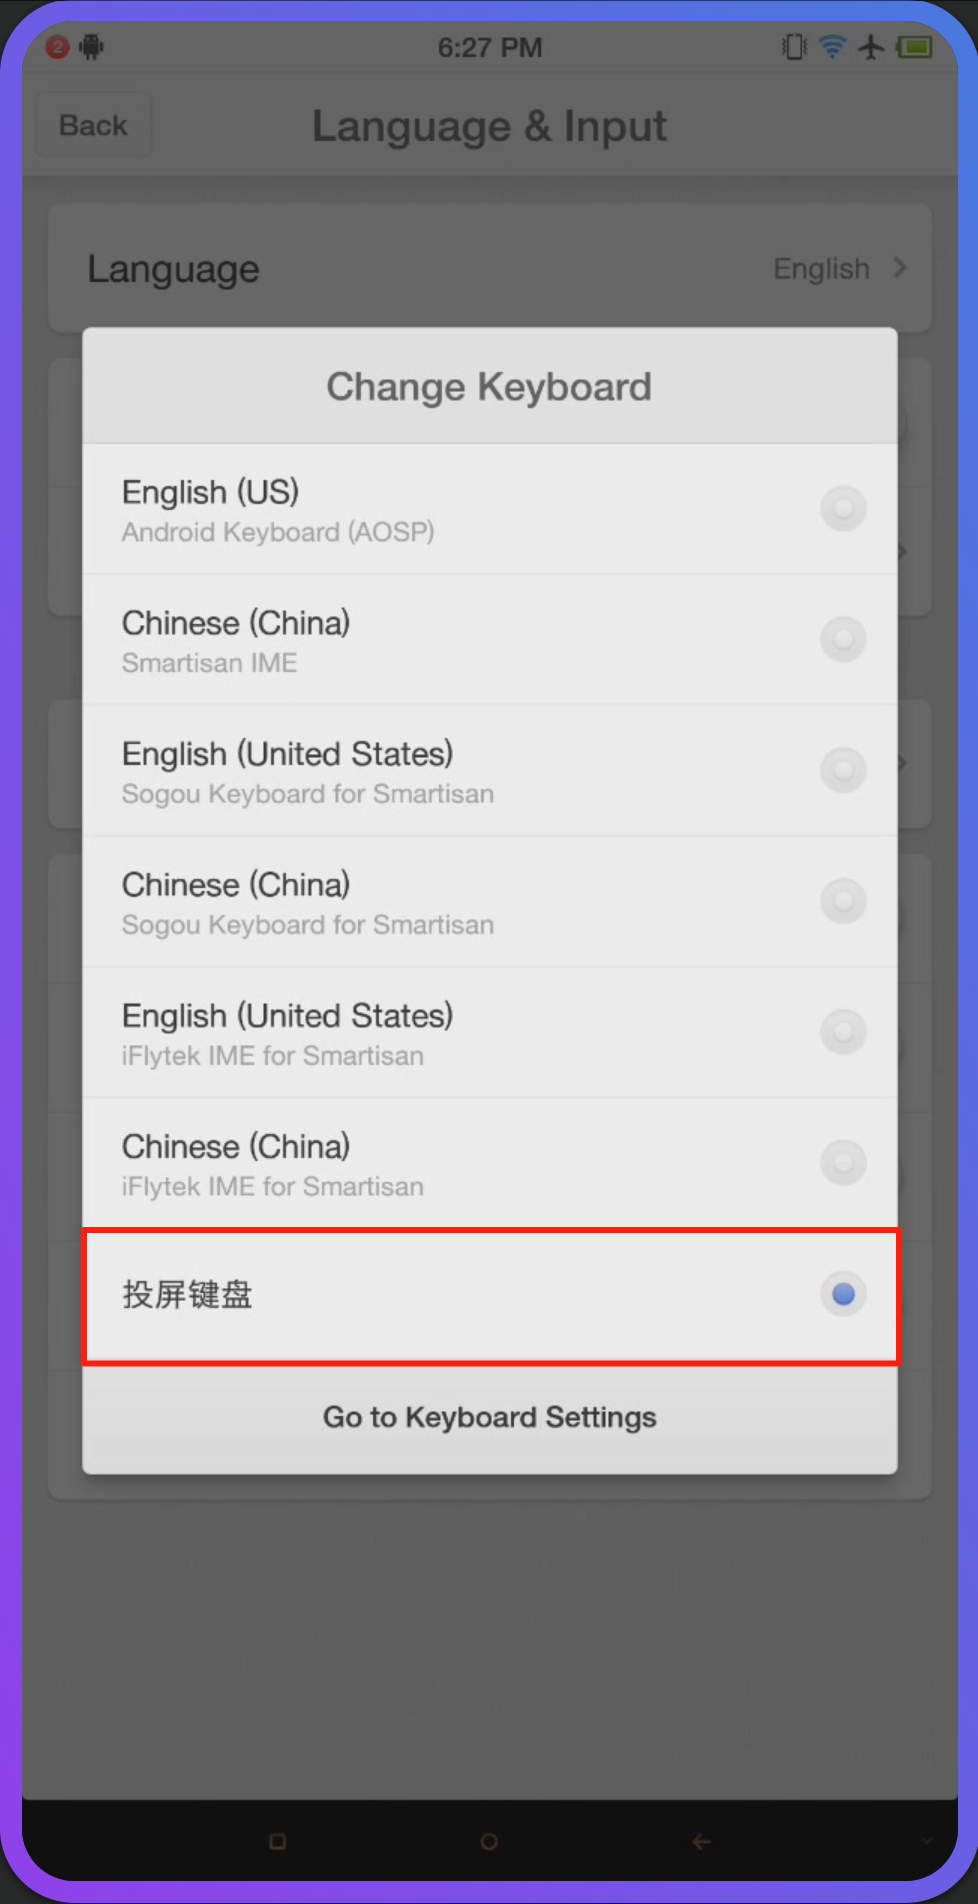
What to Do If You Can’t Type?
- Check whether the "Projection Keyboard" is installed and enabled (see figure for demo).
- If not installed, click "Install Projection Keyboard".
- Then click "Switch to Projection Keyboard" to enable typing and clipboard functions.
If it still doesn’t work, contact technical support.
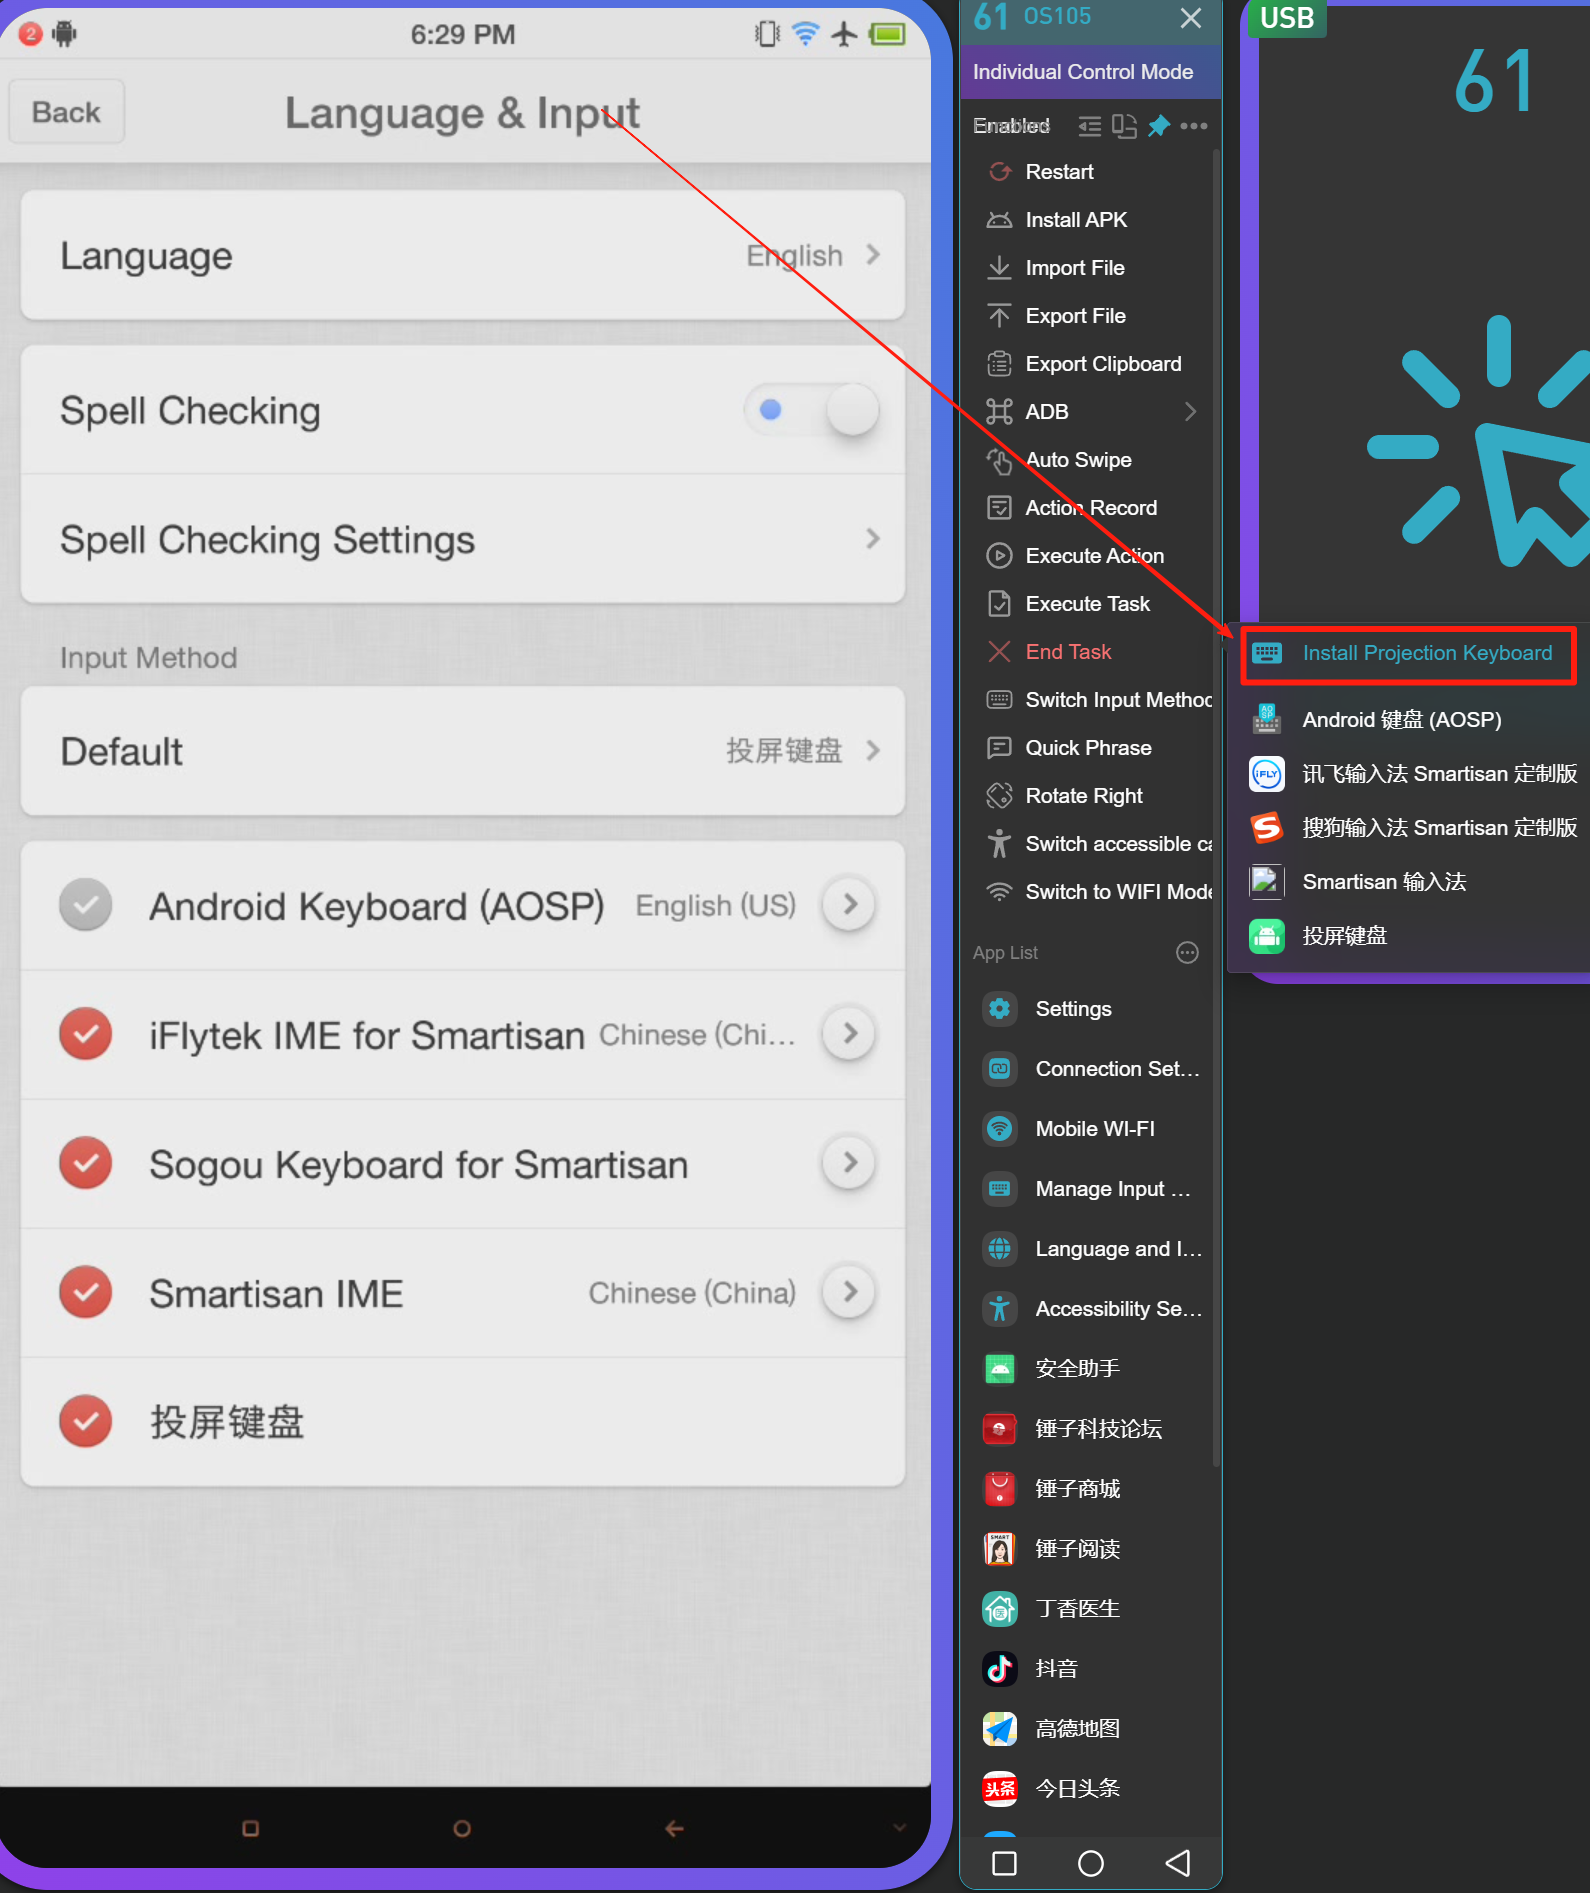
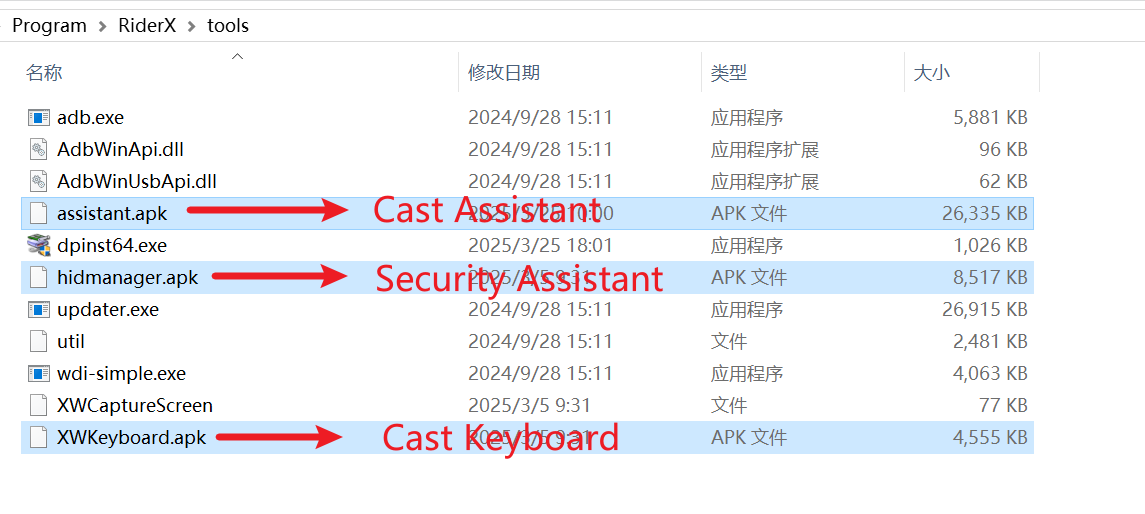
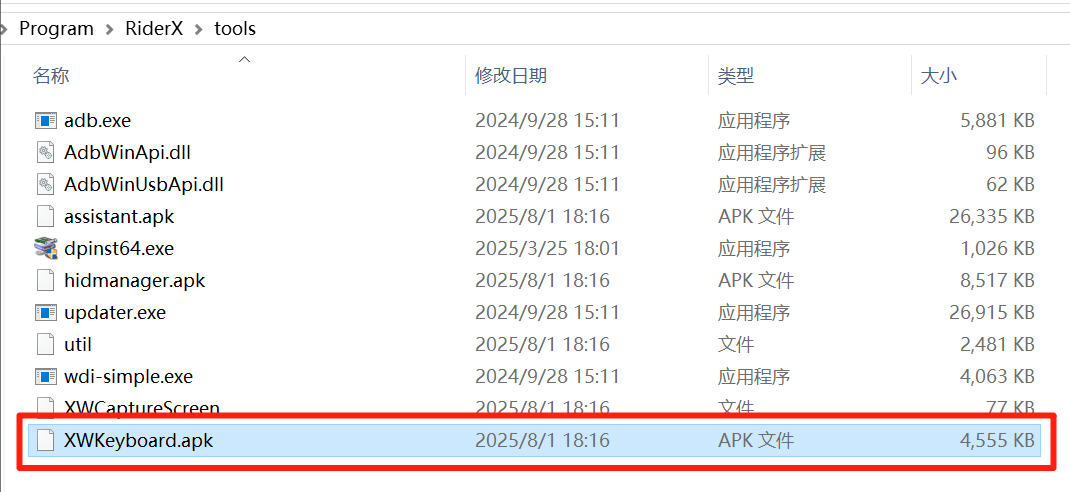
Where Is the Projection Keyboard APK Located?
Path: C:\Program Files (x86)\RiderX\tools\XWKeyboard.apk
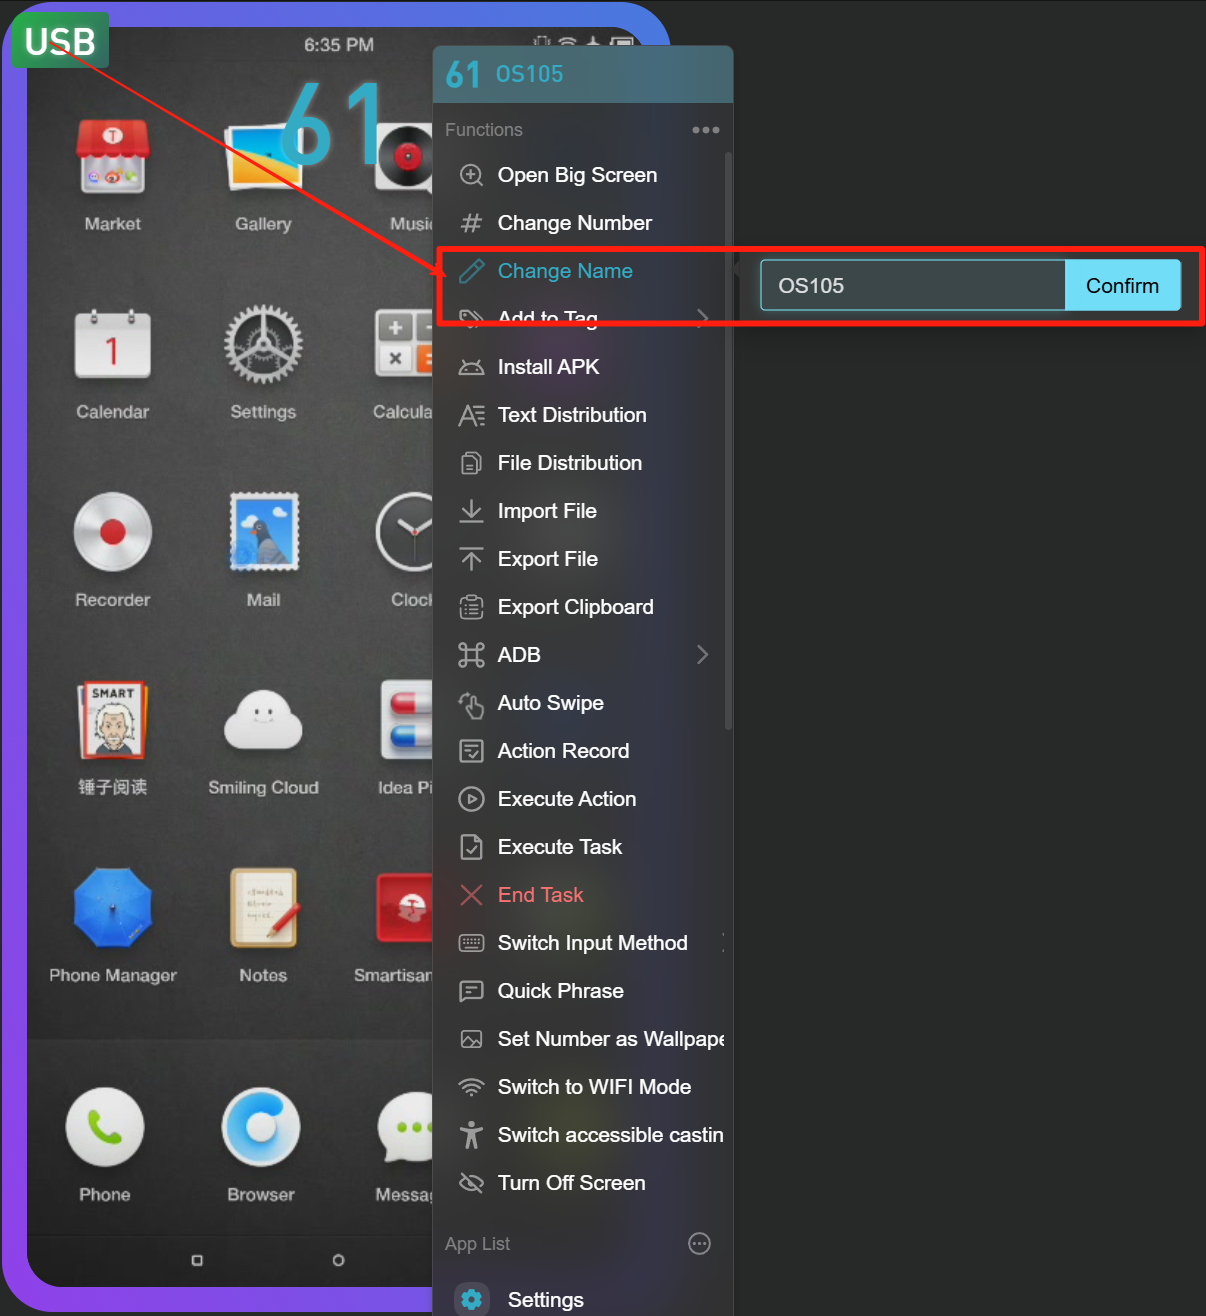
How to Modify Phone Number and Name?
Steps:
- Right-click a phone screen to open the popup (Figure 1).
- Click "Edit Number" or "Edit Name" (Figure 2).
- Enter the new
number or name and click Confirm.
Note:
Modifying the number changes the screen layout order.
Phones are arranged in ascending order of numbers.

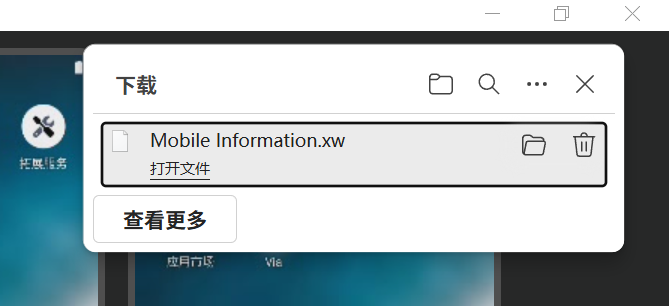
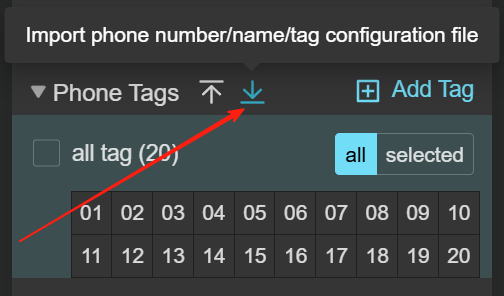
How to Import/Export Phone Number and Name Info?
- Hover over a phone label; "Export" and "Import" buttons will appear (Figure 1).
- Click Export to save the data to C:\Users\Administrator\Downloads, file name: Mobile Information.xw (Figure 2).
- Click Import to select and load a previously exported .xw file.

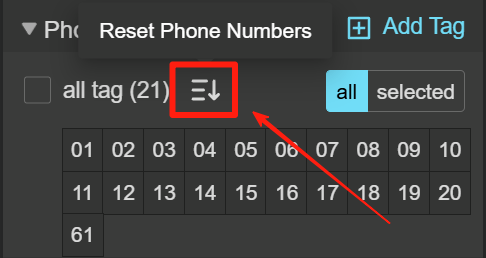
How to Reset All Phone Numbers with One Click?
- Hover over the “All Phones” tab; the reset button will appear (Figure 1).
- Click it to reset all phone numbers starting from 1 in sequence.
How to View Only the Devices in a Specific Group?
- Hover over the group name to reveal the eye icon.
- Click the eye icon to view only that group's devices. You can repeat for multiple tabs.
- Double-clicking the group name also shows only that group's devices.

How to Reorder Group Tags?
- Hover over the group name to reveal six dots.
- Drag the icon to move the group up or down.

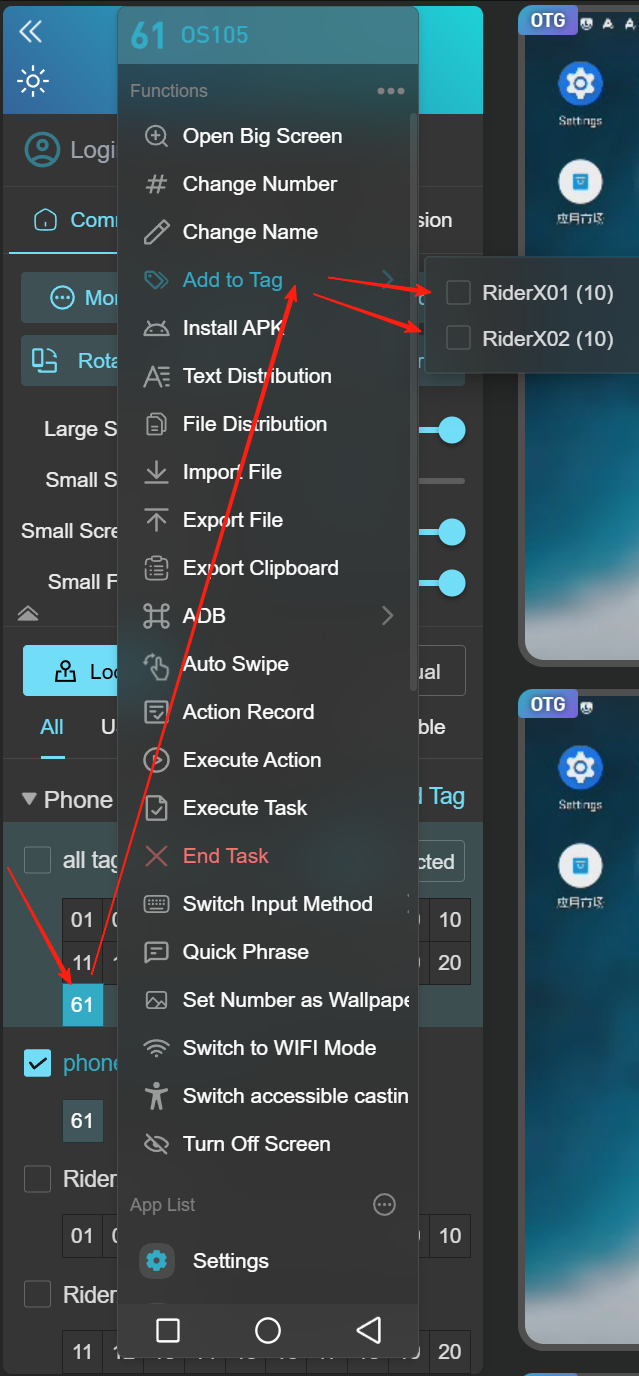
How to Move Devices to a Group?
- Select the devices, right-click to open the popup.
- Click "Add to Tag" to proceed.
-
Check the desired groups to move devices into them.
Note: Devices can belong to multiple groups.
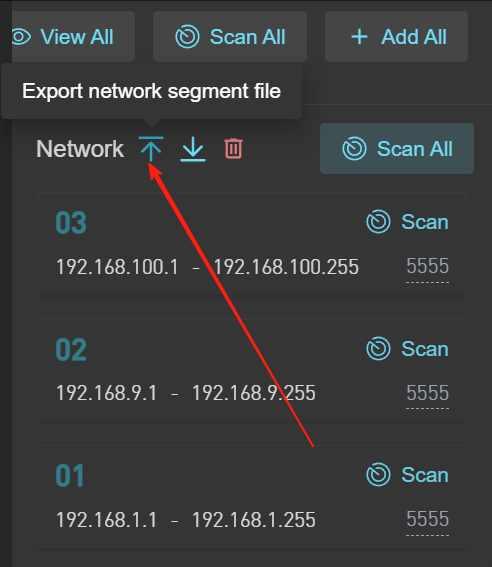
How to Import/Export/Delete IP Segments?
- Click on OTG Settings.
- Hover over the "IP Segment Management" area; buttons for import, export, and delete will appear (Figure 1).
- IP files (Figure 2) can include single IPs or IP ranges, and should match the export format.
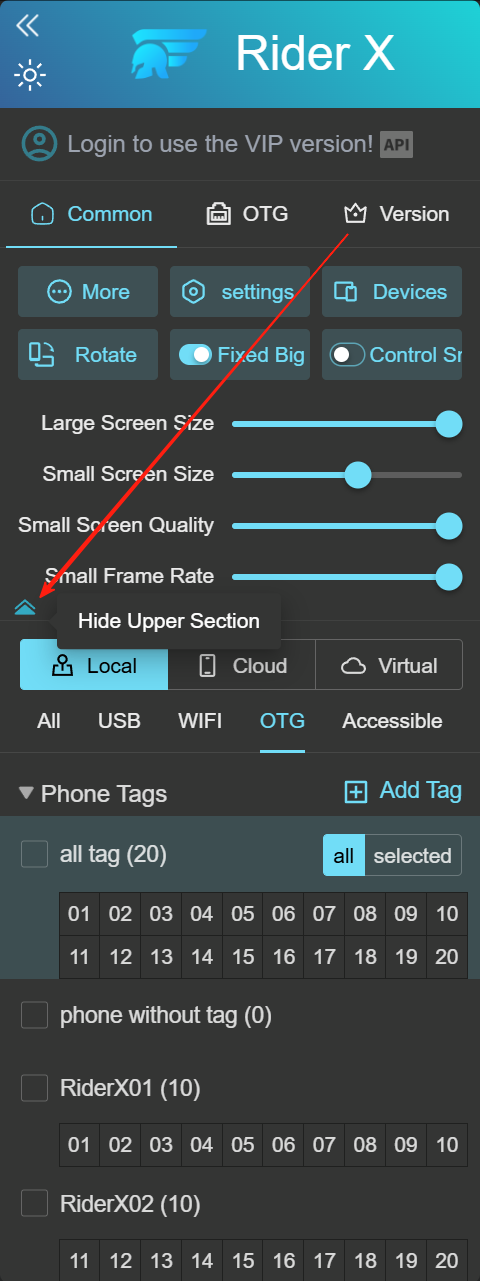
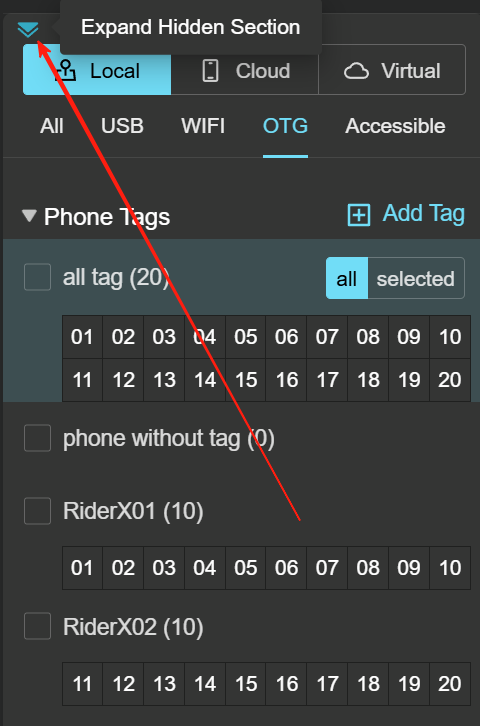
How to Hide the Function Area on the Control Panel?
- Click the "Hide Function Area" button (Figure 1) to hide the top section of the panel.
- The result is shown in Figure 2.
-
Click the expand button (Figure 2) to show it again.
Note: Hiding the function area allows more room for displaying groups.
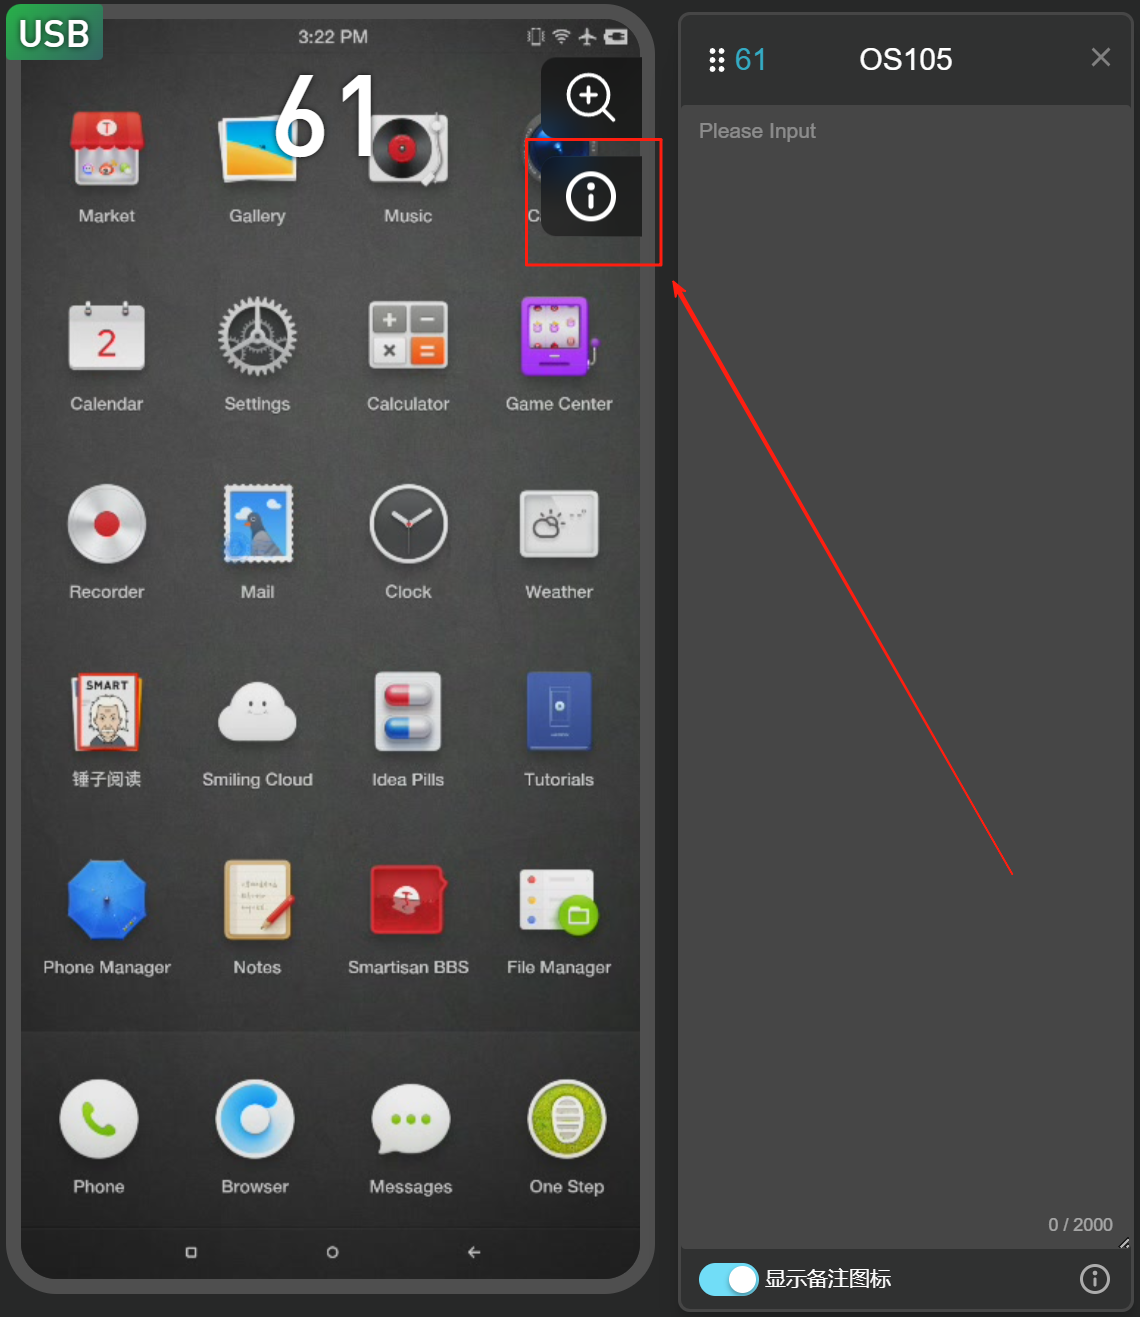
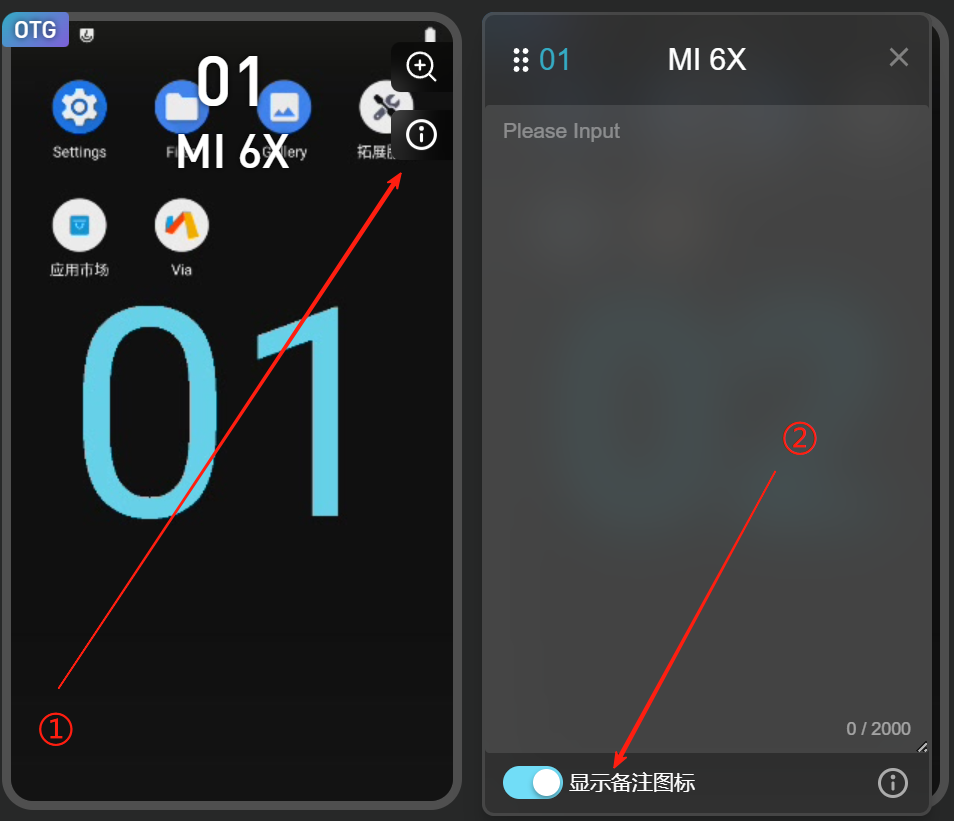
How to Add Notes to a Phone?
- Hover over the phone screen to show the note icon.
- Click the icon to open the notes field.
- Use shortcut keys:
(1) Ctrl+R: open note for selected phone
(2) Ctrl+Q: close all notes
Note: Notes are stored locally and can be backed up with group data.
How to Hide the Note Icon on the Phone Screen?
- Open "System Settings" and click.
- In the popup, find the "Note Box" option and choose Hide.
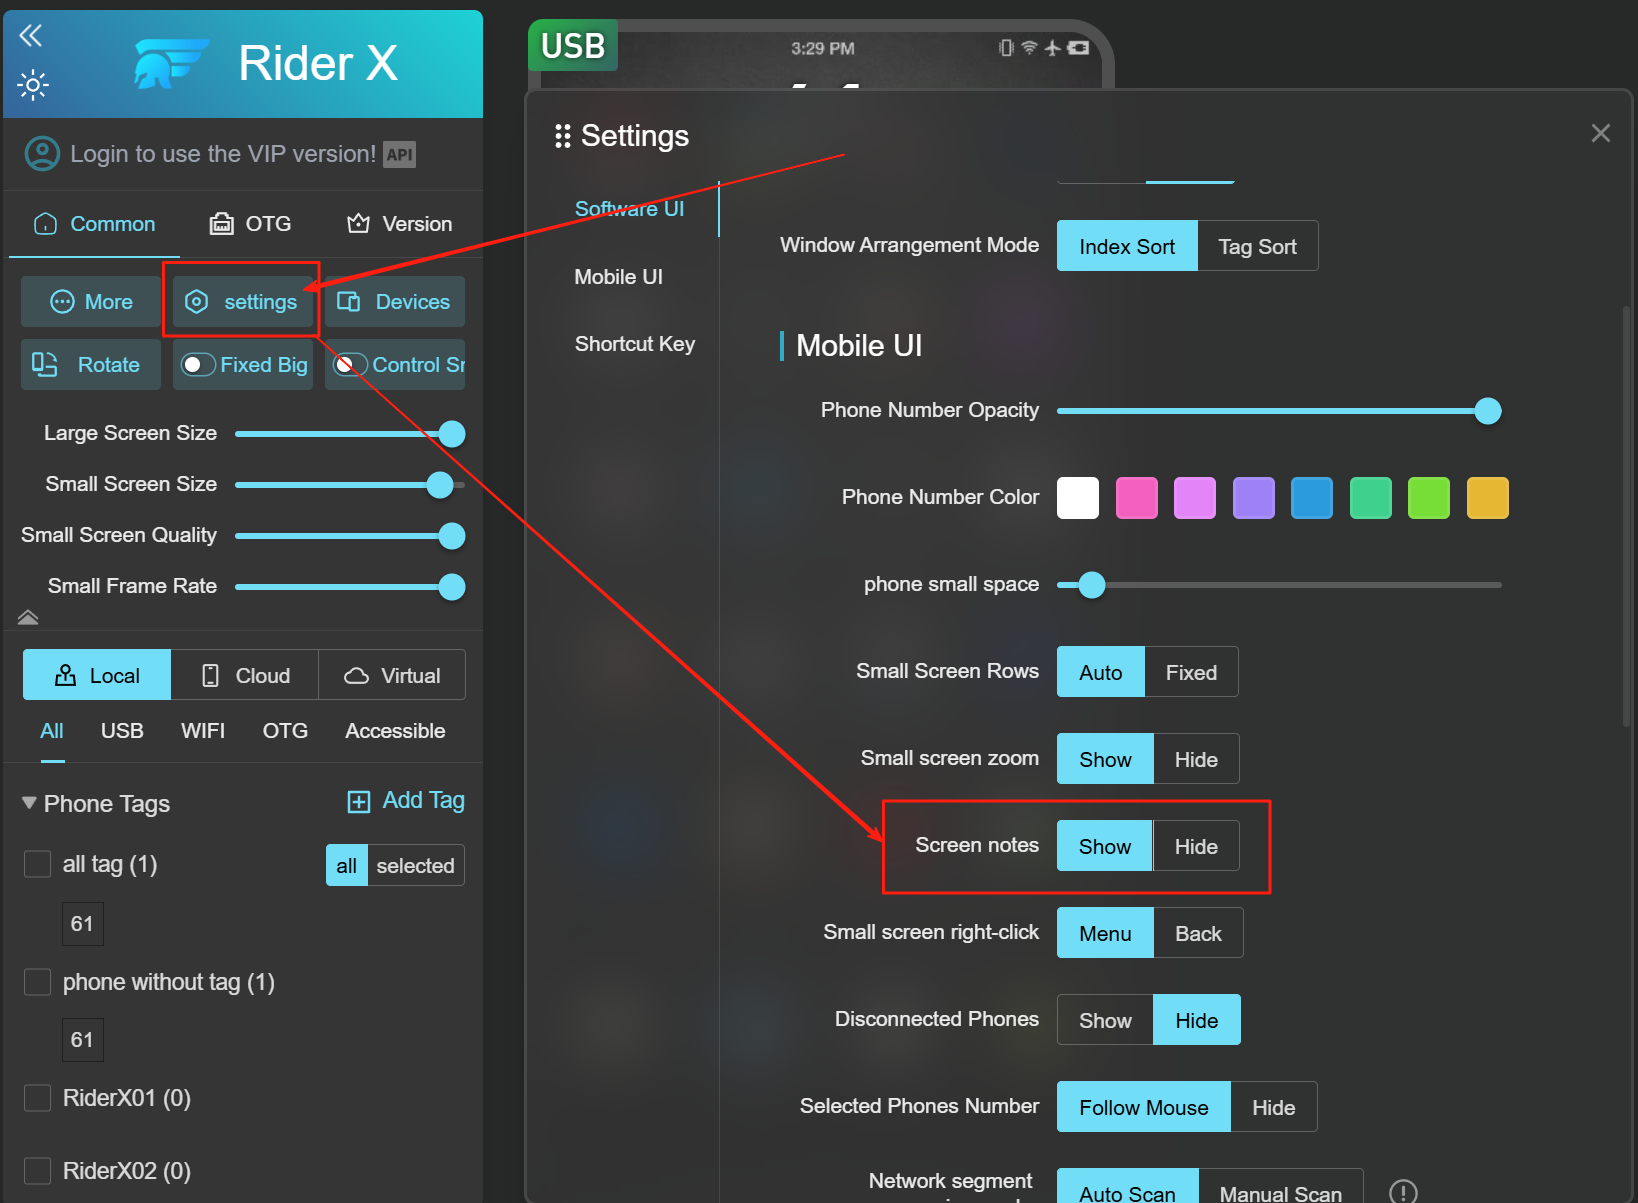
Note: When hidden, only hotkeys (Ctrl+R, Ctrl+Q) can control notes.
How to Disable Auto-Install of the Projection Keyboard?
- Go to "System Settings".
-
In the popup, find "Install Projection Keyboard" and set to Manual.
Note: Without the keyboard, screen operations work, but you can’t input text or paste from PC.
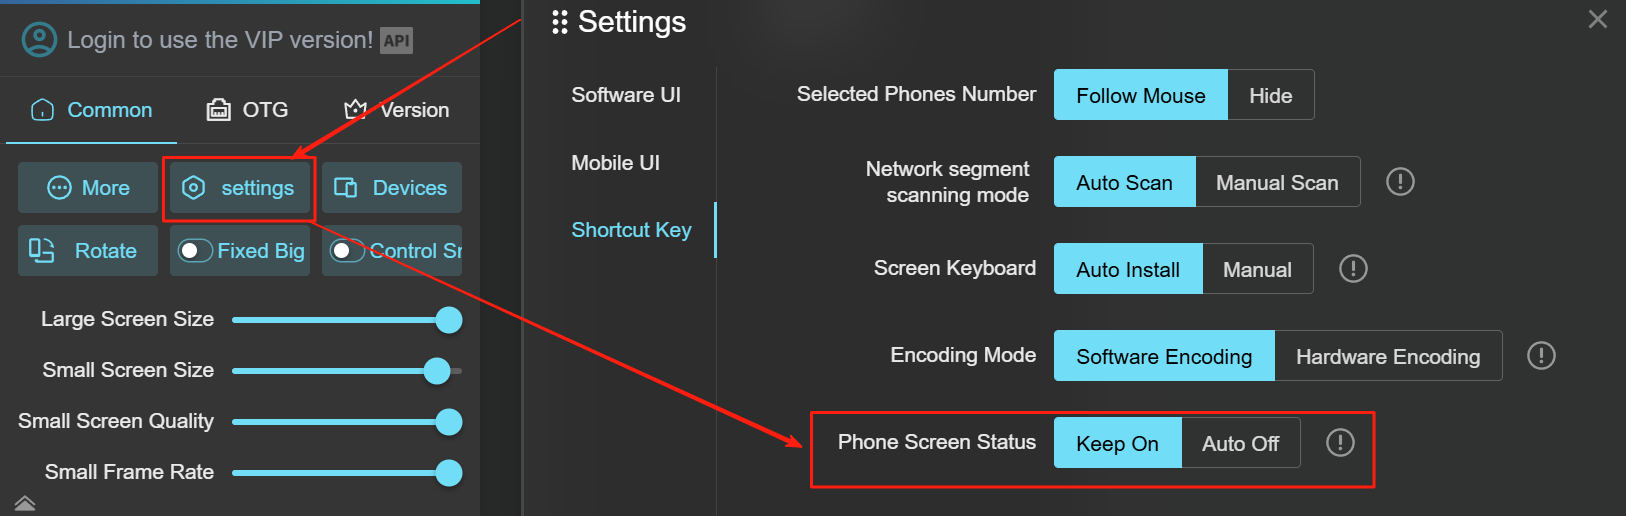
How to Keep the Phone Screen Always On?
- Go to "System Settings".
- Find "Phone Screen State" and click "Keep On".
- Restart the client to apply changes.
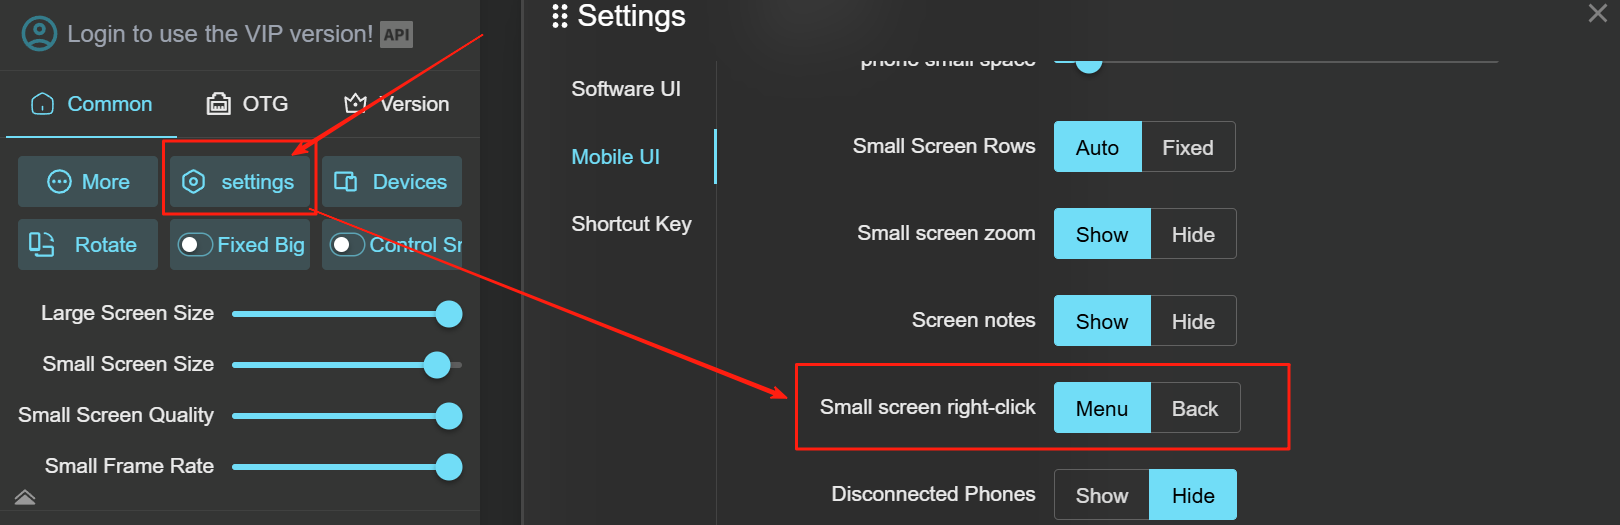
How to Set Right-Click to Return During Small Screen Control?
- Go to "System Settings".
- Find the "small screen right-click" option and select "Back".
How to Sort Screens by Label Groups?
- Click "System Settings", open the settings window.
- find "Screen Sorting Mode" and select "Group Sorting".

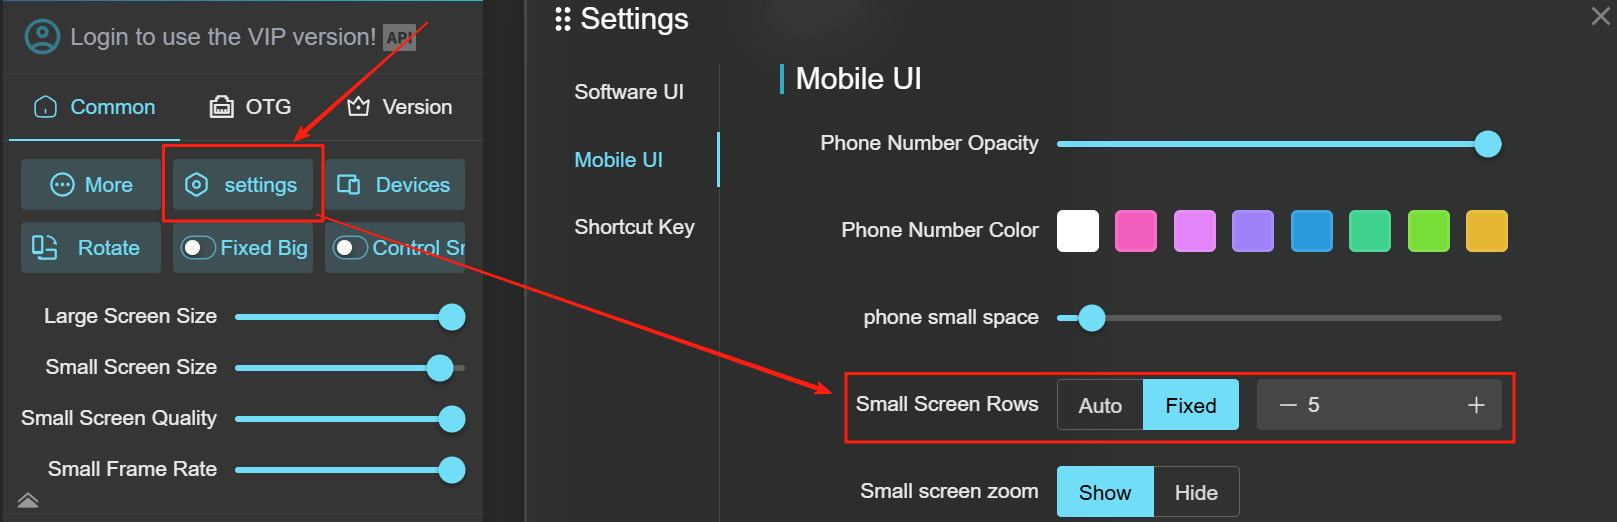
How to Customize the Number of Screens per Row on PC?
- Click "System Settings", open settings.
- find "Small Screen Rows", click "Fixed" .
- enter the number of screens per row.
5. Phone Control
This chapter primarily introduces screen-related functions within the software.
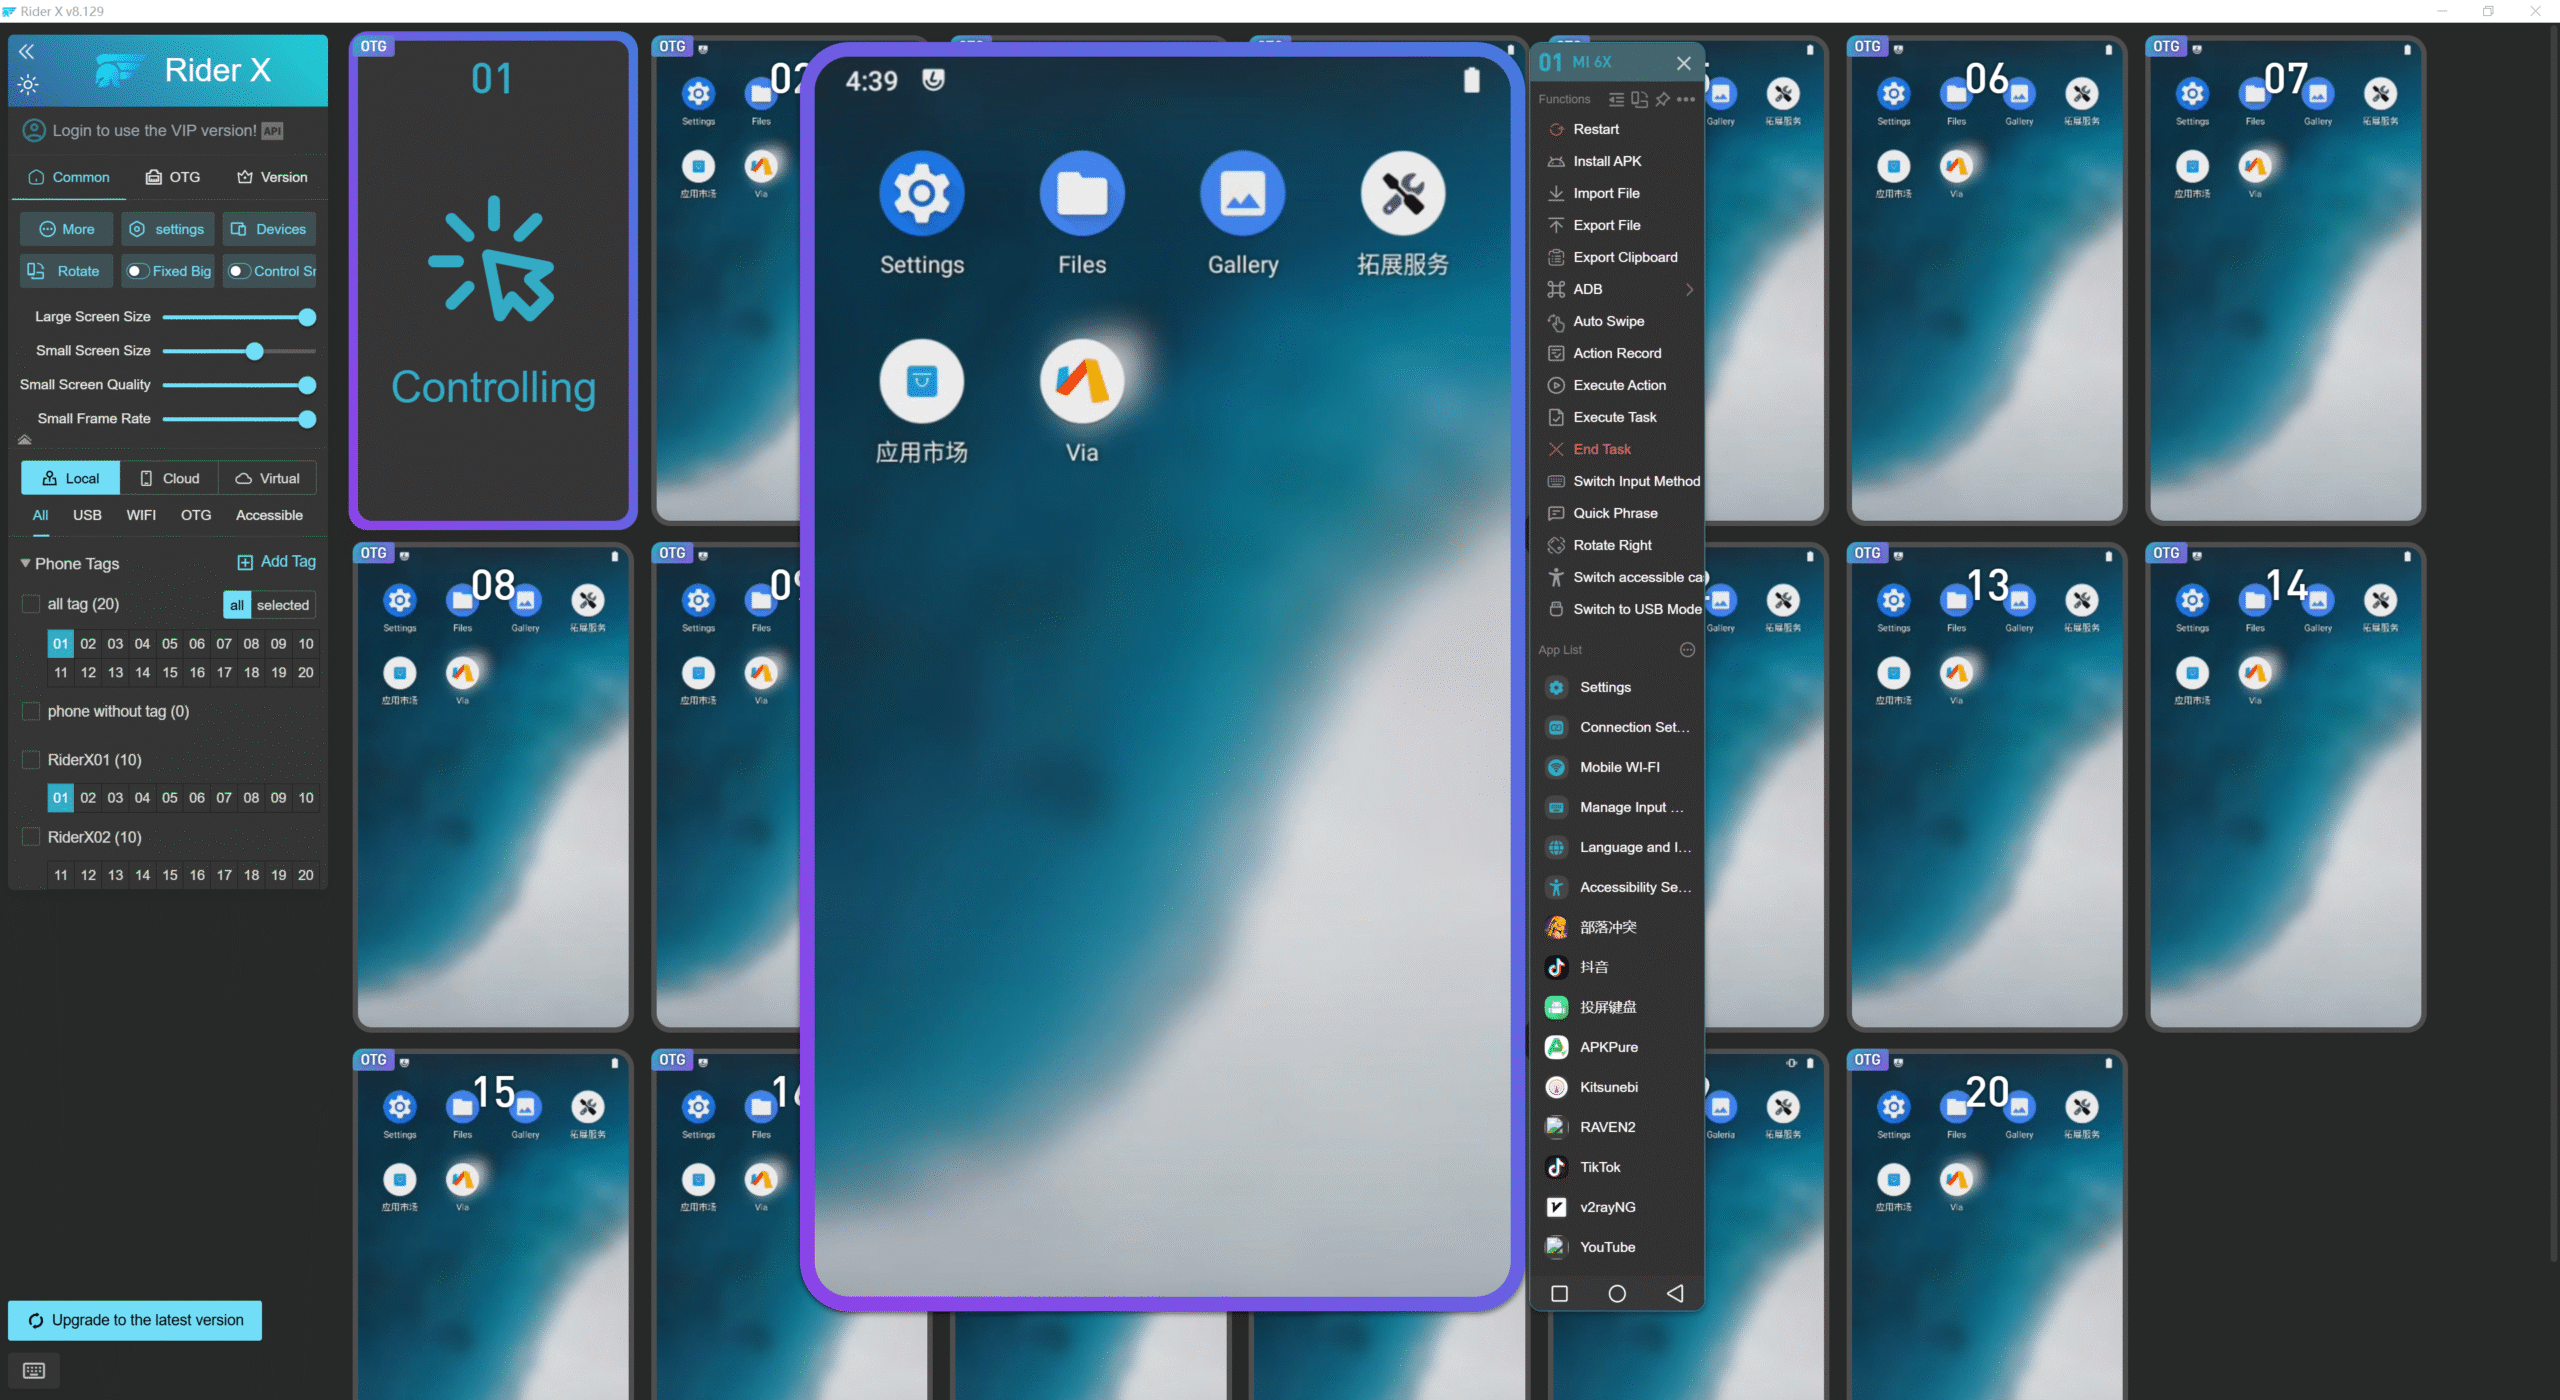
How to Perform Single Control and Group Control?
- When in single control mode, simply double-click a small screen with your mouse to enlarge it, as shown in Figure 1.
- You can then operate the corresponding phone by using your mouse on the enlarged screen.
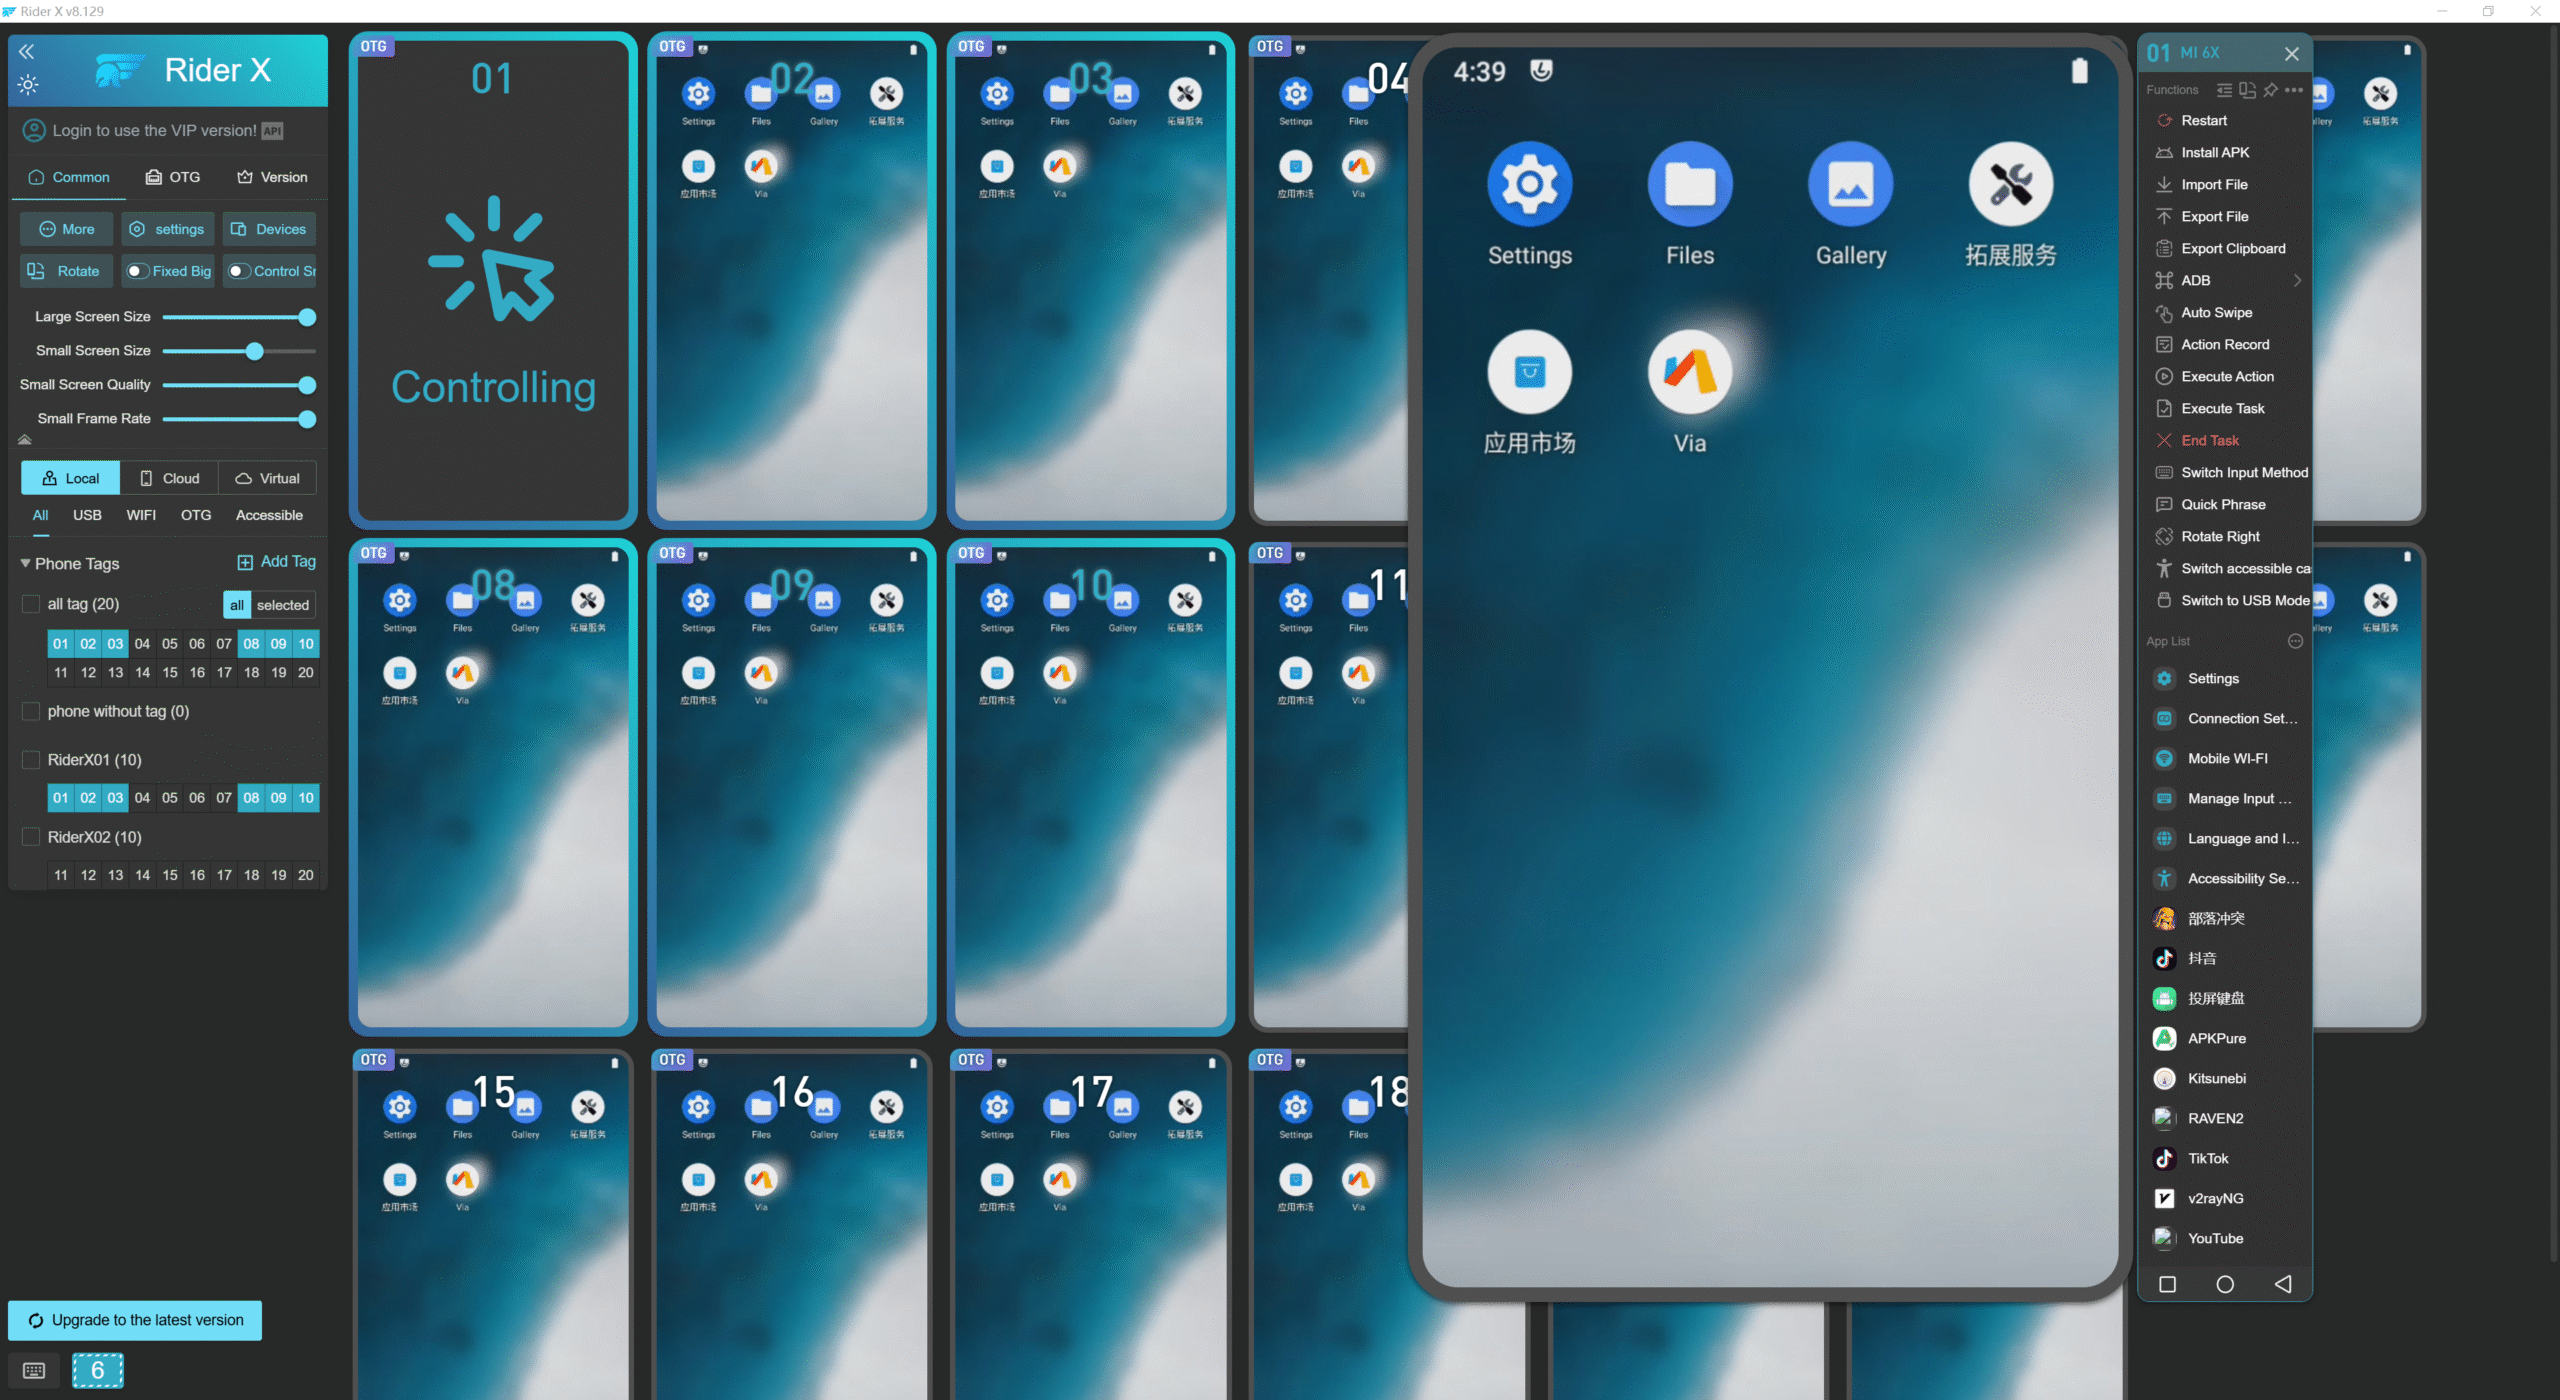
- When in group control mode, click to select multiple devices by single-clicking on their small screens, as shown in Figure 2.
- Double-click any one of the selected small screens to enlarge it.
- Now, any operation performed on the enlarged screen will be synchronized across all the selected devices.
How to Operate via Small Screen?
Enable small screen control from the menu bar.
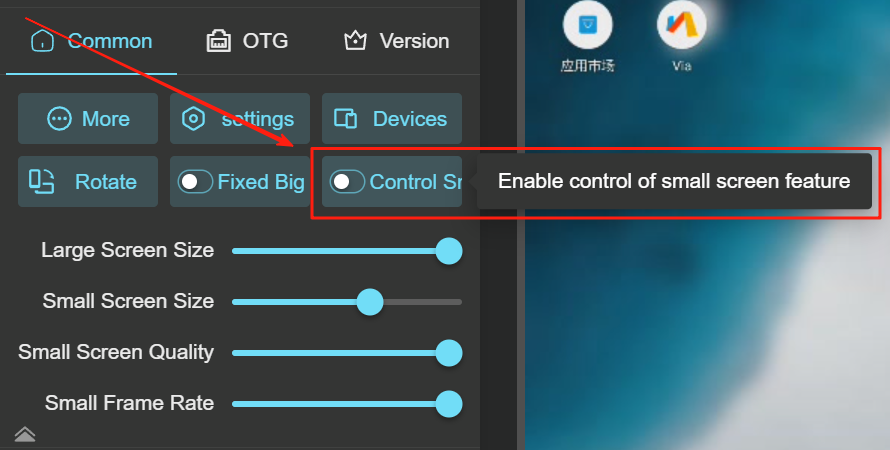
Note:While small screen control is enabled, double-clicking a small screen will not enlarge it. To enlarge, you need to right-click to open the large screen or click the magnifier icon on the
How to Close a Mirrored Device?
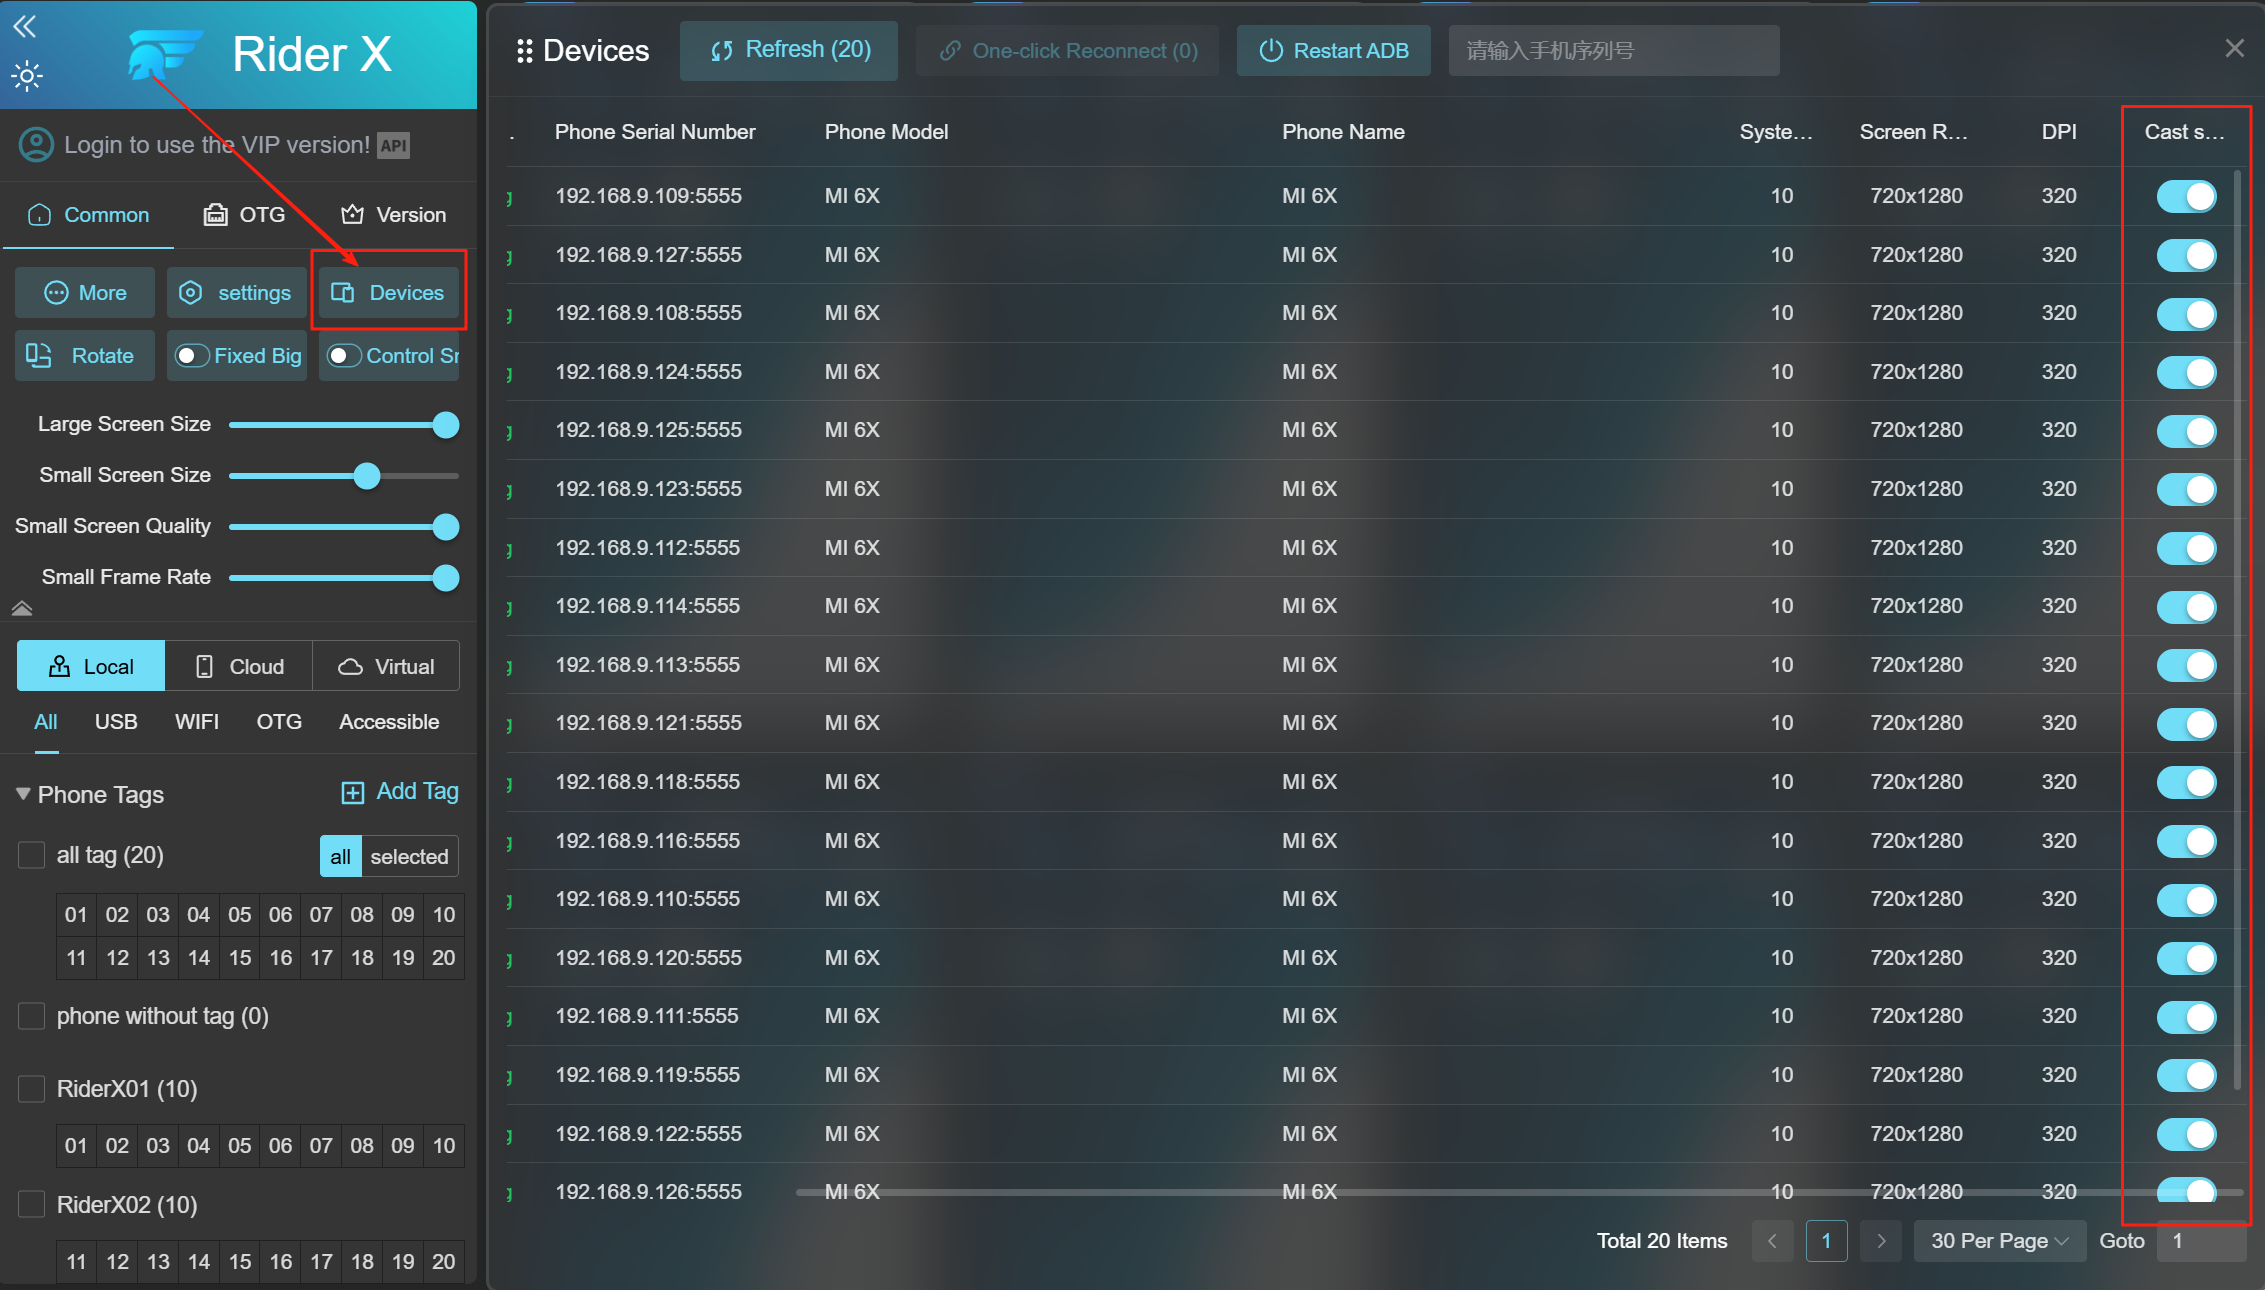
- Click on “Devices” from the menu bar.
- In the pop-up Devices window, you can enable or disable the desired phone windows.
How to Turn Off the Phone Screen with One Click?
Hover over "More" and click “Dark Scree”.

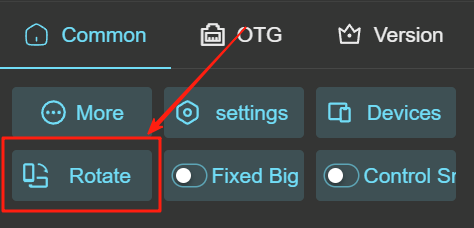
How to Rotate a Small Screen?
Hover over "More Functions" and click "Rotate Small Screen".
How to Show or Hide Phone ID, Name, IP, and Mode?
- Click on “More” from the menu bar.
- Enable or disable the corresponding features.
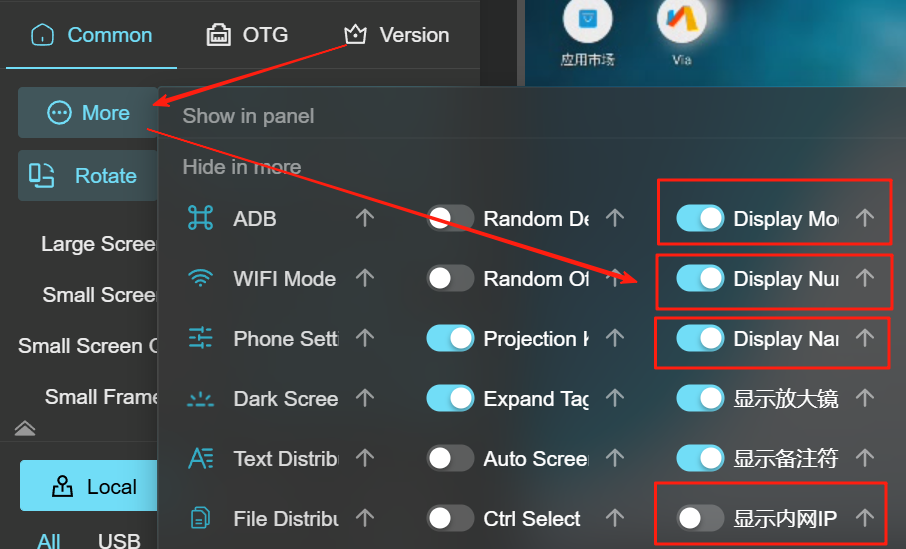
You may turn them off if they interfere with visibility.
How to Adjust Small Screen Size, Quality, and Frame Rate?
- As shown in Figure 1, drag the slider with your mouse to adjust the small screen’s size, image quality, and frame rate.
- You can also use the shortcut Ctrl + Mouse Scroll Wheel to adjust the small screen size.
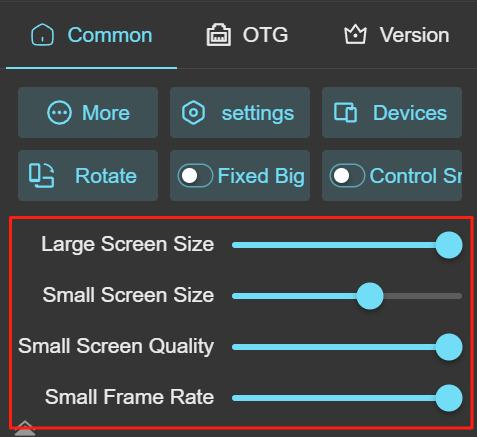
Note:
- The higher the frame rate of the small screen, the more demanding it is on your computer performance and network stability. If you experience lag while operating the phone screen, try lowering the frame rate to the minimum.
- If the small screen appears blurry, you can try increasing its size for better clarity.
How to Pin the Large Screen?
Click the "Pin" icon to dock the large screen to the left of the control panel.
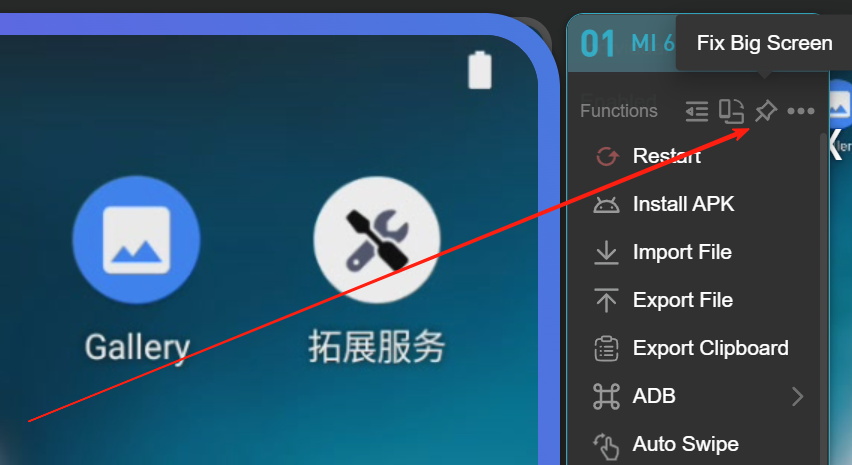
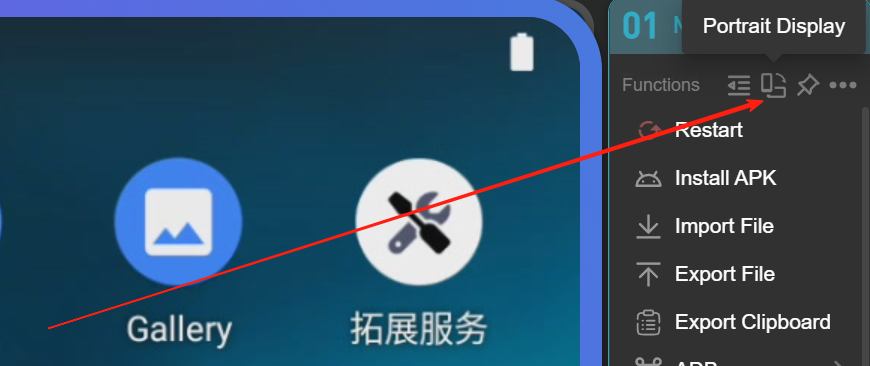
How to Switch the Large Screen to Landscape Mode?
Click the portrait icon to change the orientation to landscape.
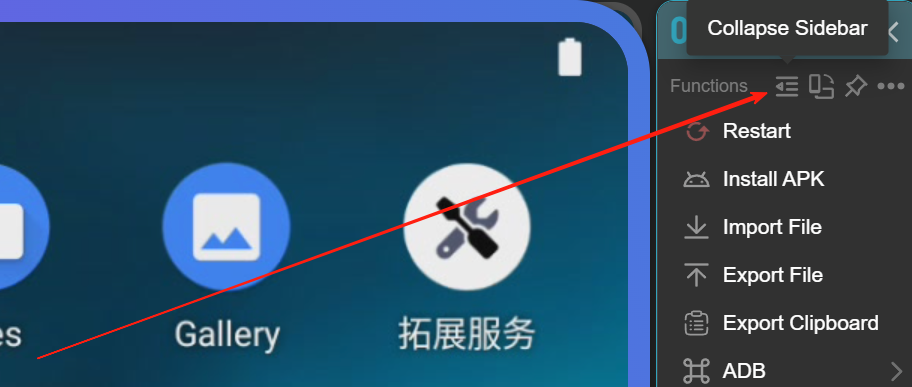
How to Hide the Large Screen Control Bar?
Click "Collapse Sidebar" to hide the large screen control bar.
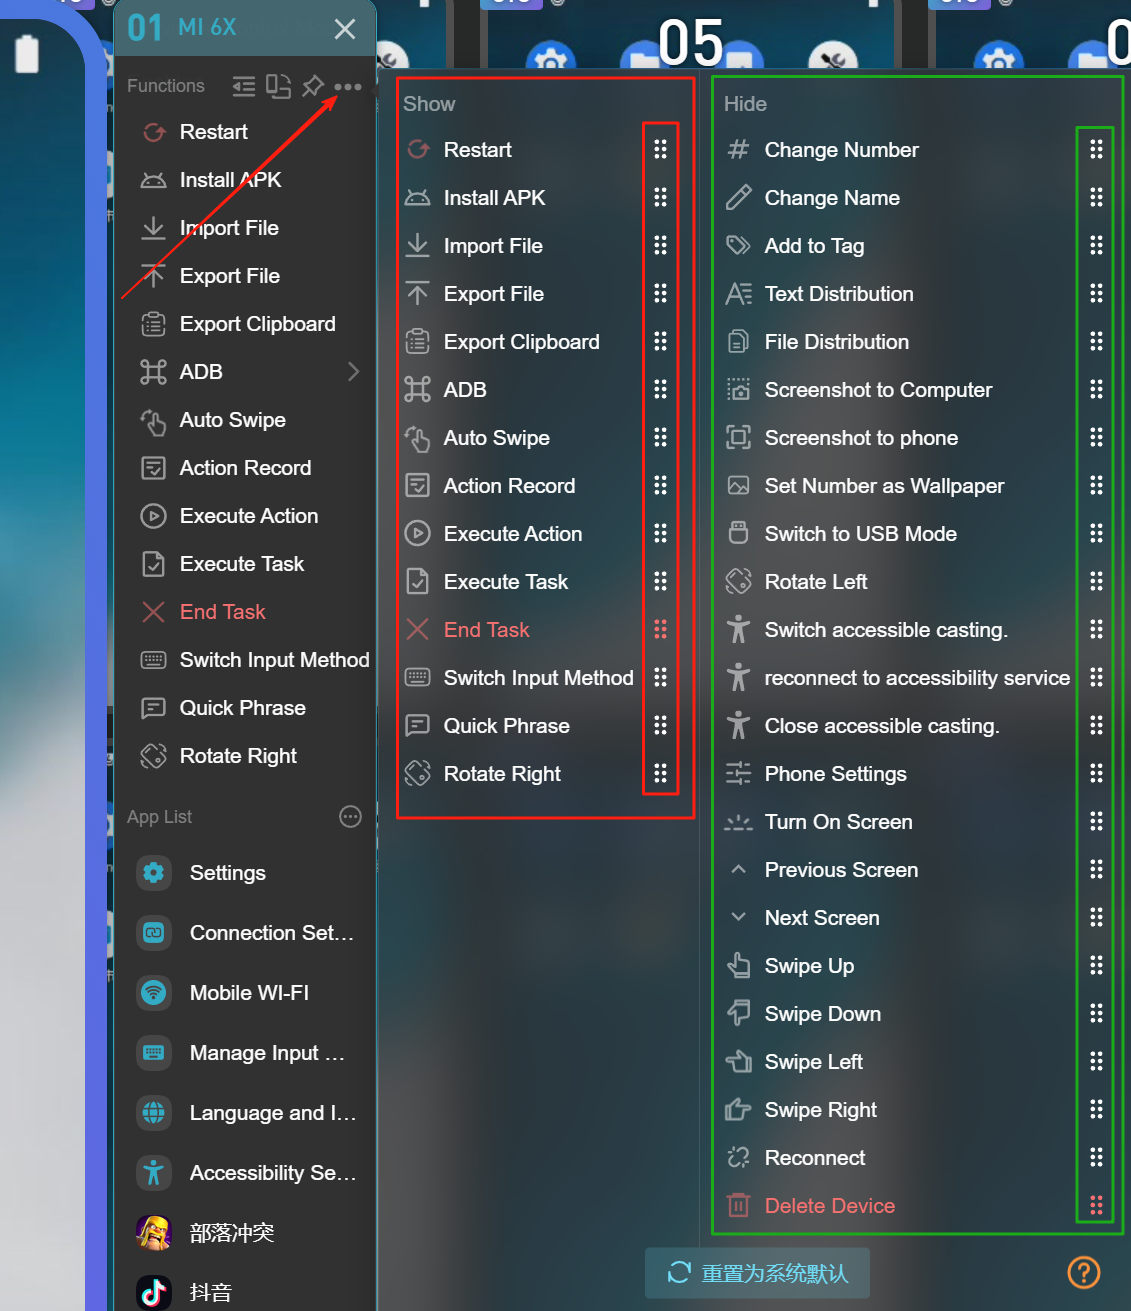
How to Hide/Show Large Screen Functional Buttons?
- open the large screen and click the three small dots at the top of the operation bar.
- In the popup window, move your mouse to the six small dots behind each function. Left-click and drag to rearrange the function:
(1) Drag it to the Hide area to hide the function.
(2) Drag it to the Show area to display the function.
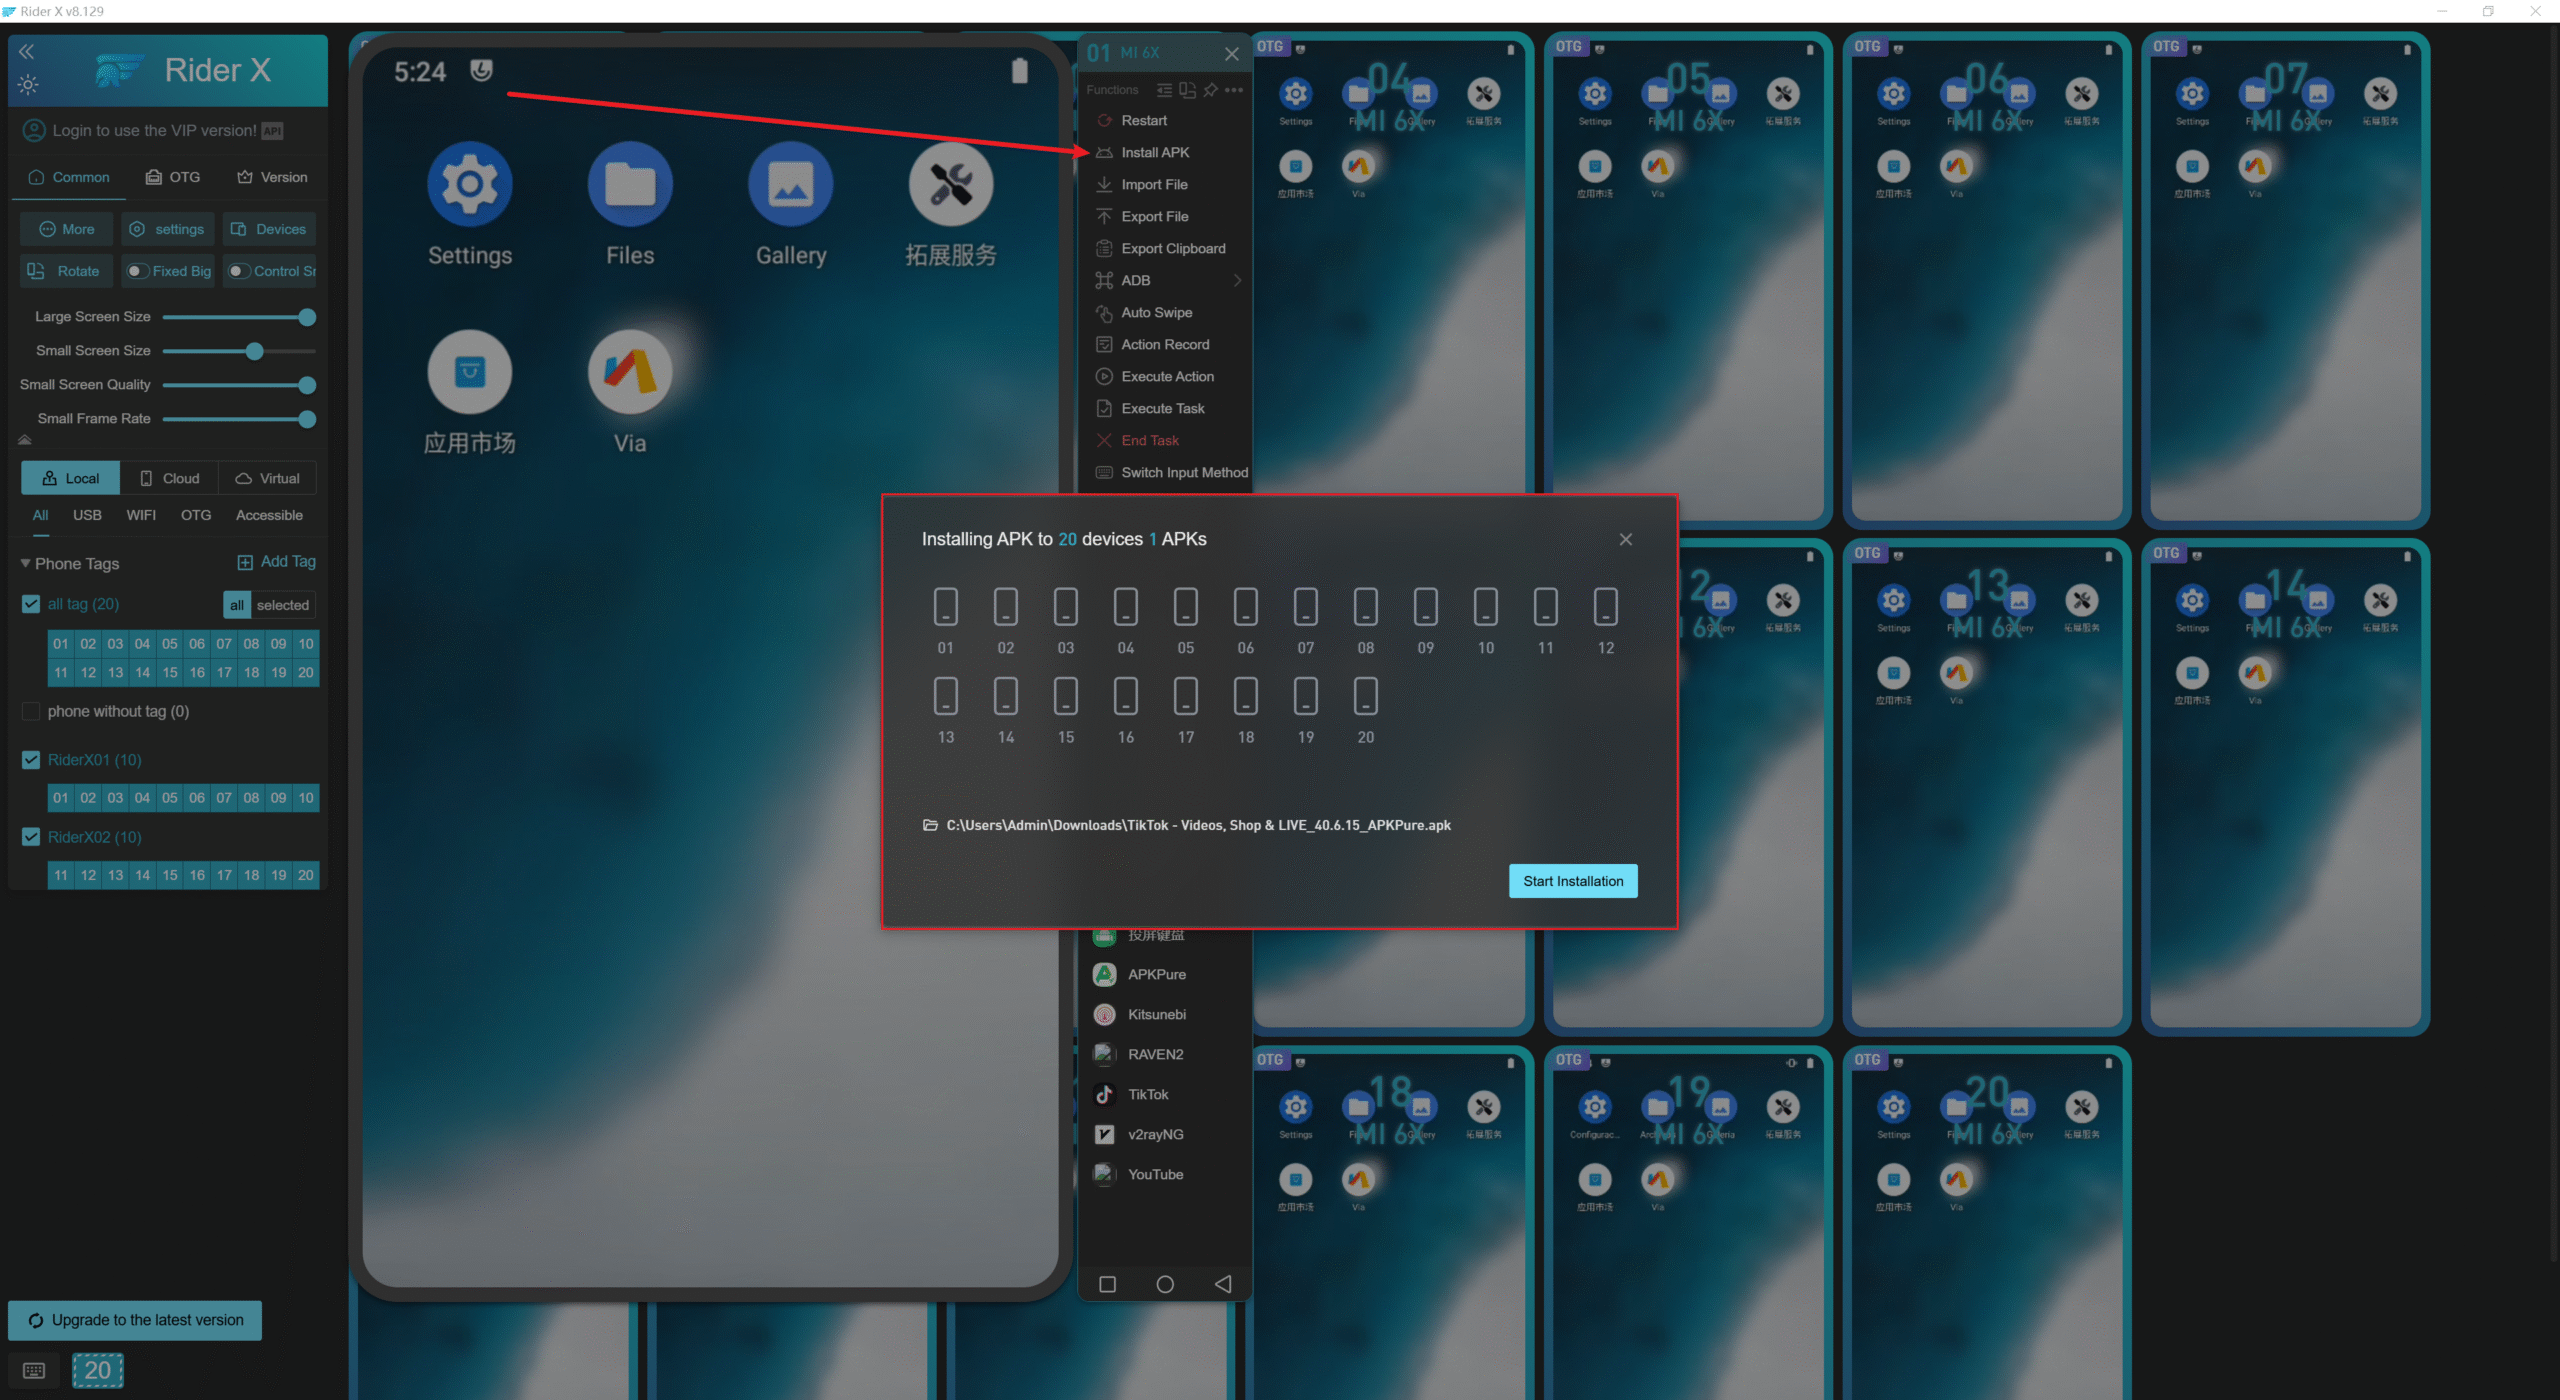
How to Bulk Install APK to Phones?
- Right-click a small screen.
- Click "Install APK", select the APK file.
- Click "Start Installation".
Note: Installation speed depends on the file size.
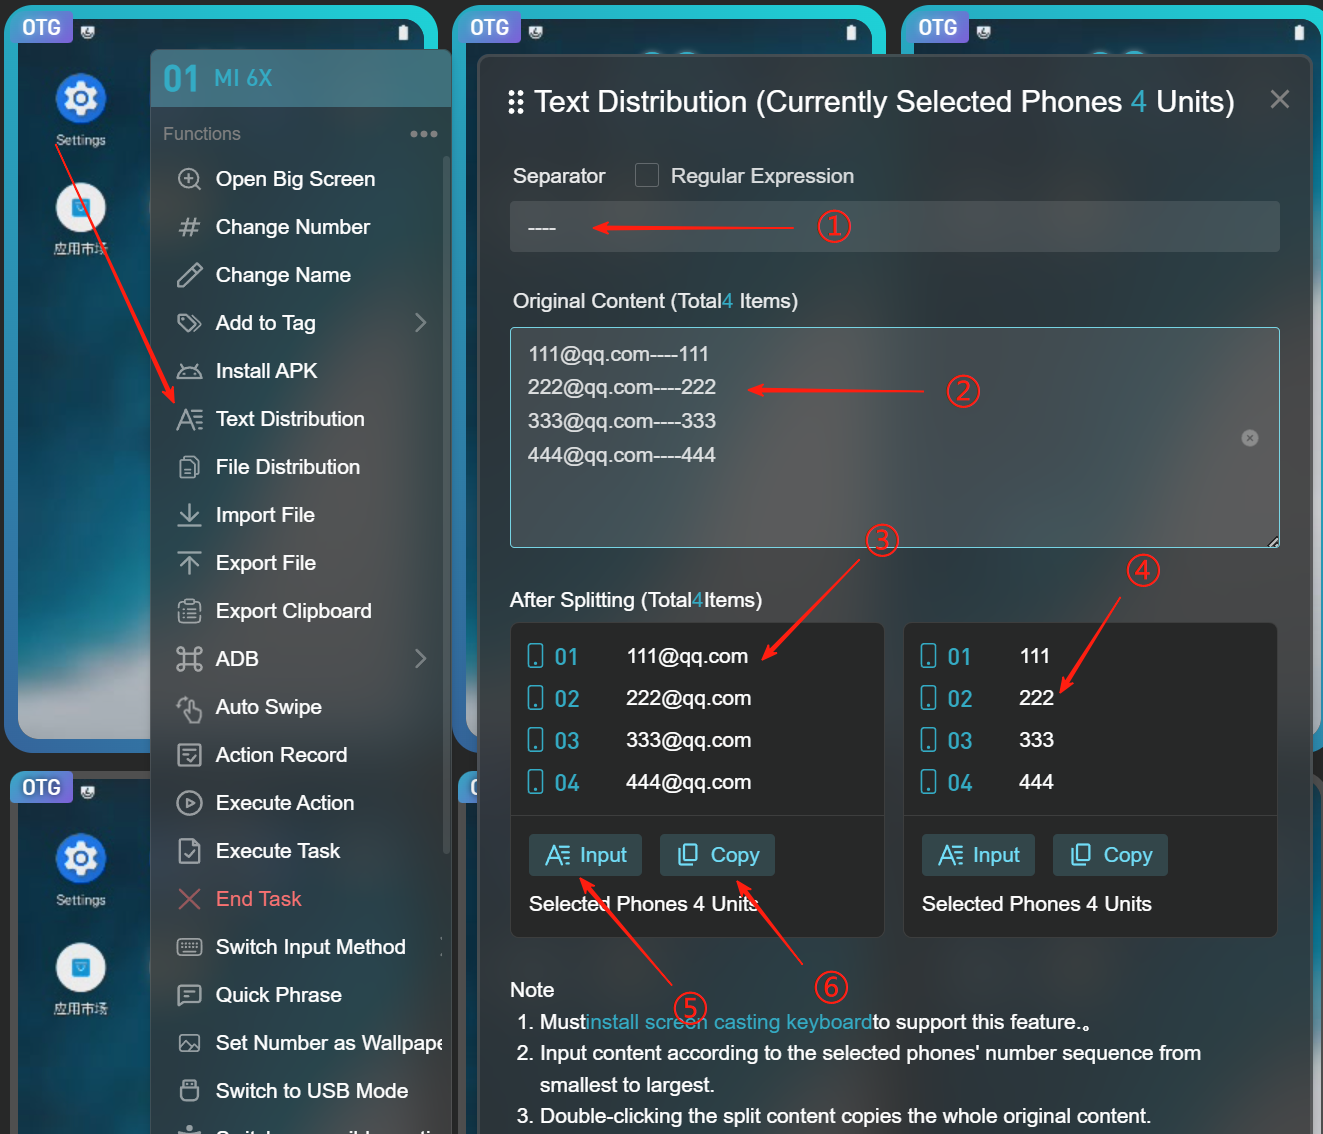
How to Distribute Text?
- Right-click on the small screen to bring up a popup window,Left-click the Text Distribution button to open another popup window.
1 represents the separator, which uses ---- (four hyphens) to divide your account and password.
2 is where you paste your original content (e.g., account and password), and use the separator to split them.
3 and ④ show the result after splitting — the account and password are separated, with each item labeled by device number.indicates that accounts like 111@qq.com, 222@qq.com, 333@qq.com, and 444@qq.com will be entered into the input fields of the corresponding mobile devices.
4 Indicates that you want to input the text into the corresponding phone number one by one.
5 Indicates that you are only copying the text to the clipboard of each corresponding phone, without actually inputting it into the text field on the phone. You will need to manually press Ctrl+V to paste it.
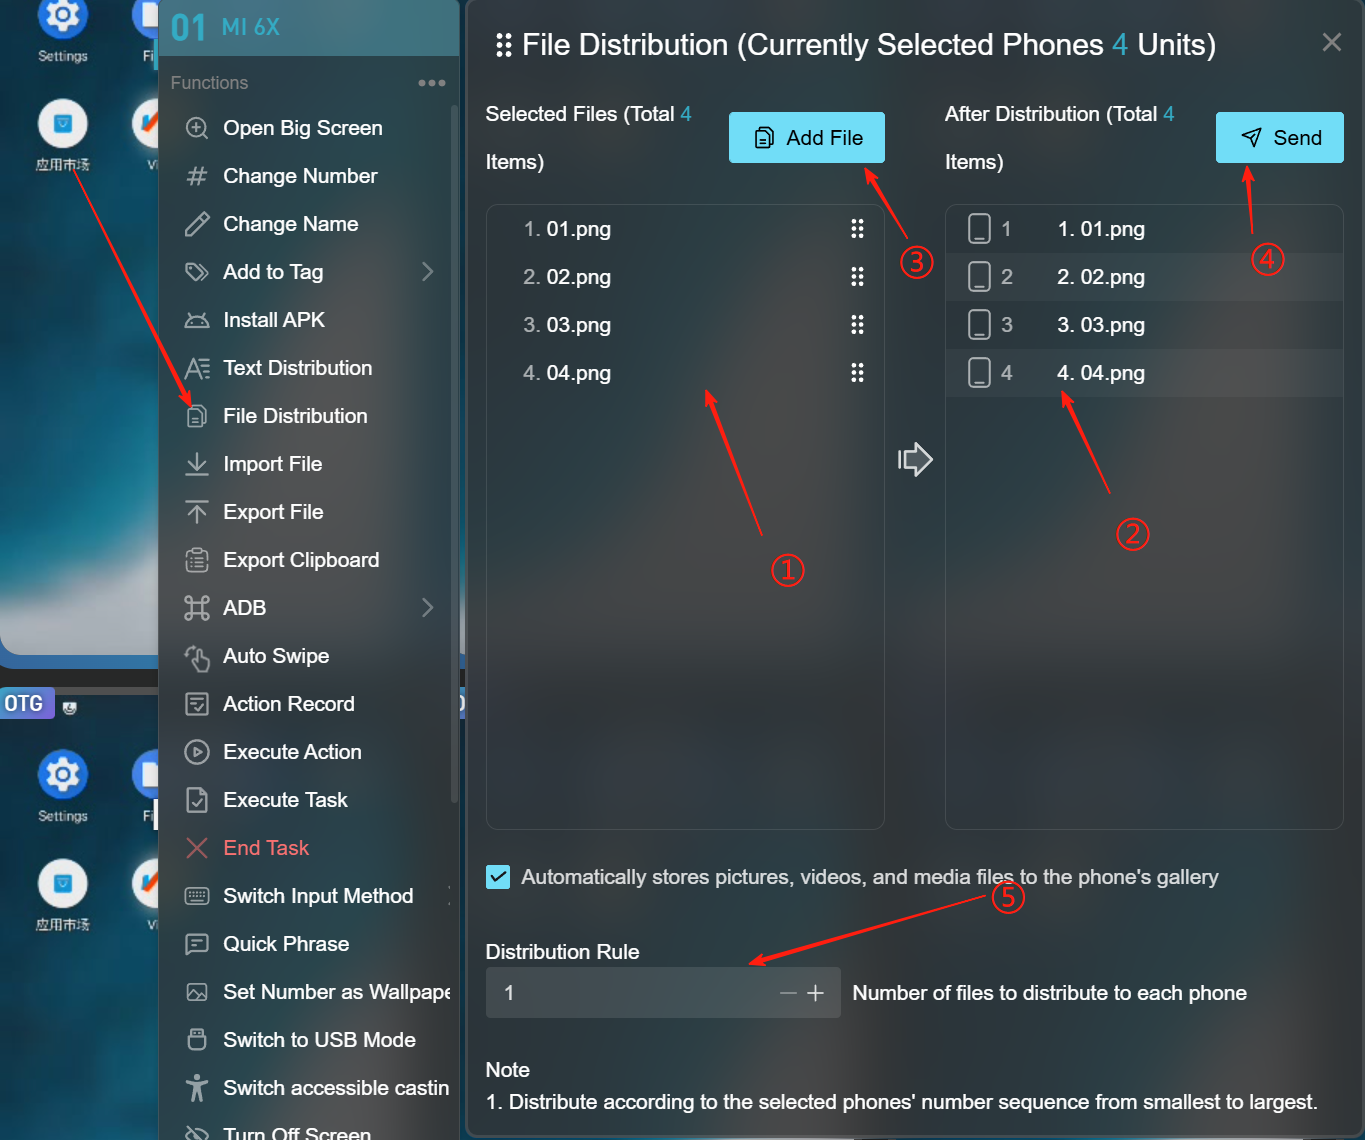
How to Distribute Files?
- Right-click on the small screen to bring up a pop-up window.
- Left-click the File Distribution button to open the image selection pop-up window, then choose the images you want to import.
1 indicates the files you have selected.
2 shows that these selected files will be distributed to the selected phones. The number before each file corresponds to the phone number it will be sent to.
3 allows you to continue adding more images from your computer.
4 is the Send button. Click it to send the images to each designated phone.
5 sets the distribution rule. For example, if you selected four images and set the rule to 1, each of the four selected phones will receive one image. If the rule is set to 2, the four images will be distributed across only two phones.
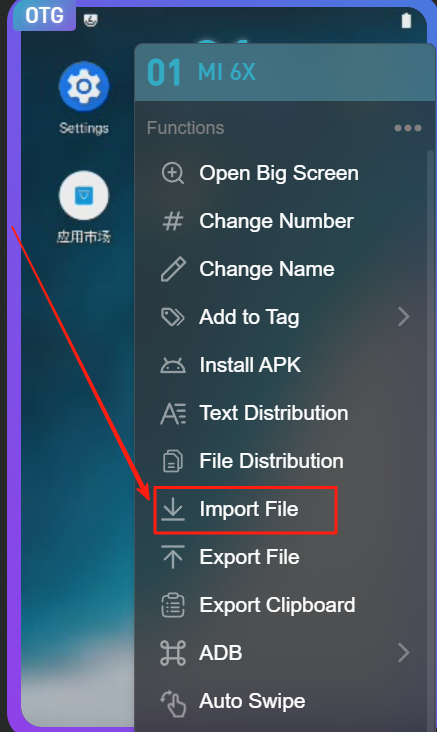
How to Import Files to Phones?
- Right-click on the small screen to bring up a context menuClick
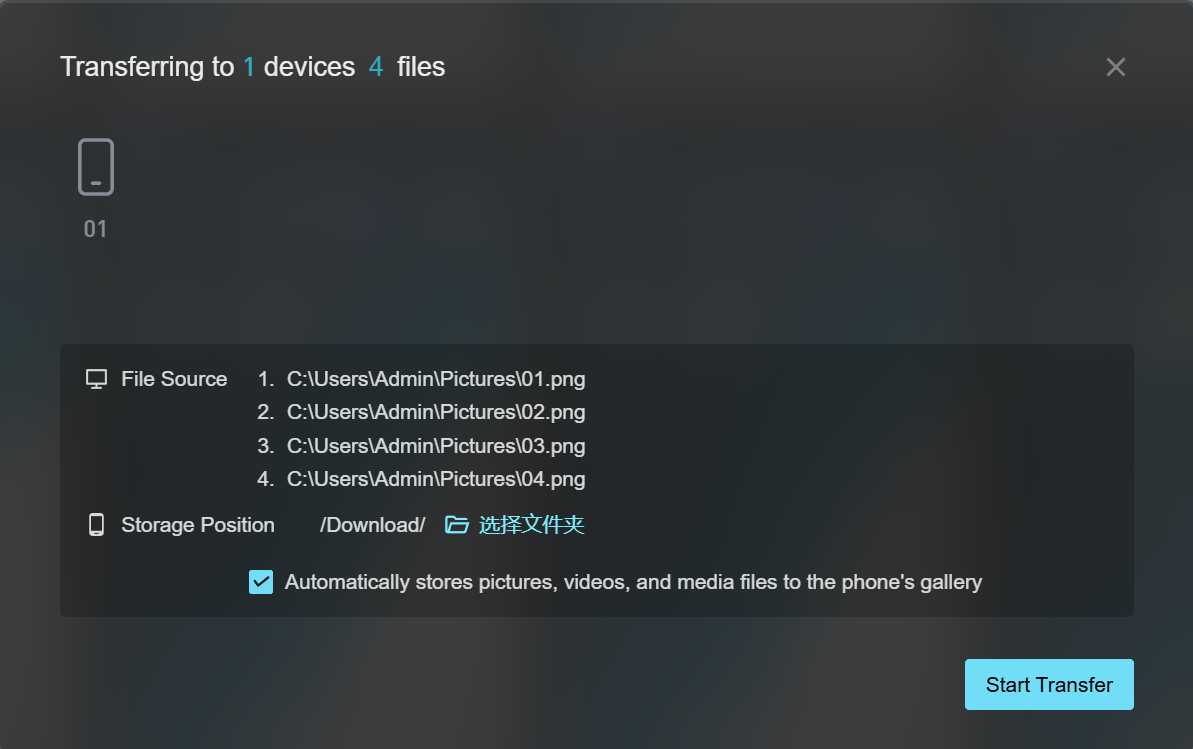
- the Import File button, then select the files from your computerClick Start Transfer to upload the four selected images to the selected phone.
- If the files are images or videos, you can check Automatically store pictures, videos, and media files to the phone's gallery.
(1) If checked, media files will be saved to the phone's gallery.
(2) If unchecked, files will be saved to the internal storage under the Download directory.
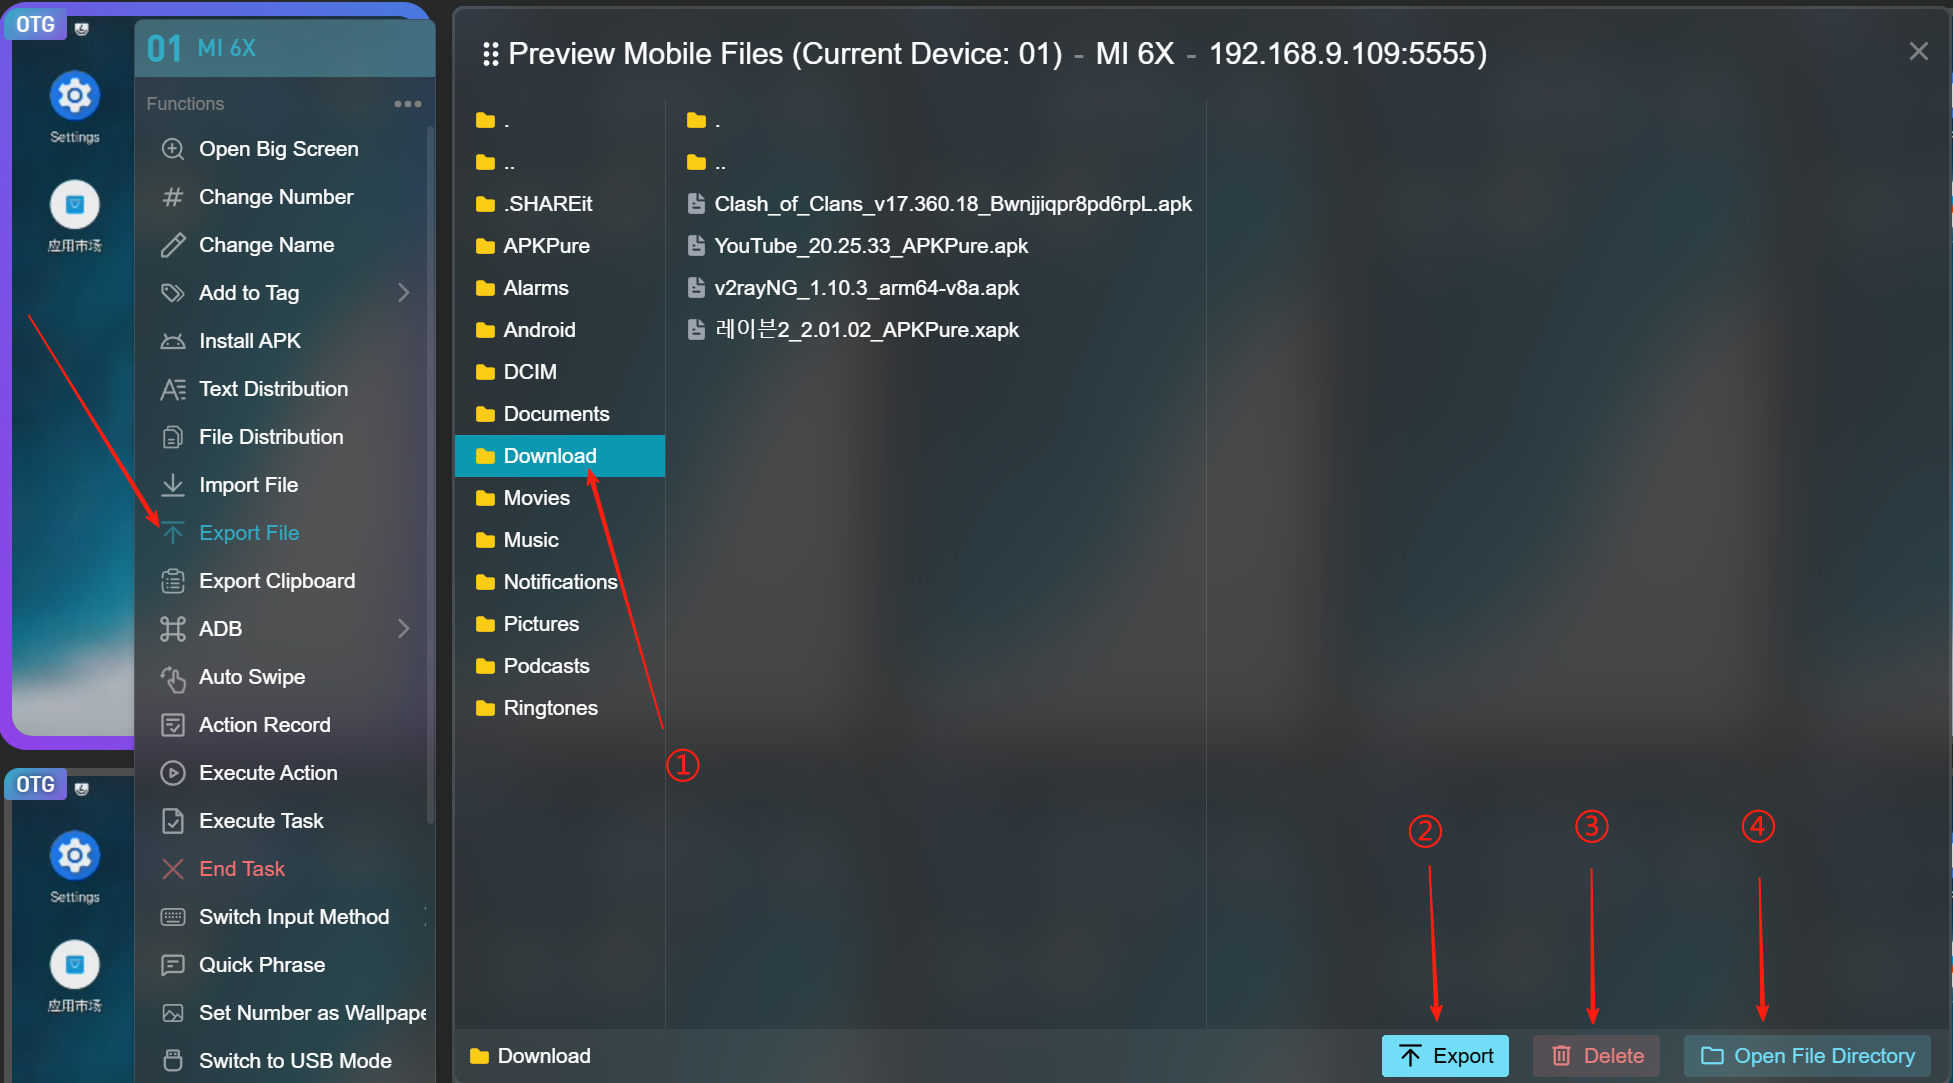
How to Export Files from Phones?
- Right-click on the small screen to open a context menu.
- Click the Export File button, which will open the export file window.
(1) Indicates selecting a file or folder.
(2) Represents exporting the selected file or folder.
(3) Represents deleting the selected file or folder from the phone.
(4) Opens the directory on the computer where exported files are saved.
- Double-clicking a single file allows you to browse it online.
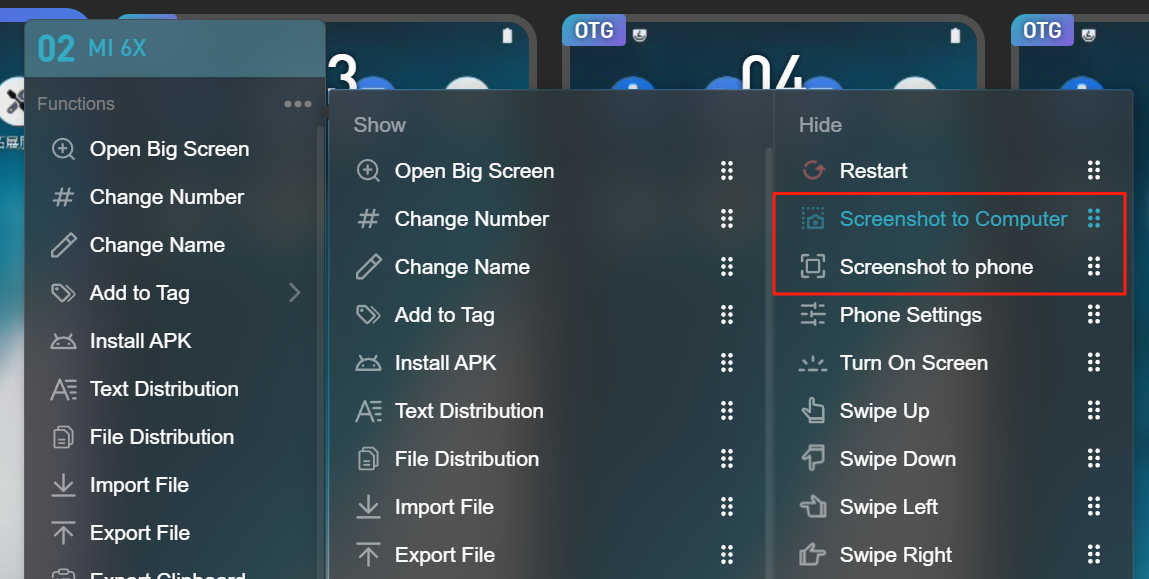
How to Take Screenshots?
- Right-click on the small screen to open a popup window.
- Click the "Screenshot to Computer" button.
- After the screenshot is successfully saved to the computer, the screenshot will be displayed at the top of the software with a success message. Click "Open Directory" to find the screenshot image, as shown in Figure 2.
- Click the "Screenshot to Album" button.
- After the screenshot is saved to the phone album, there will be no prompt. Simply open the phone's photo album to view it.

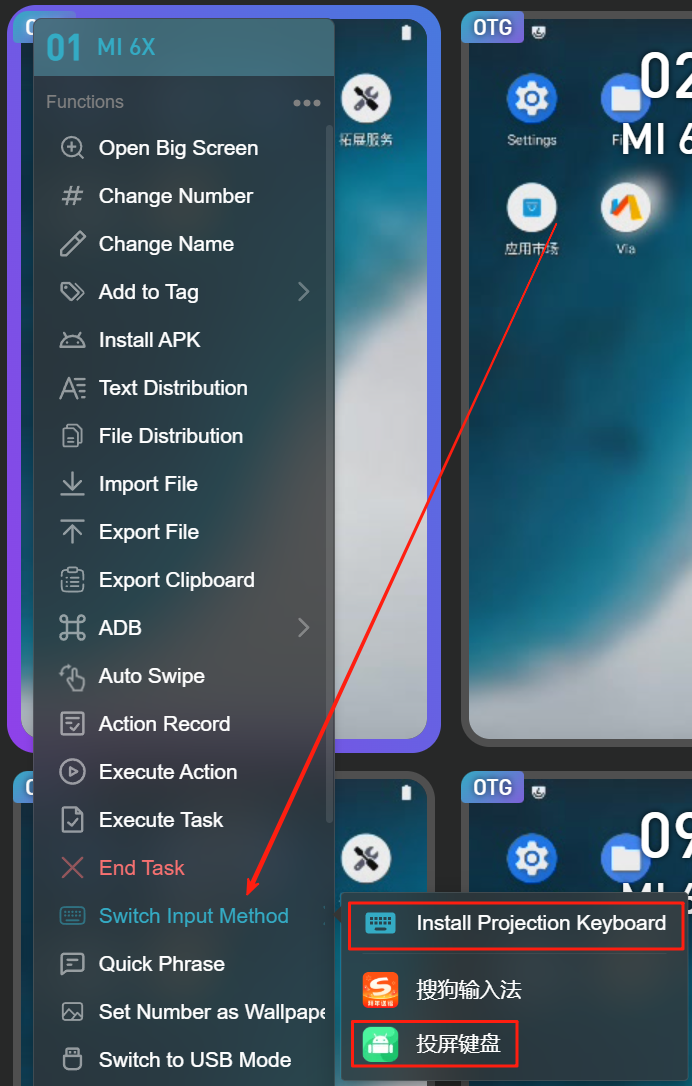
How to Install Mirroring Keyboard and Switch Input Method?
- Right-click on the small screen to open a popup window.
- Move the mouse to the “Switch Input Method” button, then click “Install Projection Keyboard”.
- After successful installation, you will see the “Screen Projection Keyboard” option in the secondary menu under “Switch Input Method.” Click it to switch the phone’s input method to the screen projection keyboard.
If the installation fails, please enable “Allow USB installation” in the phone’s Developer Options.
If switching to the screen projection keyboard fails, go to the phone’s Settings → Input Method Management, and enable the screen projection keyboard.
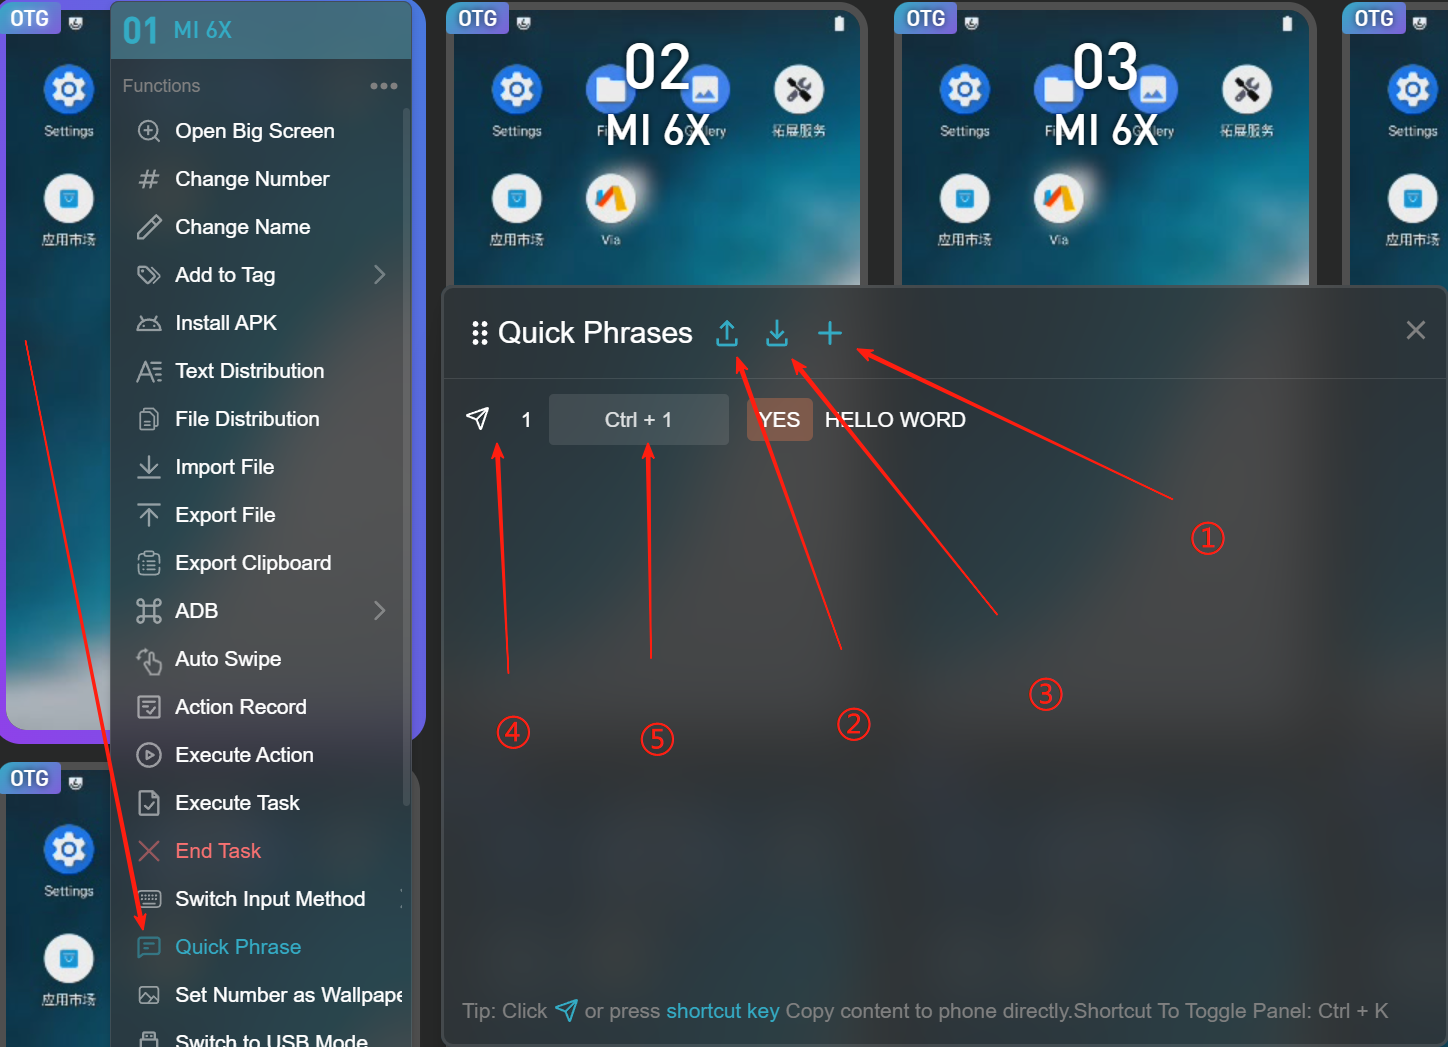
How to Use Quick Phrases?
- Right-click on the small screen to open a popup window.
- Click the “Quick Phrases” button, then the quick phrase editing box will pop up.
1 Add Quick Phrase
2 Import Quick Phrases
3 Export Quick Phrases
4 Click to Send Quick Phrase
5 Send Quick Phrase via Hotkey
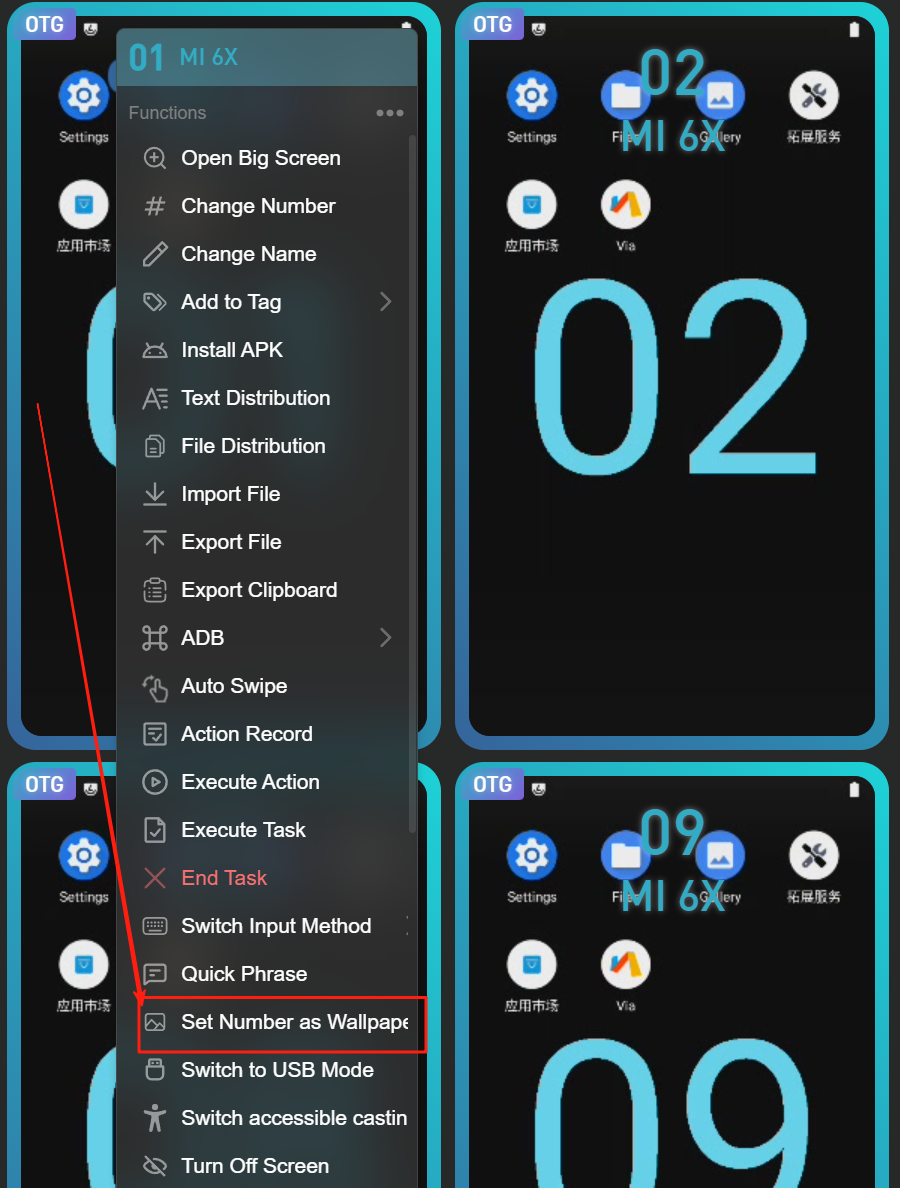
How to Set Phone ID as Wallpaper?
- Right-click on the small screen to open a popup window.
- Click the “Set Number as Wallpaper” button. The selected phone(s) will then set their device number as the wallpaper, as shown in Figure 2. This feature depends on the casting keyboard; if the casting keyboard is not installed, the setting will fail.
- The font color of the wallpaper number will change according to the theme color.
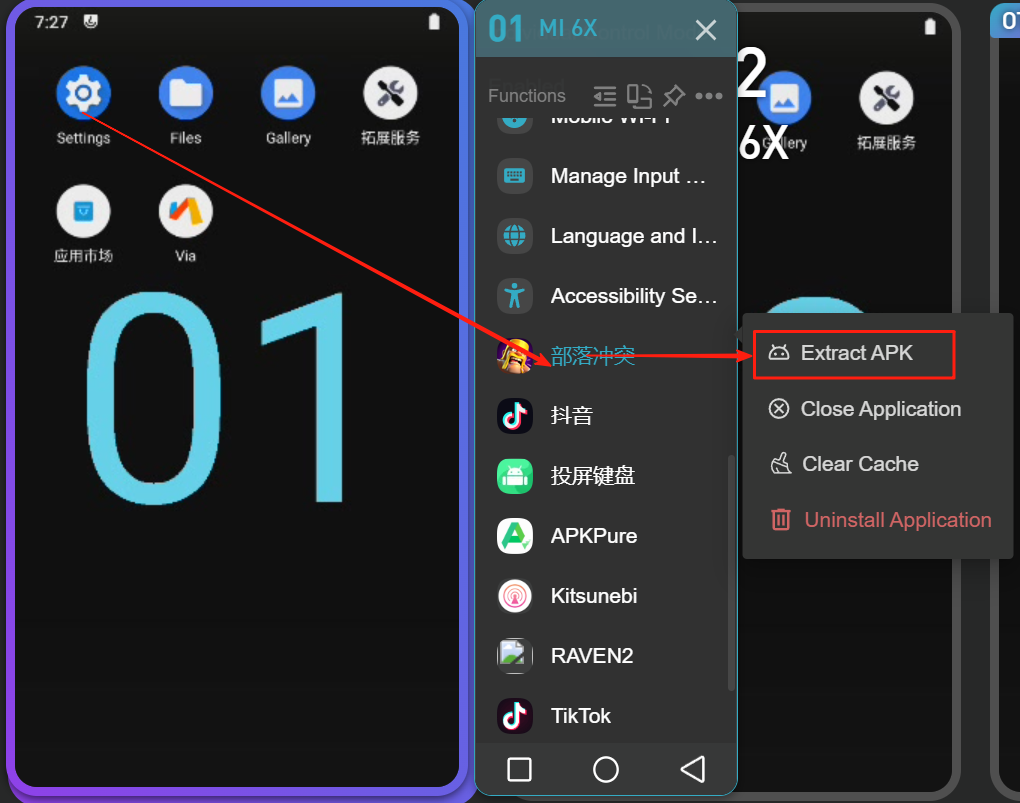
How to Manage Apps (Open/Close/Clear Cache/Uninstall)?
- Open the large screen. Scroll down the mouse wheel on the large screen’s operation bar to view the app list, as shown in Figure 2.
- Clicking the app icon will directly open the app.
1 indicates the app icon; click it to Extract APK.
2 represents closing the app; click it to close the app.
3 stands for clearing the app’s cache; click it to clear the cache.
4 means uninstalling the app; click it to uninstall the app.

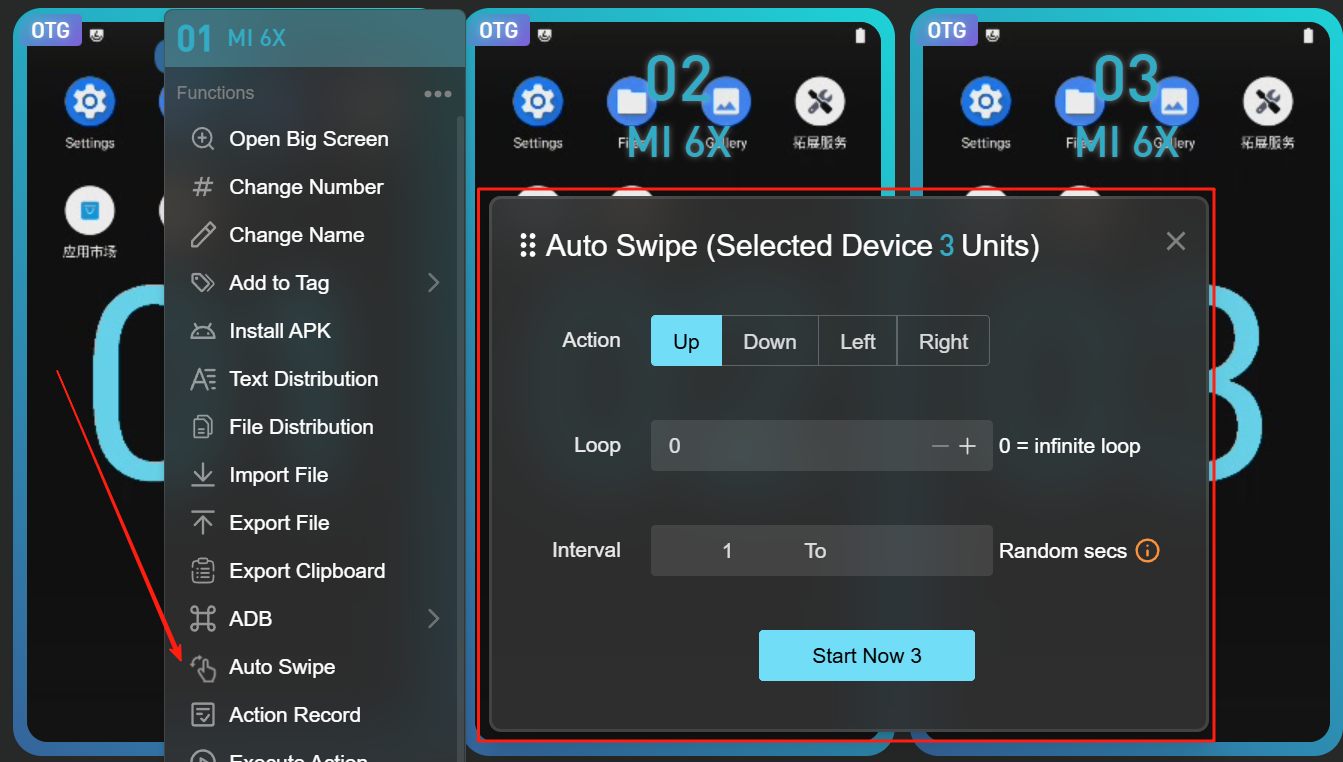
How to Enable Auto-Scrolling?
- Use the mouse to select the small screen(s) you want to auto-scroll, then right-click. In the right-click popup menu, find and click the "Auto Scroll" button.
- After clicking the "Auto Scroll" button, an auto scroll settings popup will appear.
- After completing the settings, click the "Start Now" button to begin automatic screen scrolling. While the task is running, the small screen window will show a flashing little finger icon; the direction the finger points indicates the direction of the auto scroll.
What If Payment Apps Cause Black Screen or Disconnect?
Symptoms:
Phone blacks out during payment/password input.
Cause:
Security
protection for sensitive screens.
Solutions:
- Disable secure input: Phone Settings → Input Method → Secure Keyboard/Input
- Disable payment protection: Settings → Payment Protection
- Cannot solve on Android 11 / HarmonyOS 2 and above (due to system restrictions).
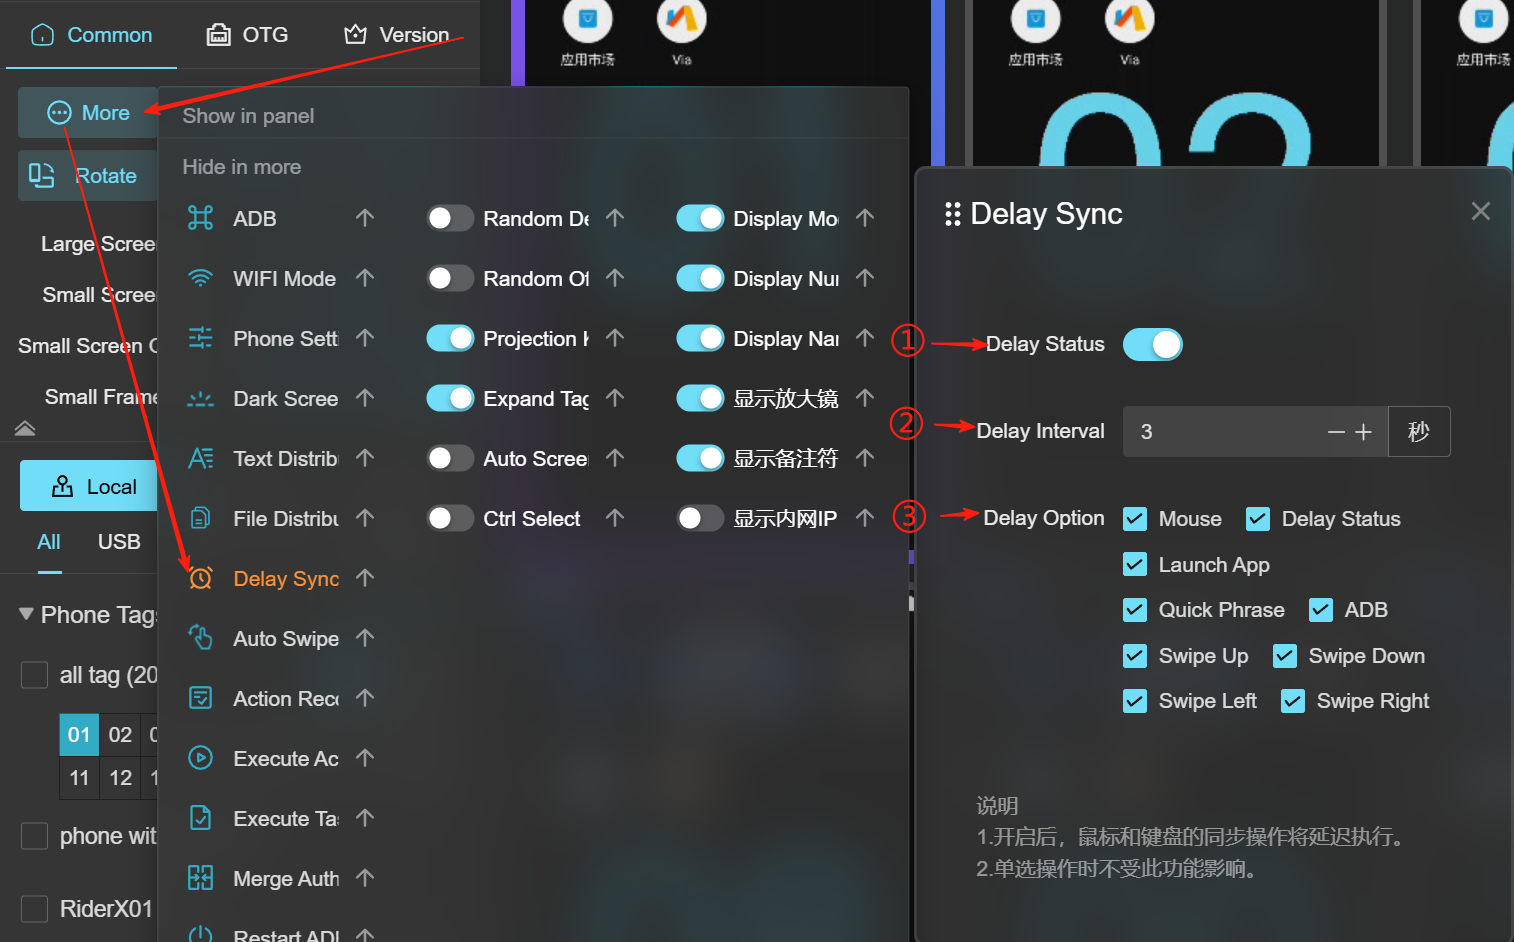
How to Use Delayed Synchronization?
Operation Steps:
As shown in Figure 1, move the mouse to the "More Functions" area, and a popup with more options will appear.
In the popup, find and click the "Delay Sync" option, which will open the Delay Sync popup as shown in Figure 2.
In Figure 3, item 1 represents the toggle switch to enable Delay Sync.
Item 2 indicates the delay duration, with a minimum of 1 second and a maximum of 3600 seconds.
Item 3 shows the operation options that require delay.
After setting these, close the popup. Now, the phone operations will execute sequentially with the specified delays according to their device numbers.
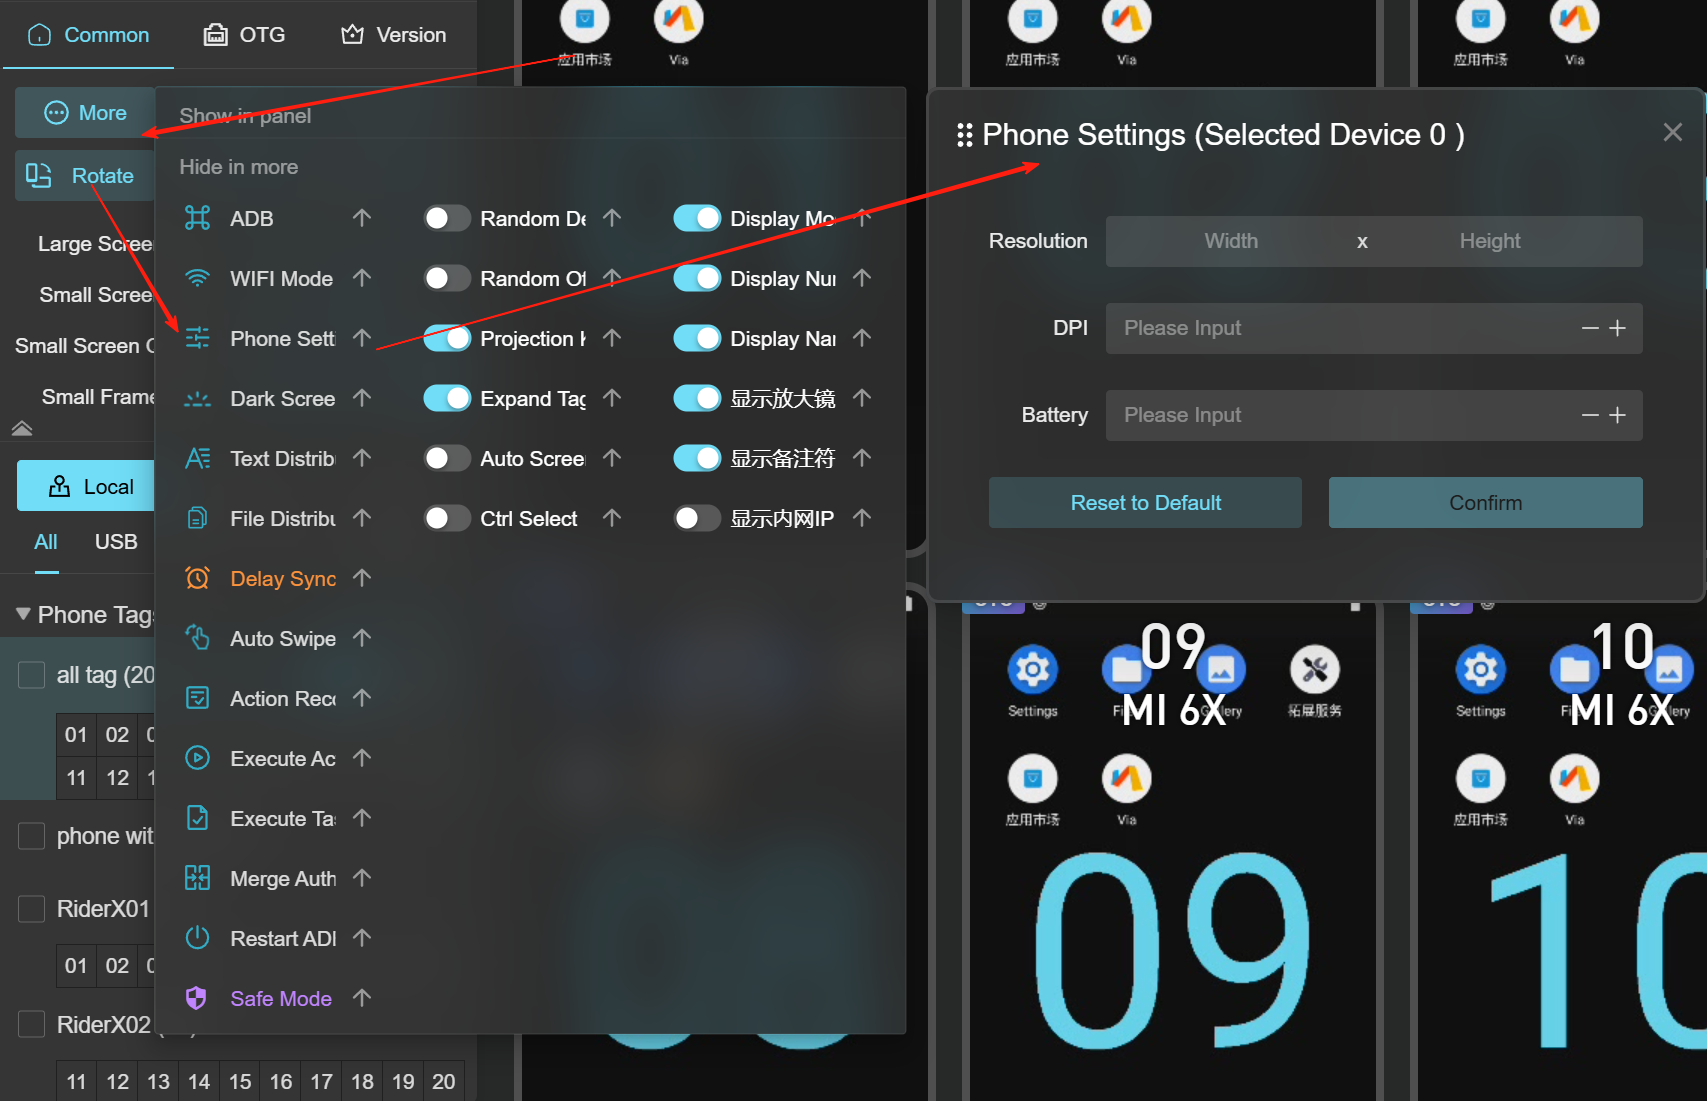
How to Modify Phone Parameters?
- move the mouse to the "More Functions" area to display the popup menu.
- find the "Phone Parameters" option and left-click it to open the phone parameter modification popup.
- the Resolution field allows you to customize and input the phone’s resolution value; the DPI field allows you to customize and input the DPI value; the Battery field allows input of a value between 1 and 100.
- After entering the relevant values, click "Confirm." The changes to the phone parameters will take effect immediately, but the resolution and DPI displayed in the device list will require restarting the client software to refresh.
- The "Restore Phone Defaults" button can reset the selected device’s resolution and DPI back to the phone’s default values; the battery level setting is ignored.
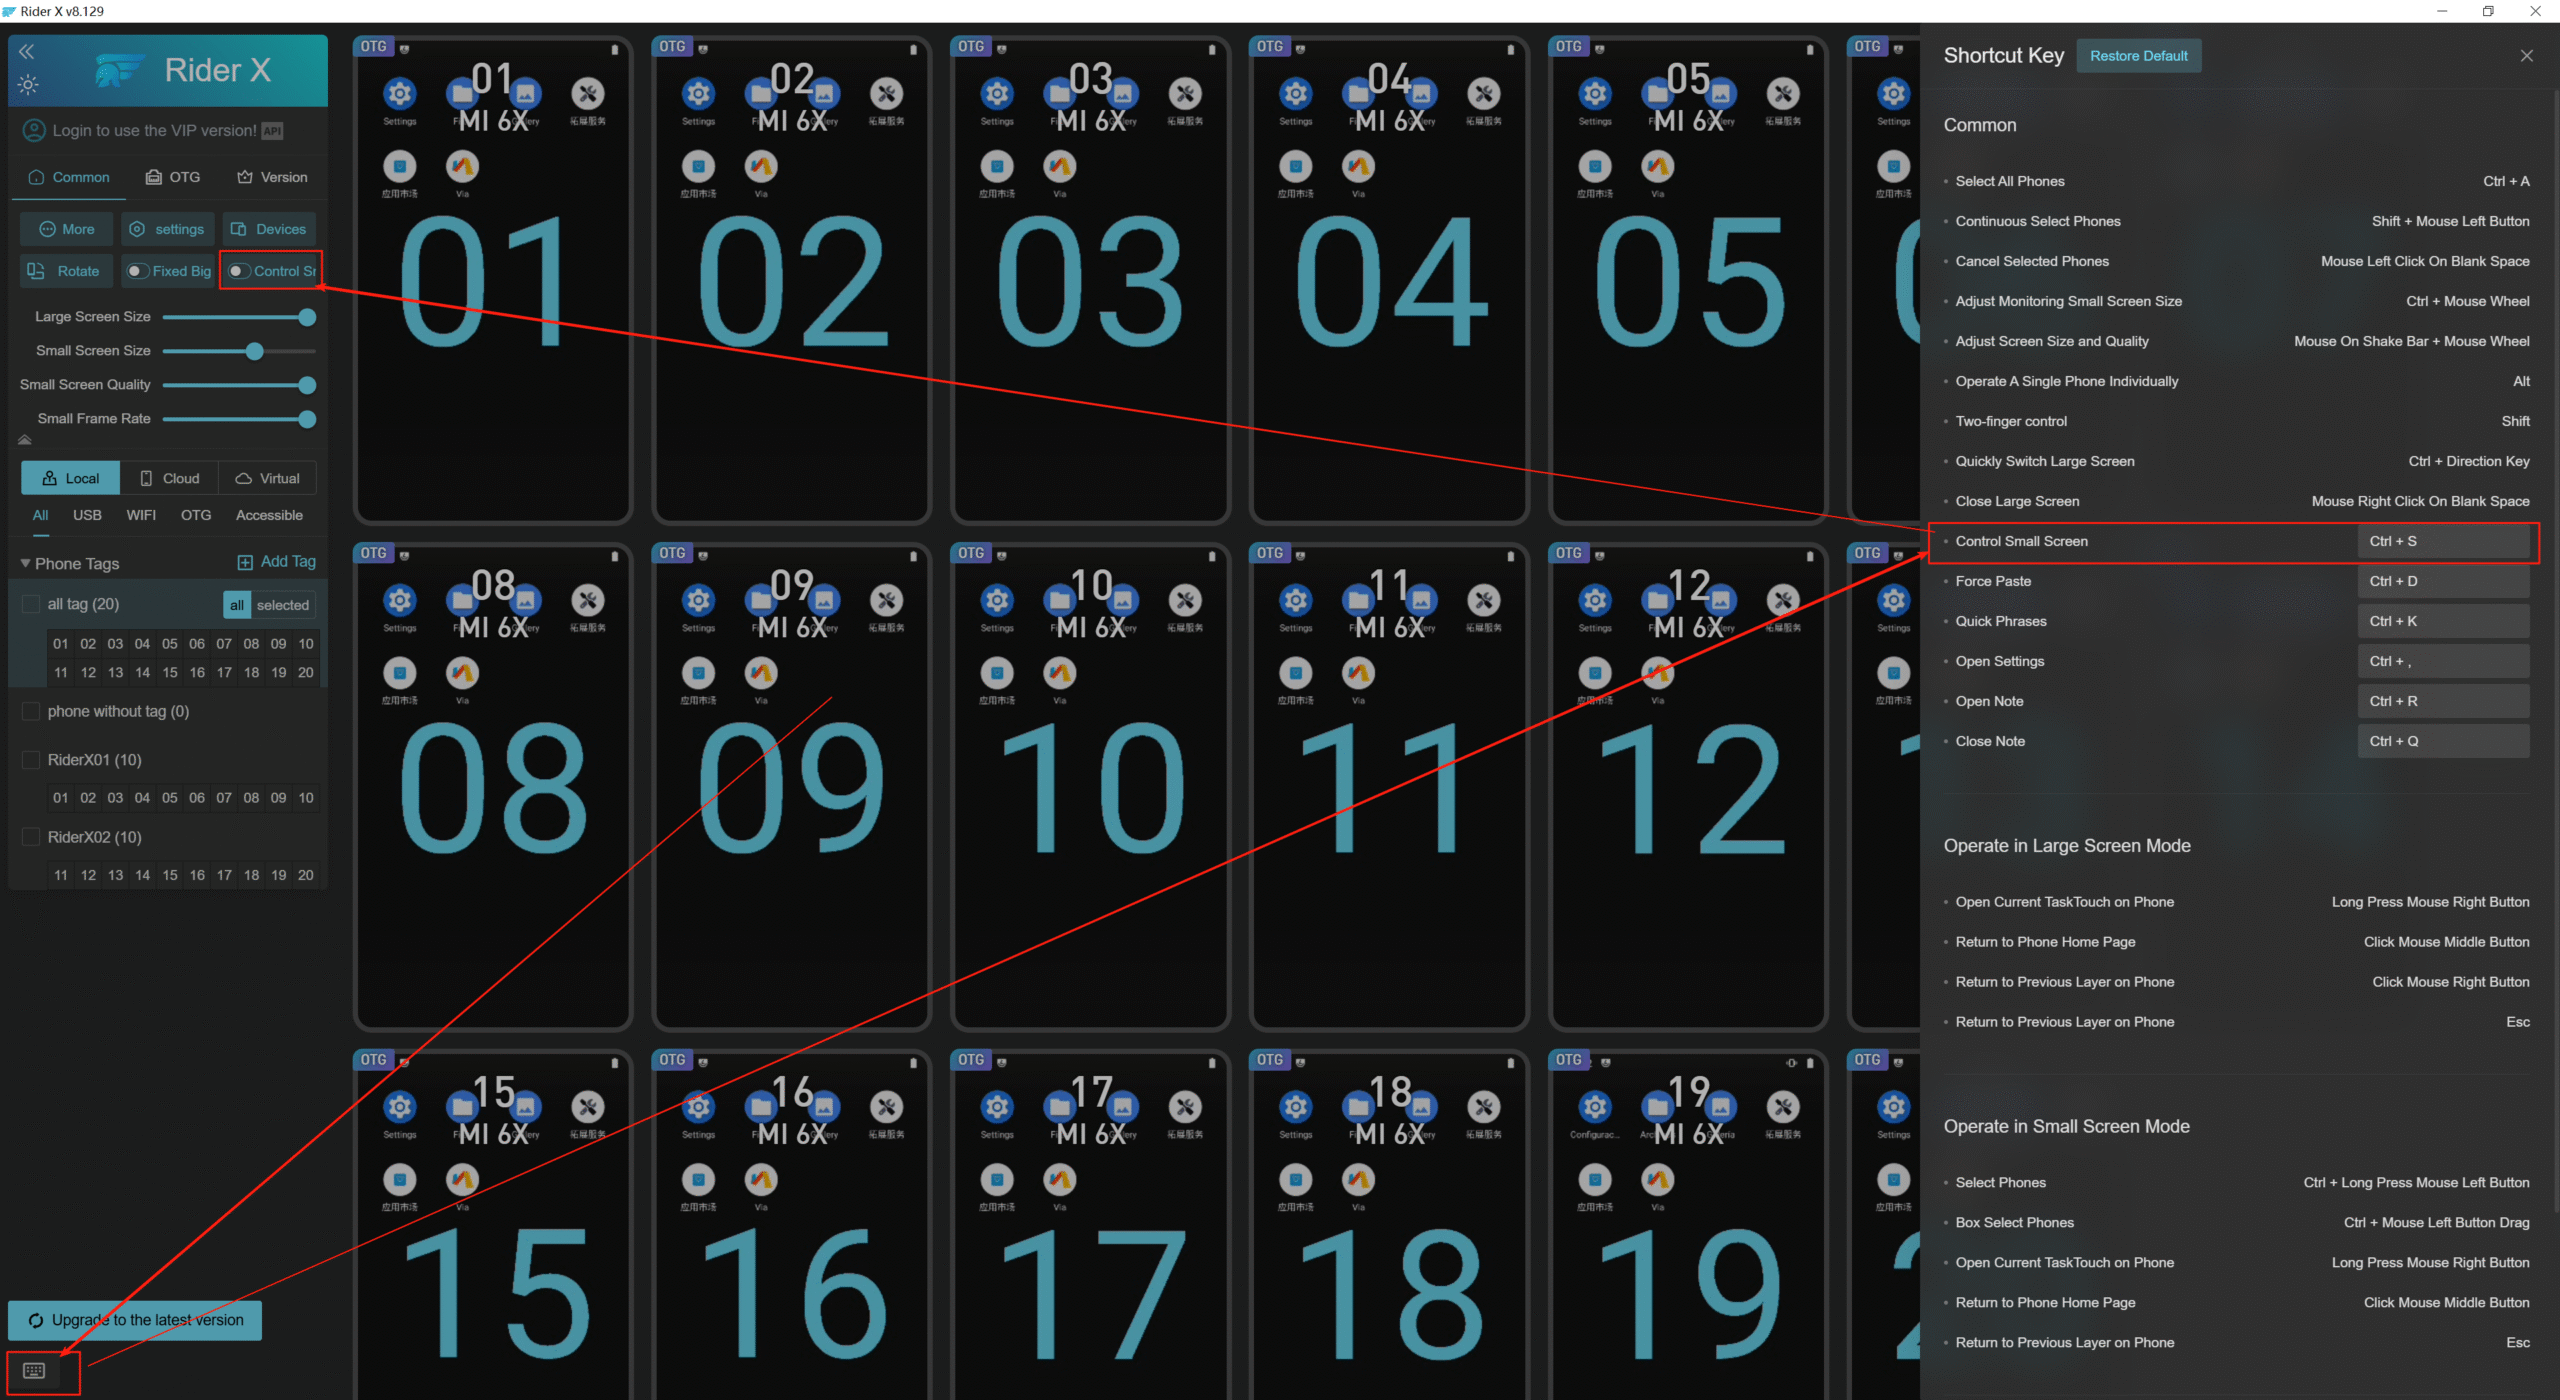
How to Toggle Small Screen Control with Shortcut?
- move the mouse to the shortcut bar icon and click to open the shortcut bar instructions.
- find the "Control Small Screen" shortcut key option. The default shortcut to open or close is Ctrl + S, which can be customized.
- Press Ctrl + S to open the small screen control.
- Press Ctrl + S again to close the small screen control.
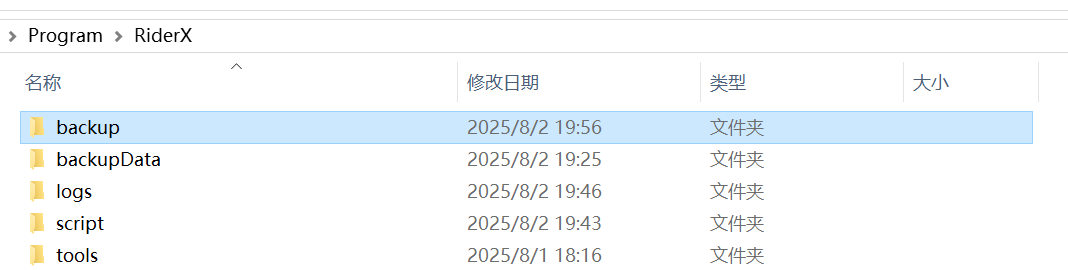
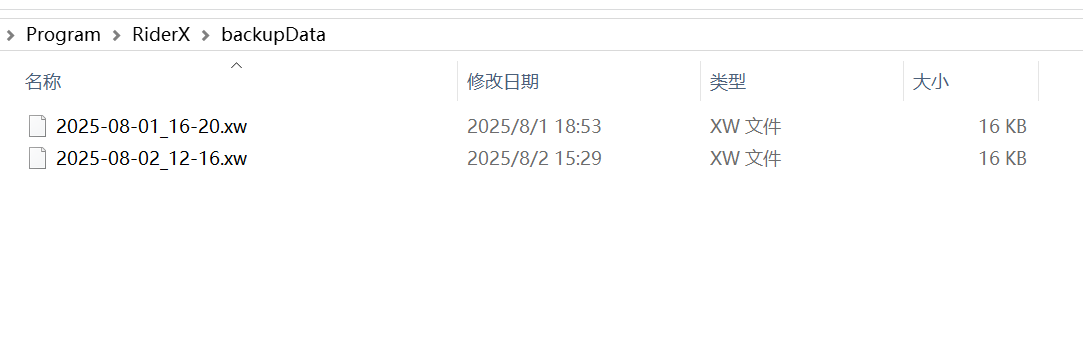
How to Import Auto-Backup Phone IDs?
- open the backupData directory located in the installation folder of the screen casting software, as shown in Figure 2.
- the files in this directory are the automatically backed-up phone ID information.
- In the phone label section, you can import these auto-backup files into the screen casting software to take effect immediately, as shown in Figure 2.
How to Quickly Hide Phone Note Icon?
1 click the icon to open the phone remarks box.
2 click the "Hide Remark Icon" button to hide the remark icons on the phone screen.
How to Extract APK?
- As shown in Figure 1, open the large screen. Hover the mouse over the app icon of the APK you want to extract in the app list on the right control panel. A popup will appear. Find and click the "Extract APK" button, then confirm.
- In Figure 2, the APK extraction is in progress. The larger the APK, the longer the extraction time, so please be patient.
- In Figure 3, after successful extraction, click the "Open Directory" button to view the extracted APK file.


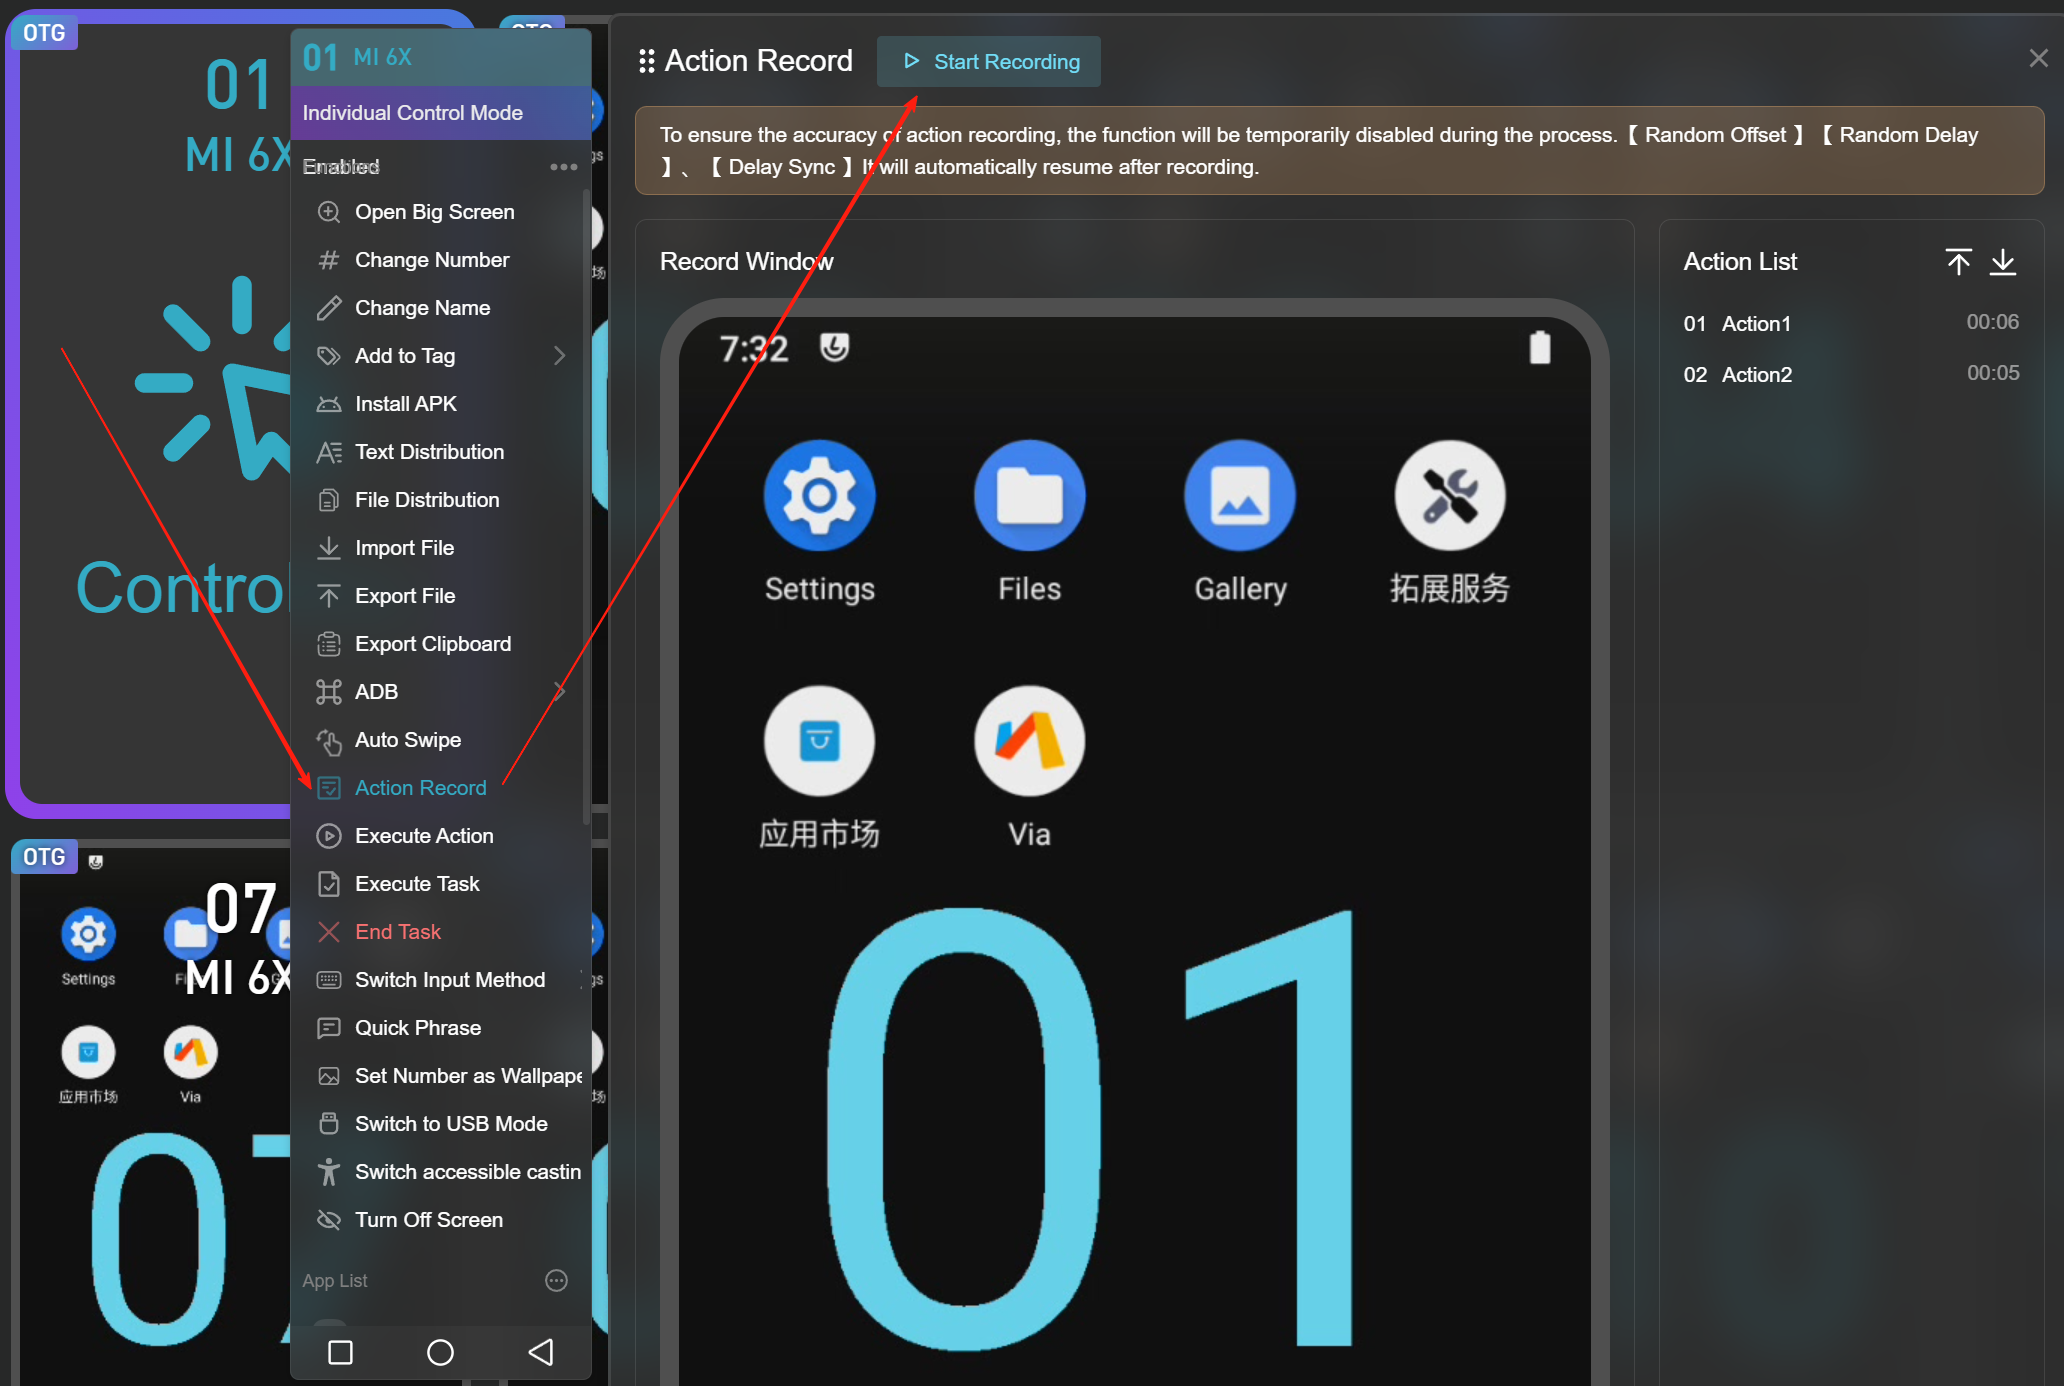
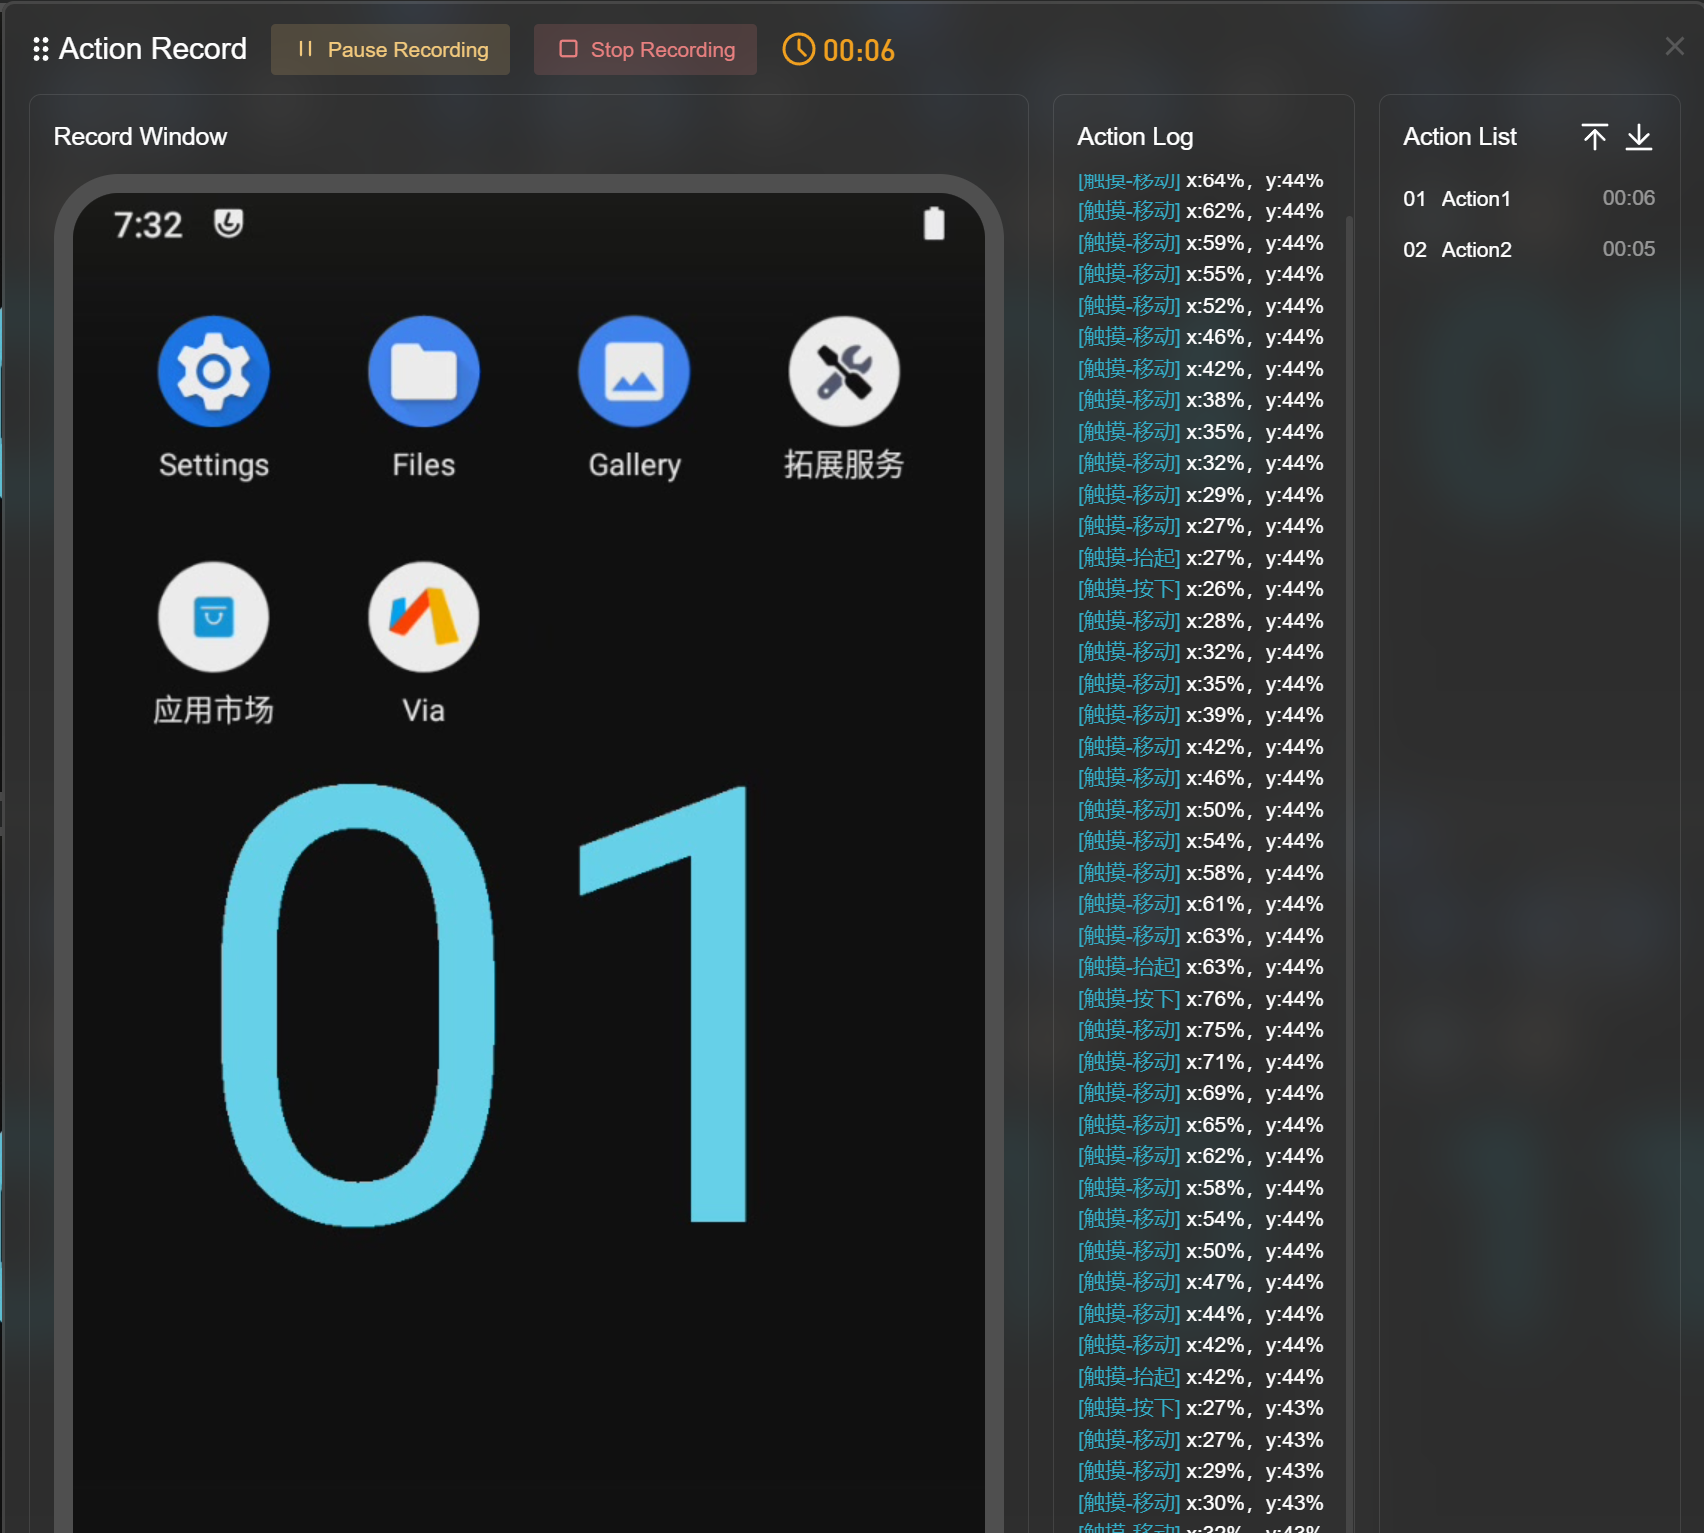
How to Record Actions?
- As shown in Figure 1, right-click the device and find the "Action Recording" button in the context menu, then click it.
- click the "Start Recording" button, then you can use the mouse to click or swipe on the phone screen to record actions.
- In Figure 2, clicking "Pause Recording" temporarily stops recording your actions; clicking "Stop Recording" saves the recorded actions to the system. An action name with a number will be automatically generated in the action list. The action name can be customized by double-clicking it to edit.
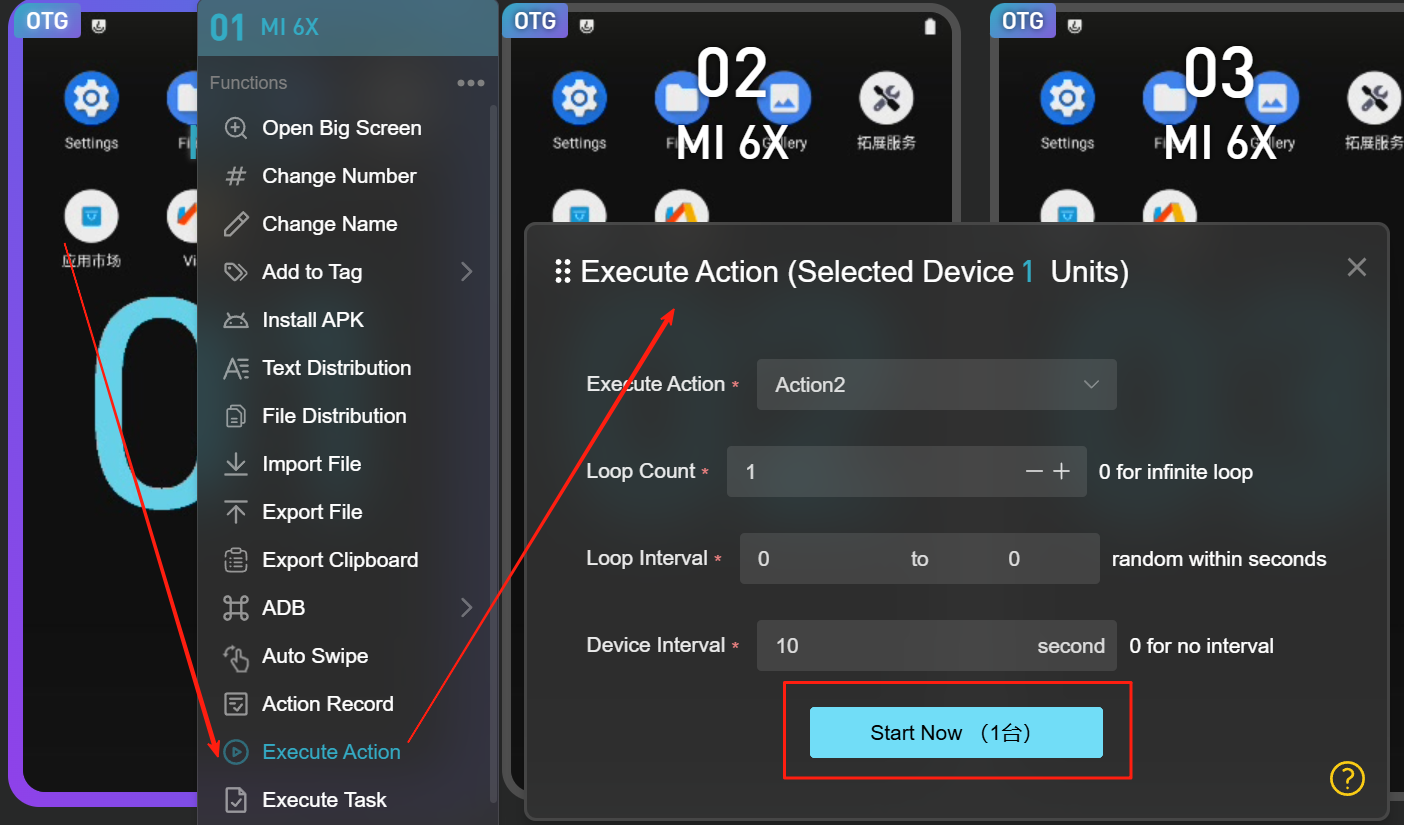
- In Figure 3, right-click the device again, find the "Execute Action" button in the context menu, and click it.
- select the action you want to execute, set the parameters, then click the "Start Now" button.
- the device performing the action will show an animation, along with a loop test display.
How to Execute Tasks?
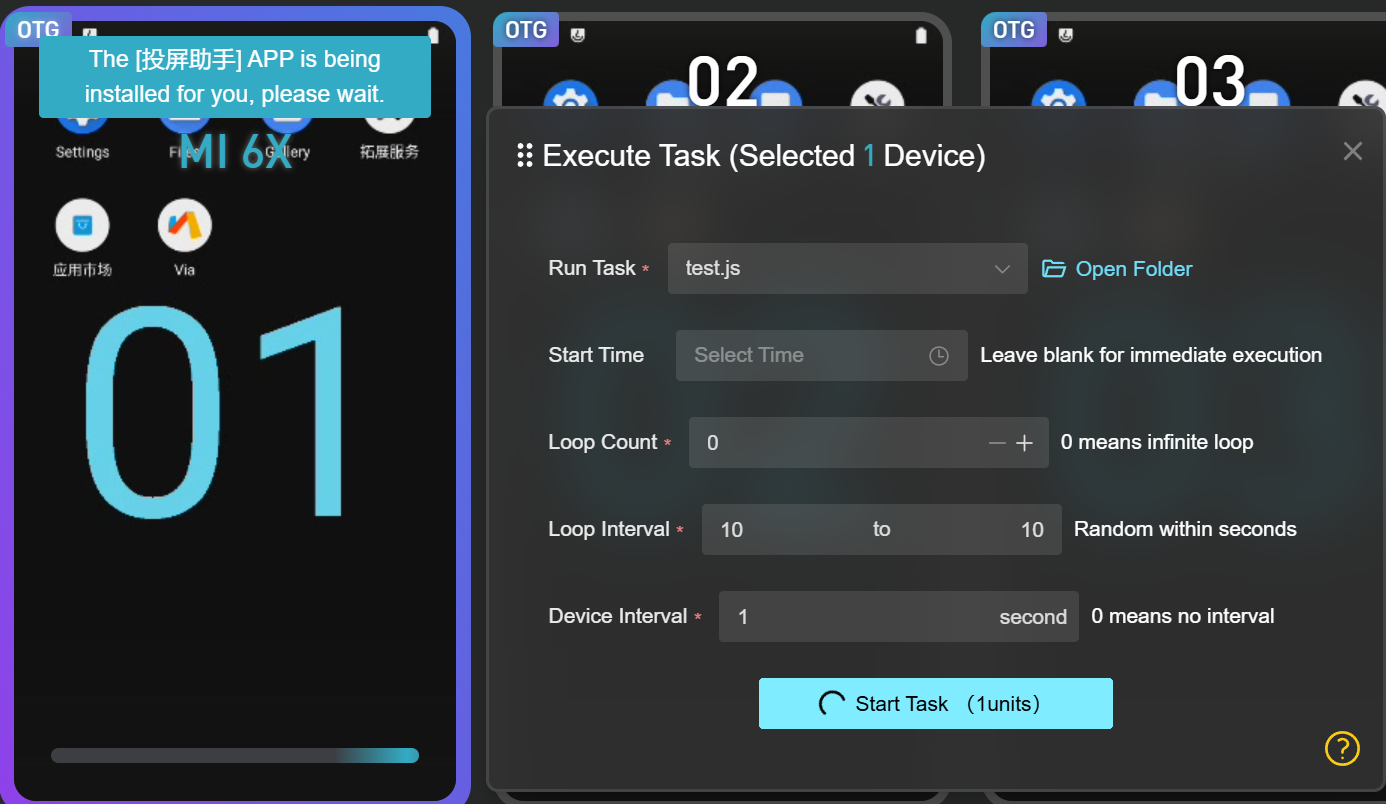
- As shown in Figure 1, right-click the device, find the "Execute Task" button in the context menu, and click it.
- In Figure 2, "Execute Task" means you need to select a JS file or a BAT file. JS files require the installation of the Screen Casting Assistant, while BAT files do not.
- In Figure 2, "Start Time" refers to the scheduled time; the task will execute at this set time, based on the local computer’s clock.
- In Figure 2, "Loop Count" indicates how many times the selected task file needs to be executed.
- In Figure 2, "Loop Interval" indicates the interval between each loop; if the loop count is 1, this interval can be ignored.
- In Figure 2, "Device Interval" means the interval between executing the task on multiple selected devices.

- In Figure 3, if the system detects that your device does not have the Screen Casting Assistant installed when executing a JS task, it will automatically install it for you.
- In Figure 4, once the Screen Casting Assistant app is successfully installed, it will automatically open.

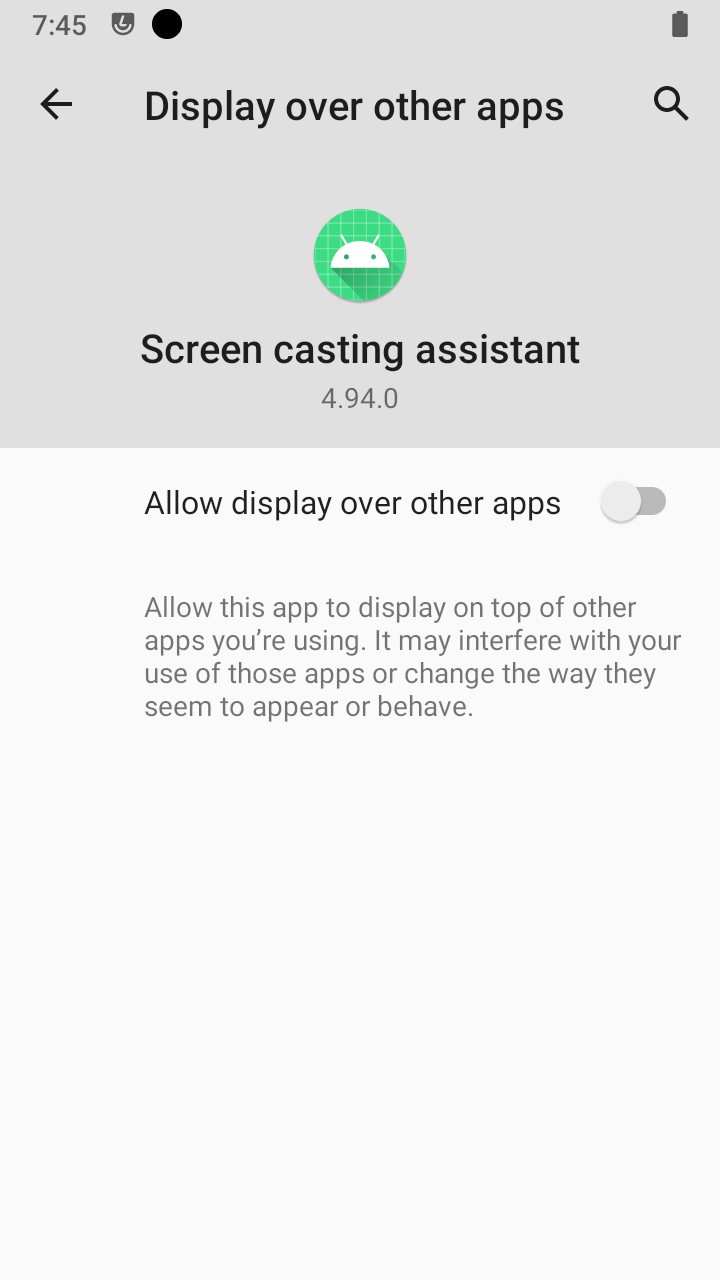
- In Figure 5, if an authorization prompt appears when executing the task again, you need to manually enable the authorization displayed at the top.
- after authorizing, executing the JS task again will succeed.
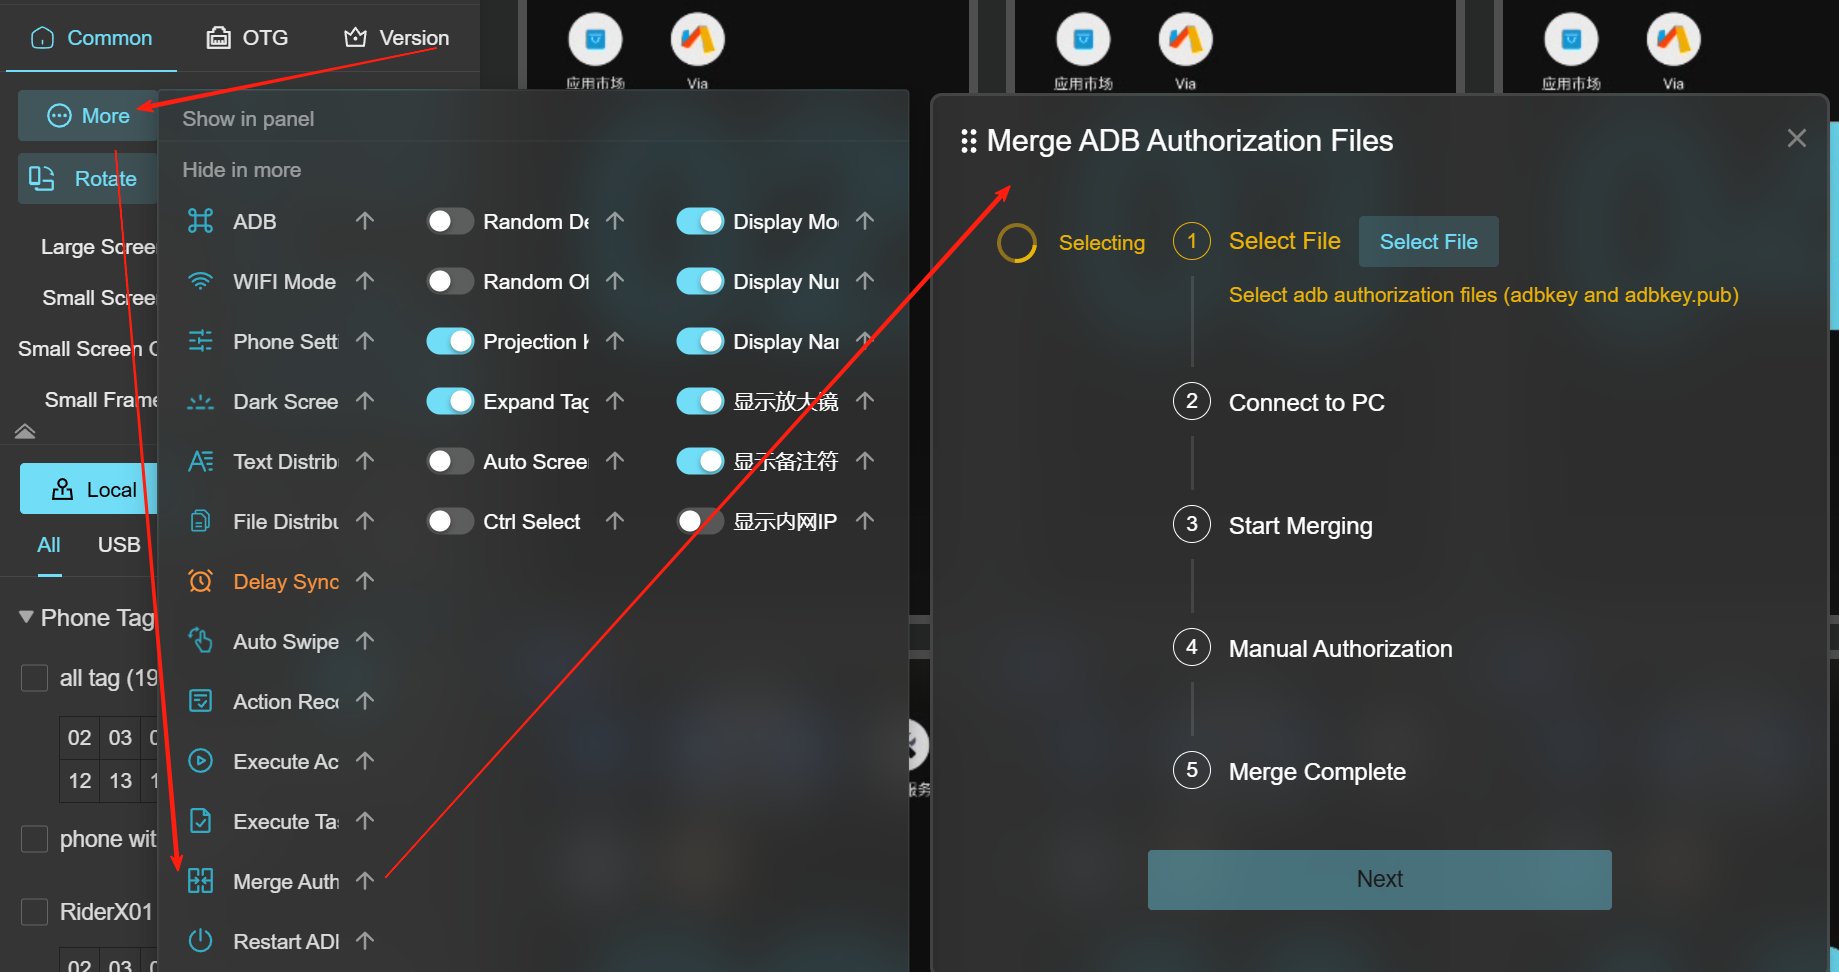
How to Merge ADB Authorization Files?
-
As shown in Figure 1, find and click the “Merge Authorization” option in the
 More
Functions popup, as shown in Figure 2.
More
Functions popup, as shown in Figure 2.
- In Figure 2, Step 1: Select the new authorization files—adbkey and adbkey.pub—and click Confirm. Do not select the two authorization files located at C:\Users\Administrator.android.
-
- Connect the unauthorized motherboard device to the computer.
- Step 3: The program will help merge the authorization files. After merging is complete, it will automatically proceed to Step 3.
- Step 4: Manually click the authorization pop-ups on the phone window within the casting software. After clicking “Allow” on all, click the “I have authorized all” button.
- the program will complete the final merge. Click “Finish” to complete.
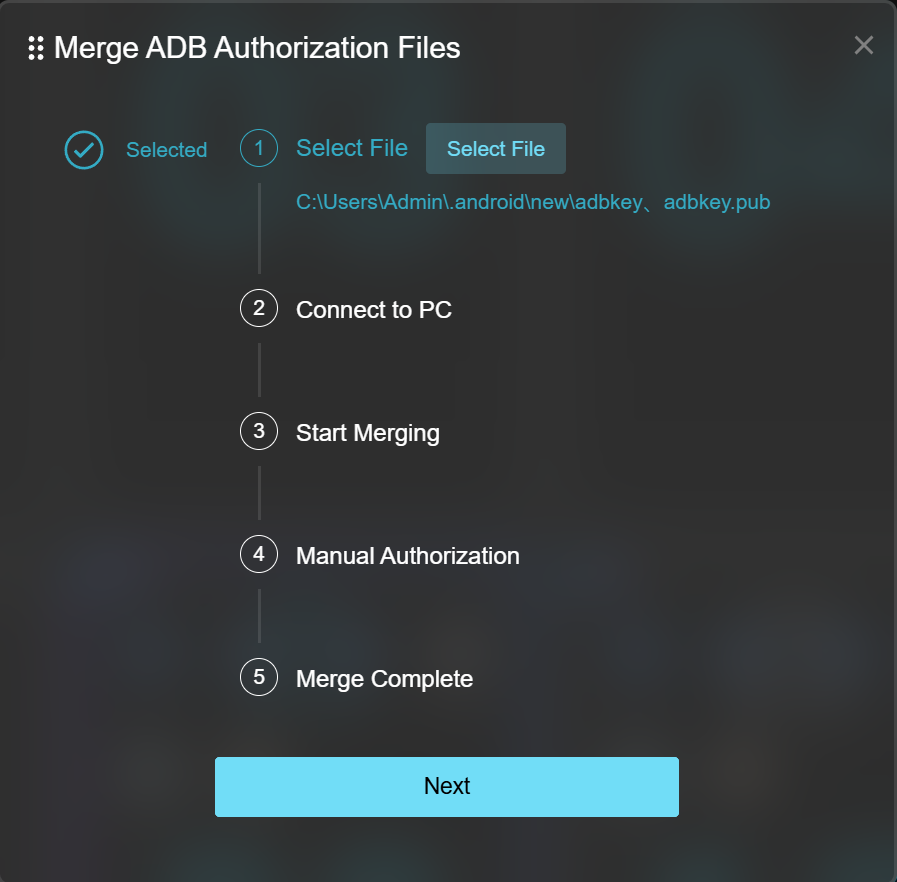 Note: The original old authorization files will be backed up by
us into the backup folder inside the casting software installation directory.
Note: The original old authorization files will be backed up by
us into the backup folder inside the casting software installation directory.